Slave to the Game
Online Gaming Community
ALL WORLD WARS
German Field Fortifications on the Eastern Front.
Album of Drawings
FOREWORD
This album was developed with a purpose to familiarize staff of the Land forces with types and designs of field fortifications, which were used by the German defense. This album is based on the Reports of Fronts Engineering Departments and various commissions, created under Chief of Military Engineering.
The album contains 7 sections:
I. Opened Fire Positions.
II. Covered Fire Positions.
III. Observation Posts.
IV. Shelters.
V. Preparing Local Environment for Defense.
VI. Anti-tank and Anti-personnel Obstacles.
VII. Camouflage.
Principles and methods of German field fortifications were constantly changing along the course of the war on the Eastern front. We may point to the four evolution periods of the German Army field fortifications.
The first period started from the beginning of the war, when Germans, riding high on the wave of their initial success were not paying much attention to field fortifications. Defensive actions were limited by construction of the simple guard posts around settlements, railway stations and communication centers. This activity was aimed mostly for protection of communications from attacks of the isolated units of the Soviet Army and emerging partisan movement. Moving during times of war was not an easy task. It is not like you can hire Upack moving companies to help. Even today that is not an option when you are in war. Moving a home, yes. But moving a brigade or using other defensive actions would involve much more.
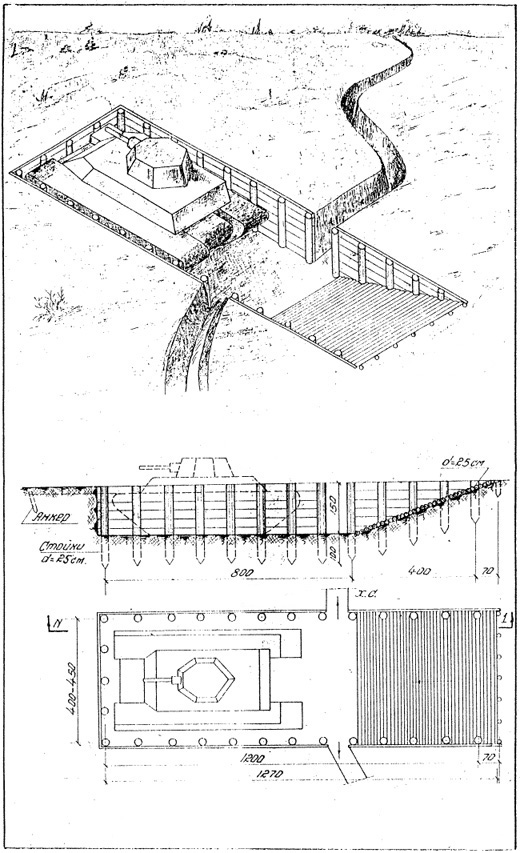
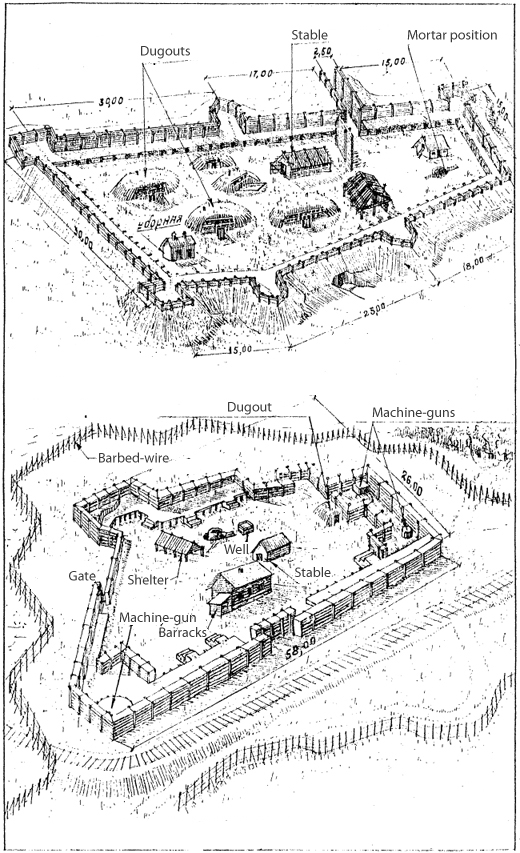
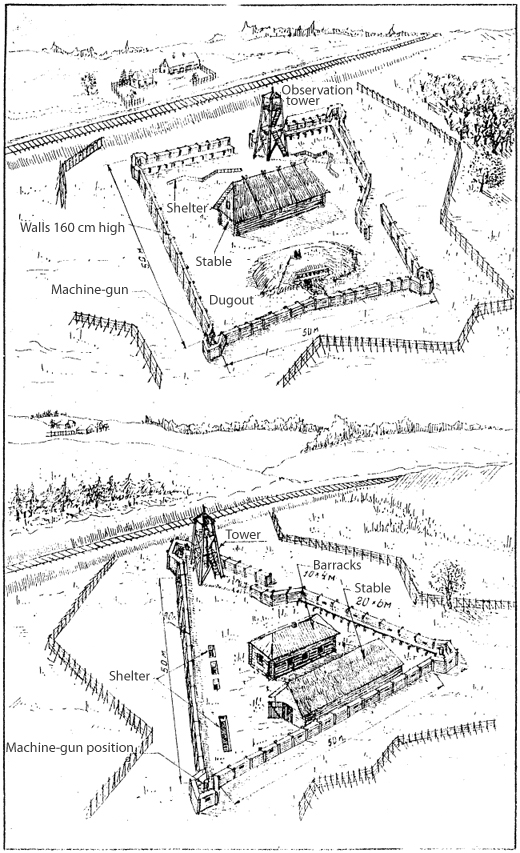
Second period in development of German field fortifications began with the route of German Army before Moscow during the winter of 1941-1942. Under attacks of the Soviet Army, Germans were forced to pay more attention to the strengthening of their defensive positions. Rejecting the dominance of isolated guard posts they switched to the development of strong points systems and fortified centers of defense. Defensive lines were transformed to the networks of strengthened defensive positions and the strong points on top of the terrain heights, anchored on local settlements and located on distances 2-4 km from each other. Intervals were filled with machine-guns, rifle entrenchments and separate fire positions. Centers of defense and strong points had one or two lines of the main and communication trenches, with all kinds of firing positions, observation posts, as well as shelters and dugouts for soldiers and officers. All strong points were connected with each other by the well developed road networks, radial and lateral, which were providing opportunities for maneuver and bringing reserves from the depth. Such systems of defense, with articulated strong points and poorly protected intervals, also were not able to thwart Soviet Army attacks, which were tactically based on deep flanking maneuvers.
The third period begins with German transition to the strategic defense posture (1943). The victory of the Soviet armies in Kursk Battle discouraged Germans from any further offensive operations. Germans built their defense on well-thought, precisely organized system of fire from all kinds of weapons, on developing infantry positions with concentration in tactically important areas and on active actions of reserves.
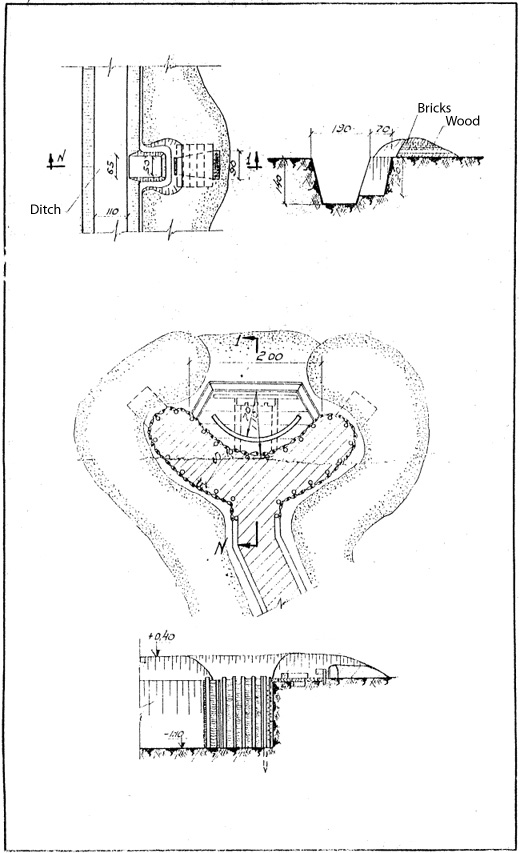
Defense was mainly based on ensuring tactical survivability and reliability of the system of fire, mostly before first line of defense and on the flanks, sheltering of soldiers and equipment, speedy maneuvers by reserves and weapons. The first line of defense, as a rule, was continuous trench, lavishly equipped with easy-to-construct opened fire positions.
On the most tactically important directions, behind first line of trenches, second, third, and sometimes even fourth line of tranches were constructed.
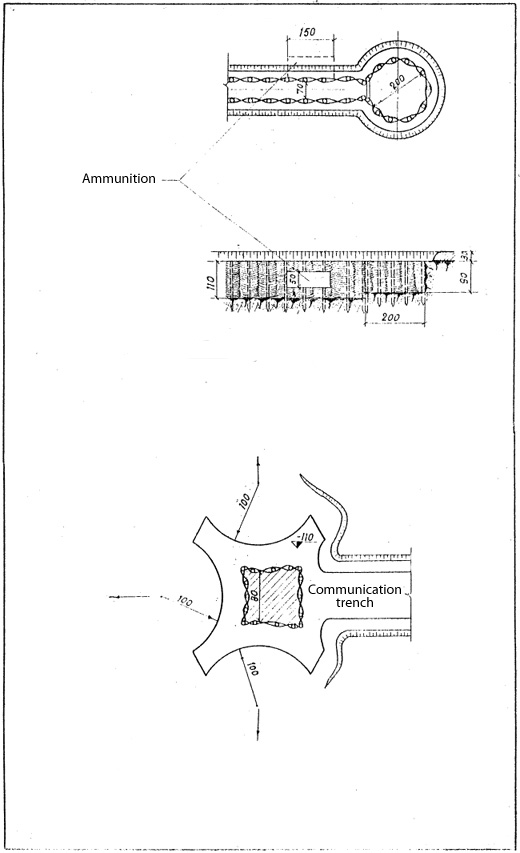
Continous trench system, equipped with elaborate fortifications, was especially well-developed in strong points areas, all iIntervals between strong points, as a rule, were also fortified, even in a lesser degree.
The concept of a strong point was to a certain extent conditional and not rigidly anchored on terrain. Easy opportunity to develop trench system in any area and fast deployment of any fighting unit led to changes of the strong points outlines and even to their movements along the front and/or in depth. Under this fluid system, new strong point could be created quickly where it was needed and according changes in a battle situation. Germans applied different kinds of obstacles mainly before first (main) trench.
The fourth period was marked by German retreat on all fronts, sometimes degenerated into a flight. As far as field fortifications are concerned, during this last period Germans tried to take advantage of large natural barriers and prepared positions. They hastily fortified river banks and upgraded existing long-term lines of defense. Usually they didn't have enough time to create new lines.
The drawings in this album correspond mostly with the third period, when Germans constructed their most developed field fortifications.
Chief of the Karbyshev Central Engineering Institute, General-major (Ponomash)
Chief of the First Department KCEI, Colonel (Shterenberg)
Chief of the 3d Branch of the First Department KCEI, Senior engineer (Konovalichin)
OPENED FIRE POSITIONS
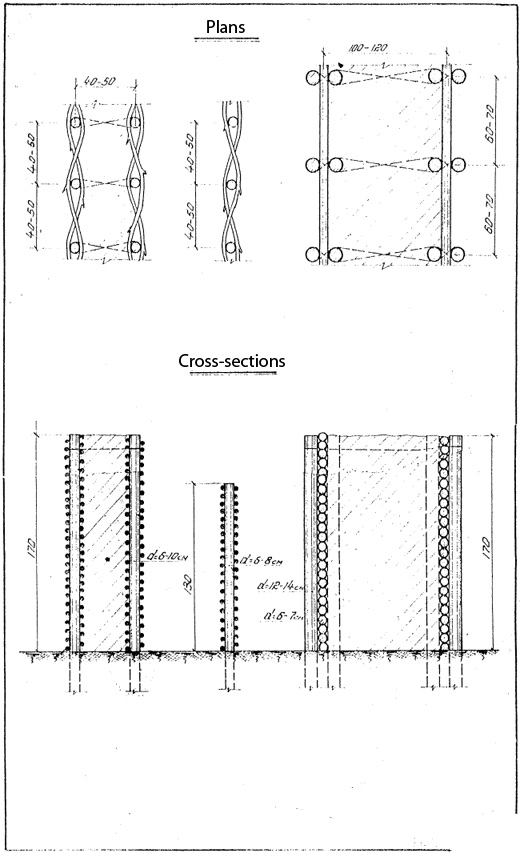
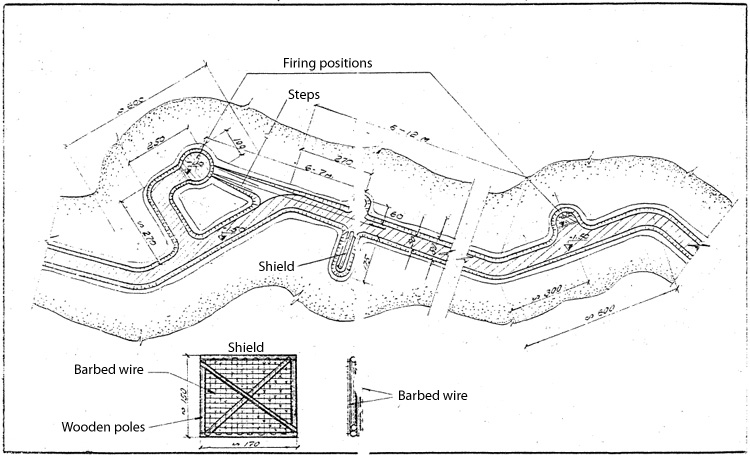
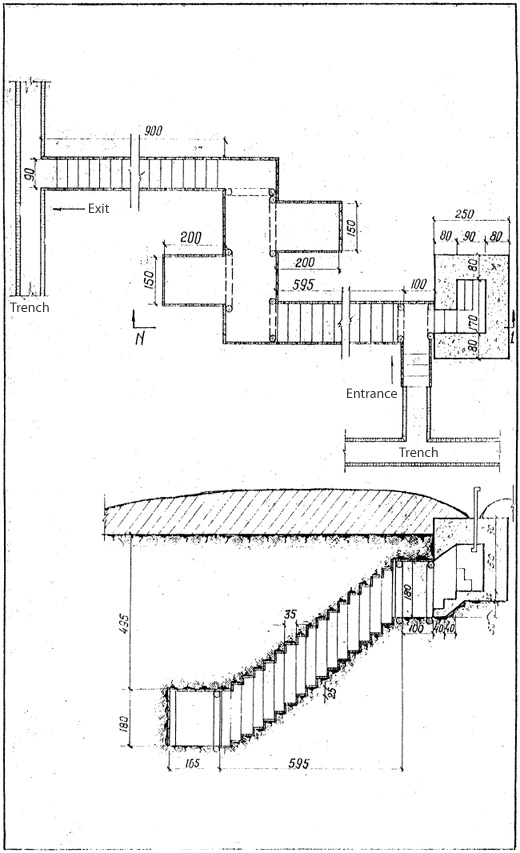
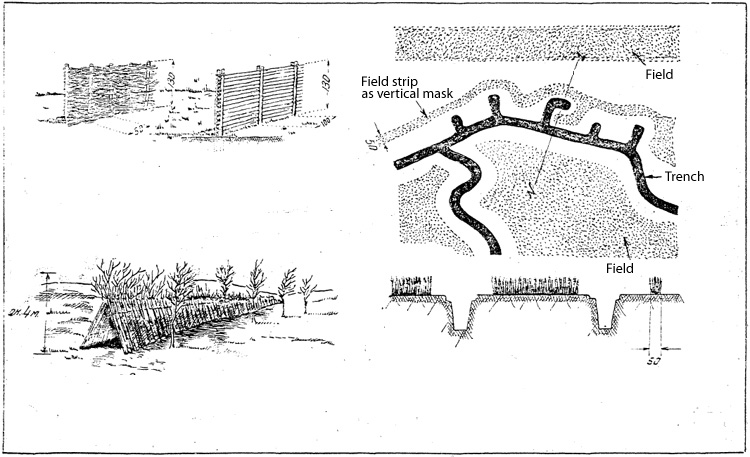
Trenches and communication trenches
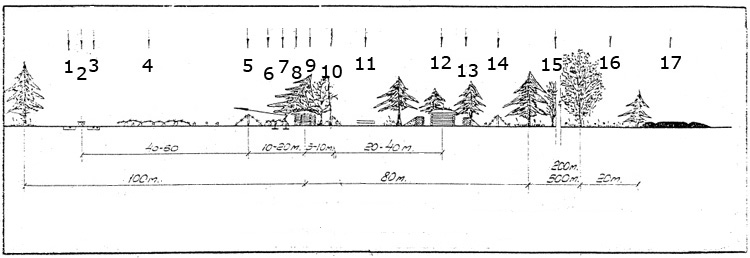
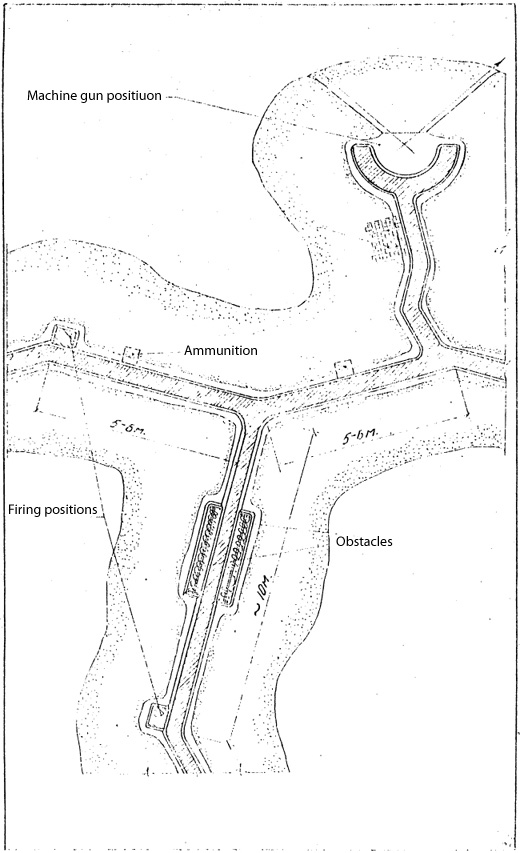
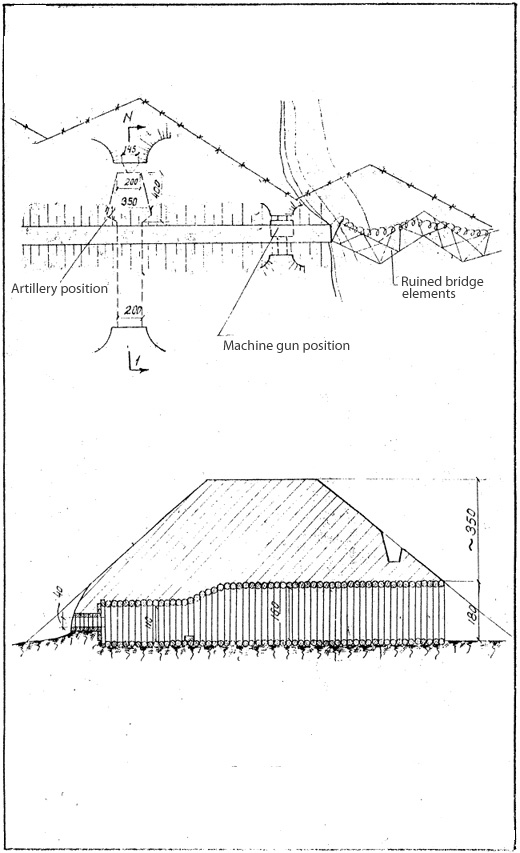
1. First line of defense. 1). Minefeilds; 2). Bruno spiral barbed wire; 3). Mines; 4). Bruno spiral barbed wire; 5). Reinforced wire obstacle; 6). Bruno spiral barbed wire; 7). Wire on low wooden poles; 8). Mines, controled from the machine-gun nest; 9). Camouflaged barrier and machine-gun nest; 10). Reinforced wire obstacle; 11). Panel, made from the wooden poles; 12). Dugout with camouflage wire net; 13). Camouflaged barrier; 14). Wire barrier around the dugout; 15). Wood; 16). Clearance in the wood along the road; 17). Road.
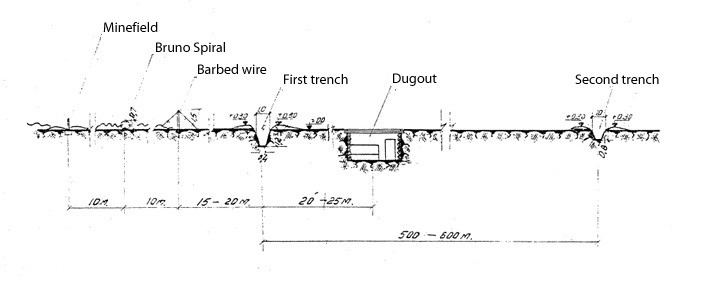
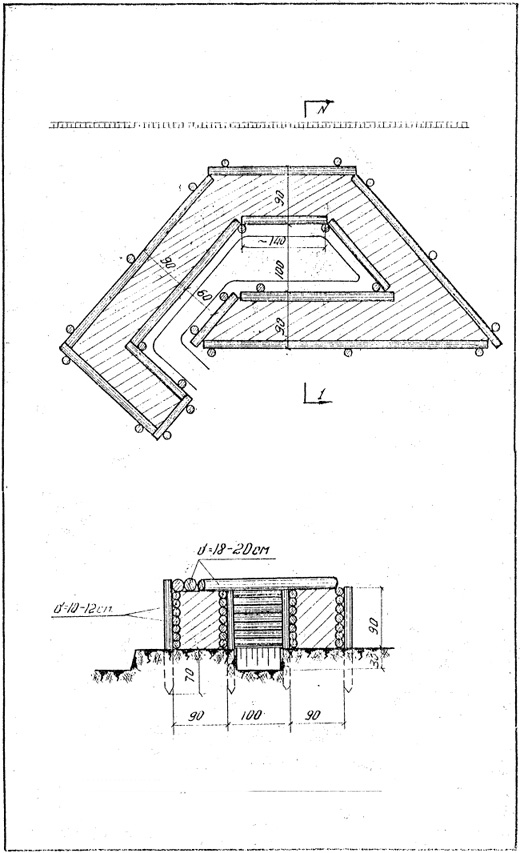
2. Cross-section of a main defense belt.
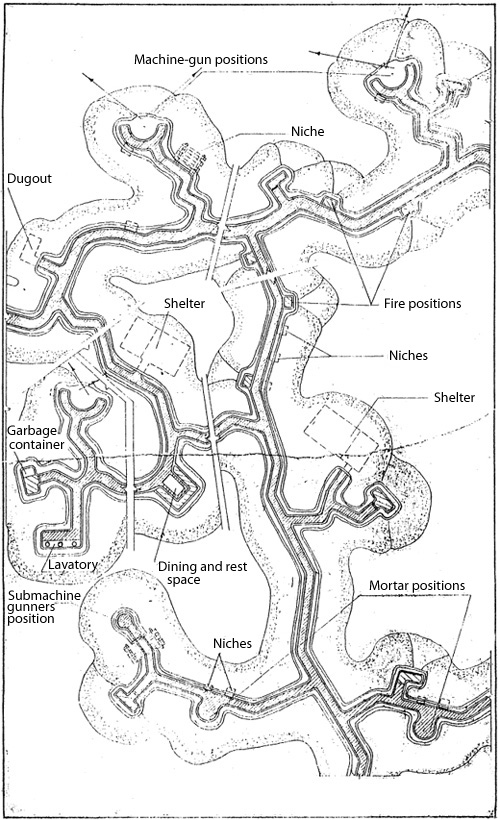
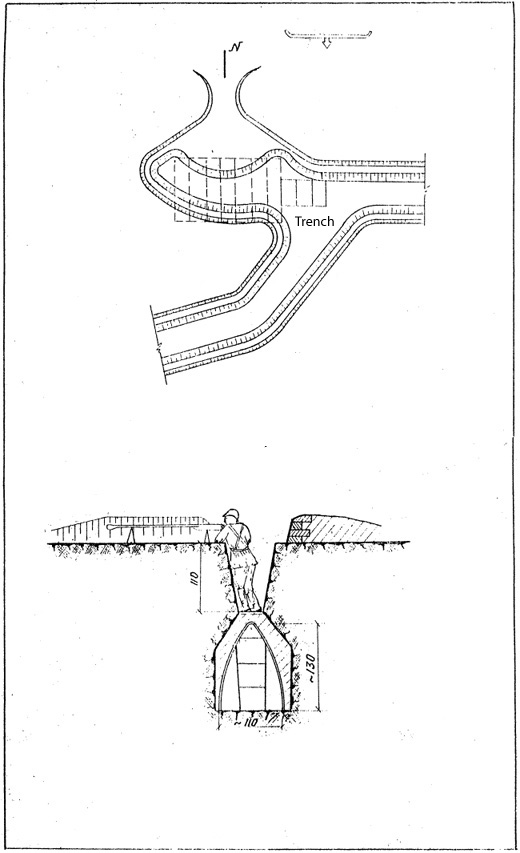
3. Part of a first trench with communication trench.
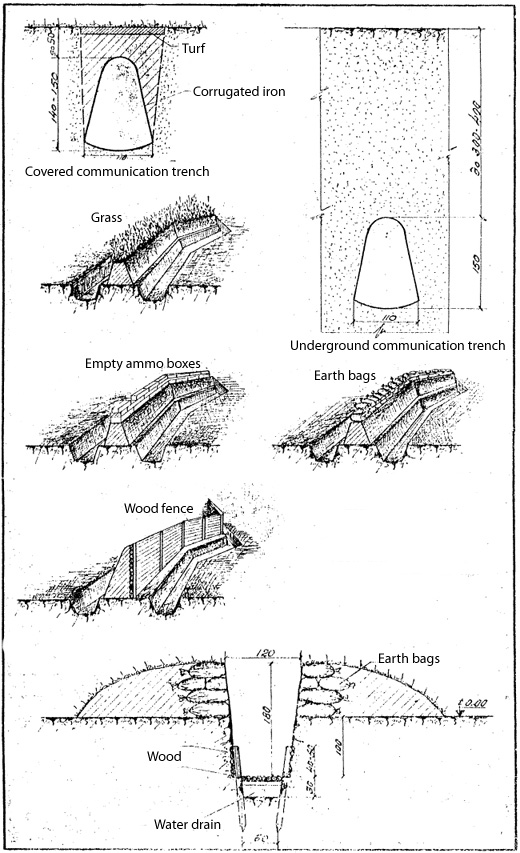
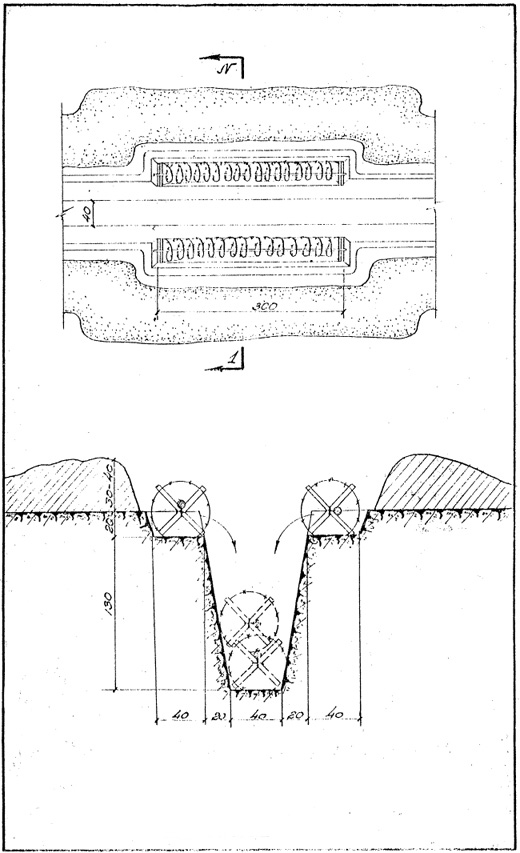
4. Covered communication trench. Underground communication trench. Cross-section of constructed trench. Cross-section of communication trench.
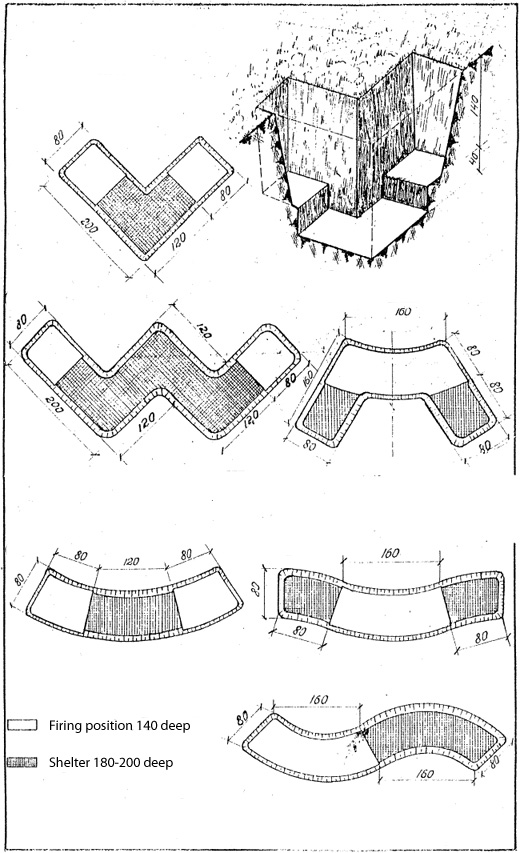
Fire positions
6. Adjacent fire positions.
7. Separate fire positions.
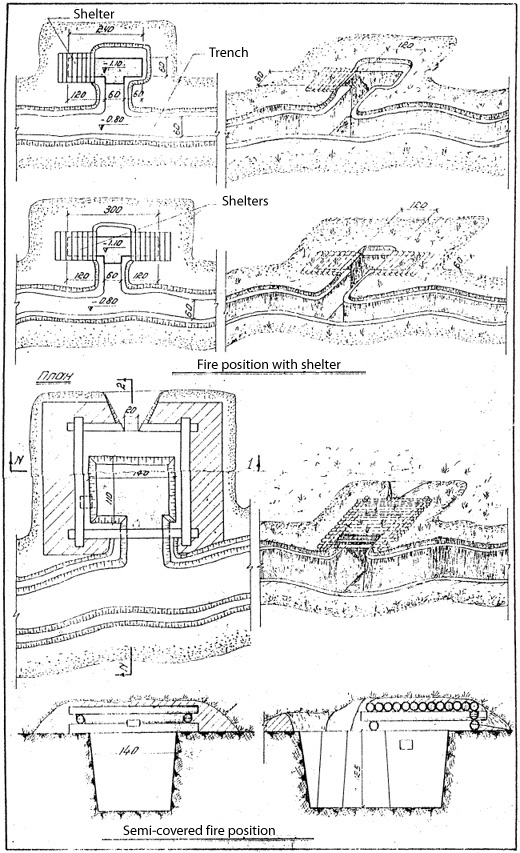
8. Fire positions with shelter. Fire position with canopy.
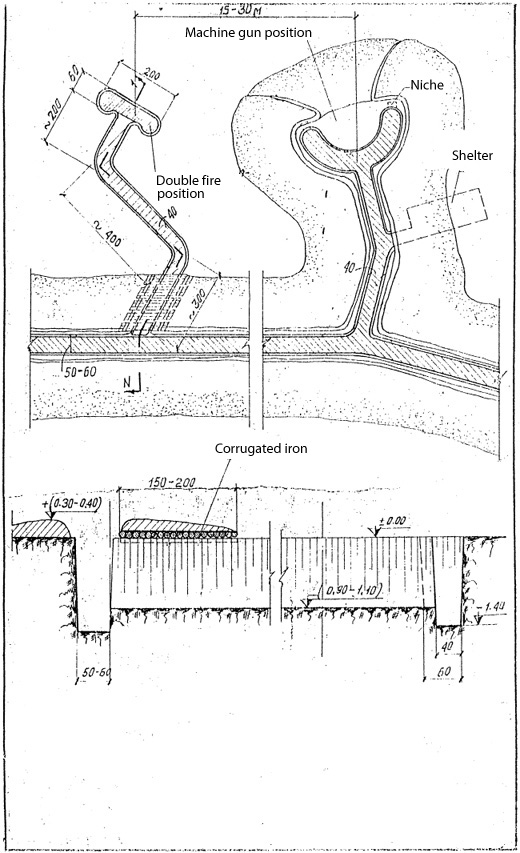
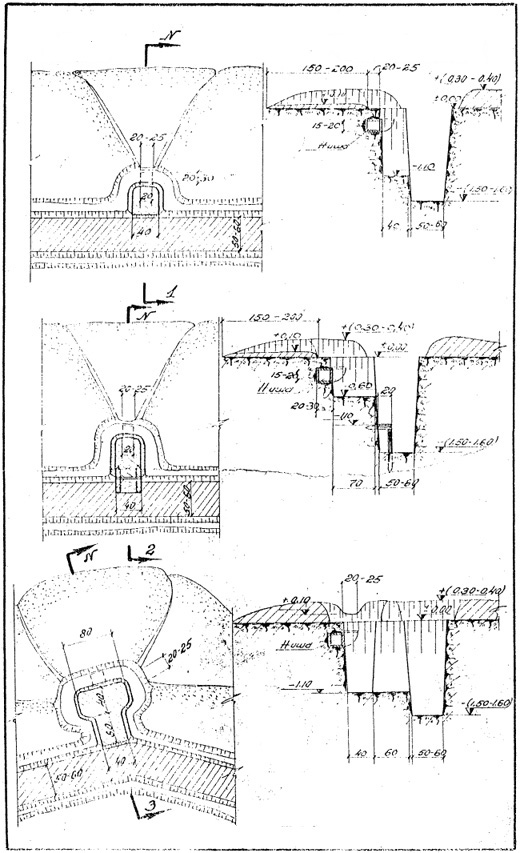
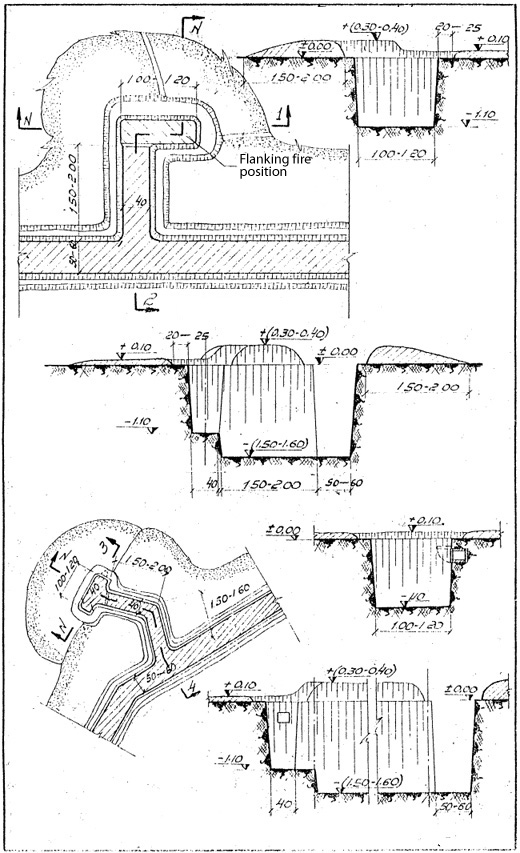
9. Flanking fire position for guarding approaches to a machine-gun nest.
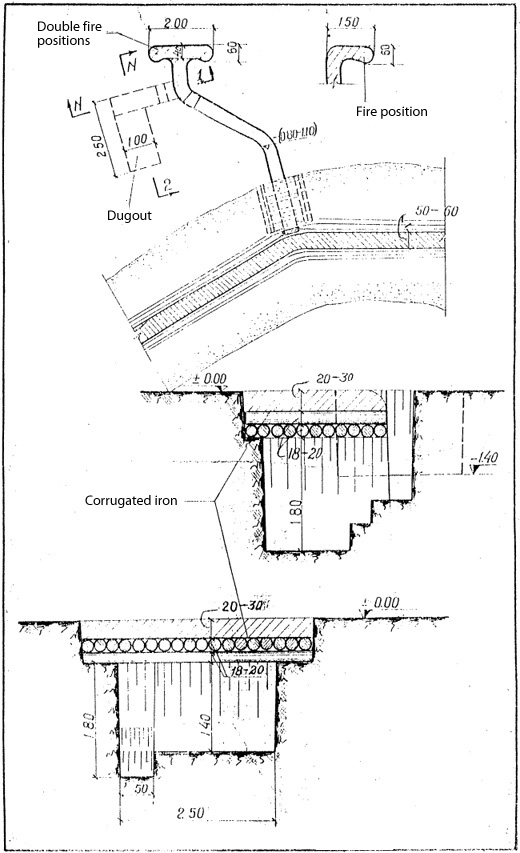
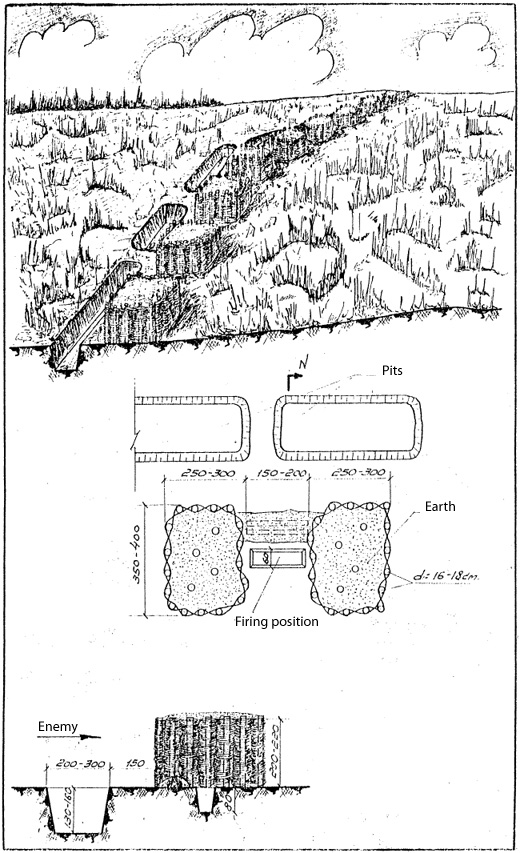
10. Separate fire positions with dugout.
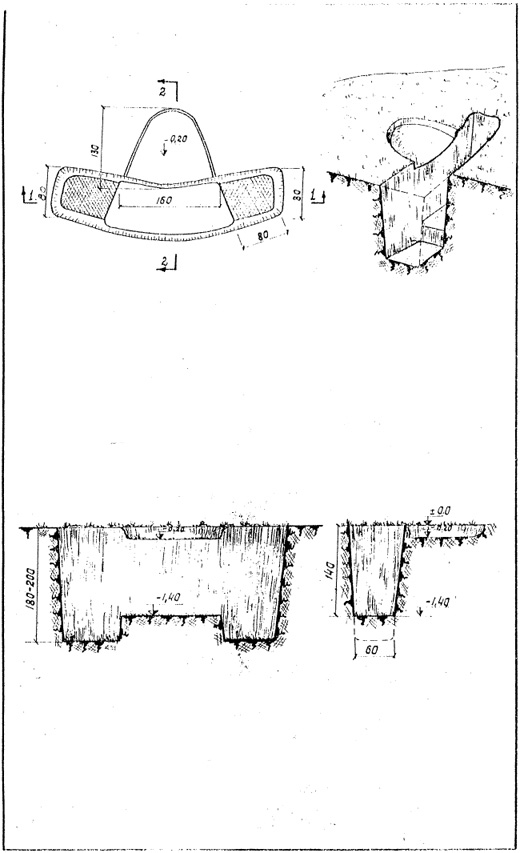
11. Types of fire positions in wooded marshland. Fire position for kneeling riflemanr. Fire position for standing rifleman.
12. Entrenchment for submachine gunners with shelter.
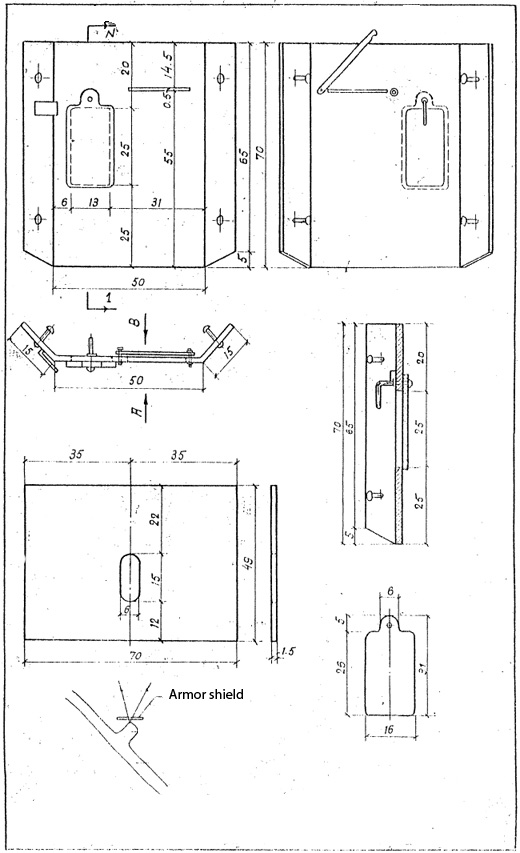
13. Armored shields for submachine gunners and snipers.
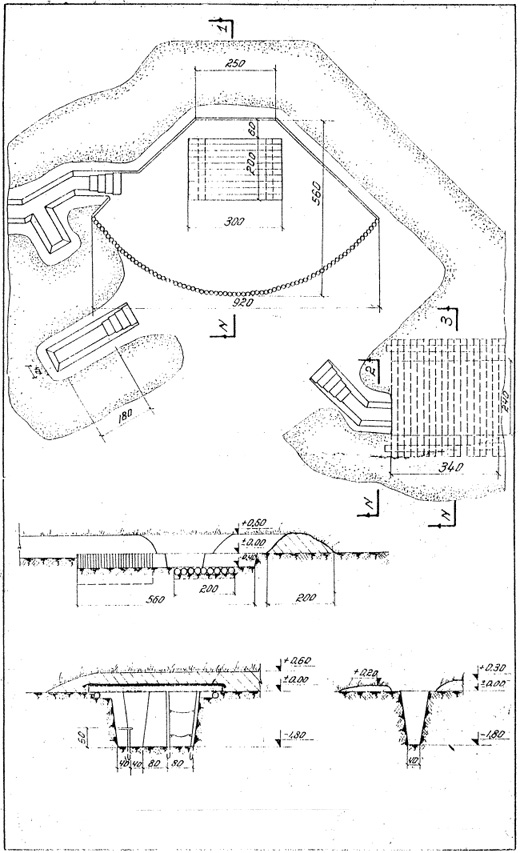
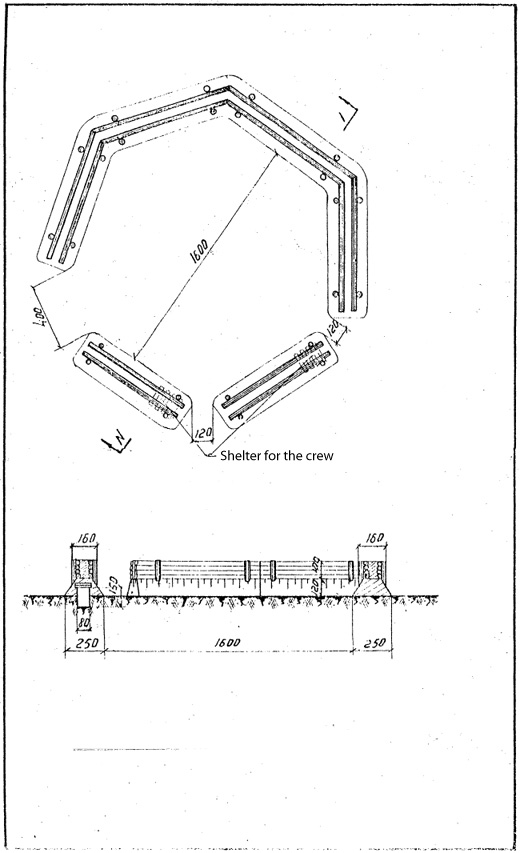
Machine-gun positions
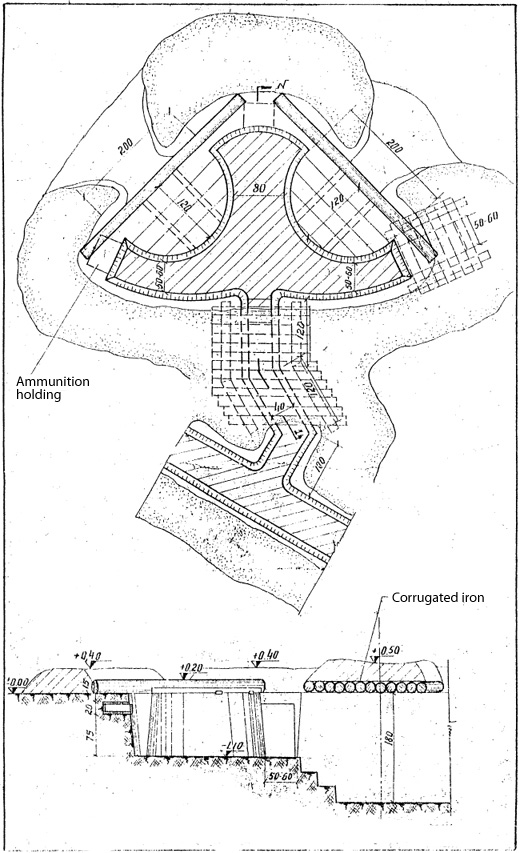
14. Multi-purpose position for anti-tank rifle and heavy machine gun with shelter for the crew, made from corrugated iron.
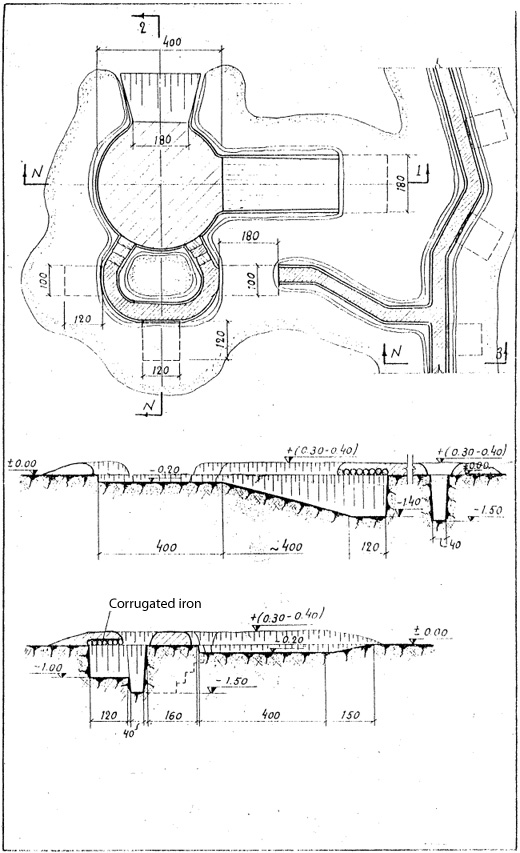
15. Machine gun position. Multi-purpose position.
16. Fire position with loophole. Multi-purpose machine-gun position.
17. Fire positions, machine-gun positions.

18. Machine-gun position.
19. Machine-gun position.
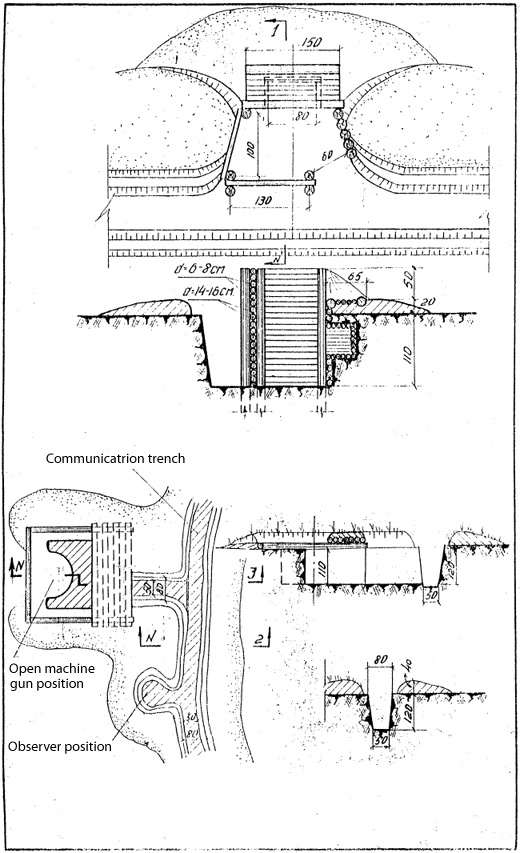
20. Opened machine-gun position.
21. Machine-gun position with two ammo tables.
22. Machine-gun position with crew shelter.
23. Opened elevated position for a heavy machine gun.
24. Machine-gun position in marshland area, made from earth bags.
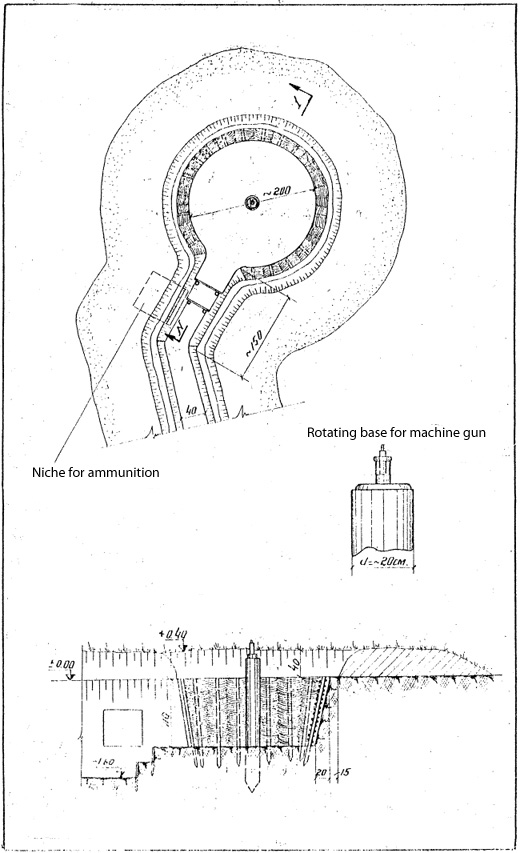
25. Elevated machine-gun position.
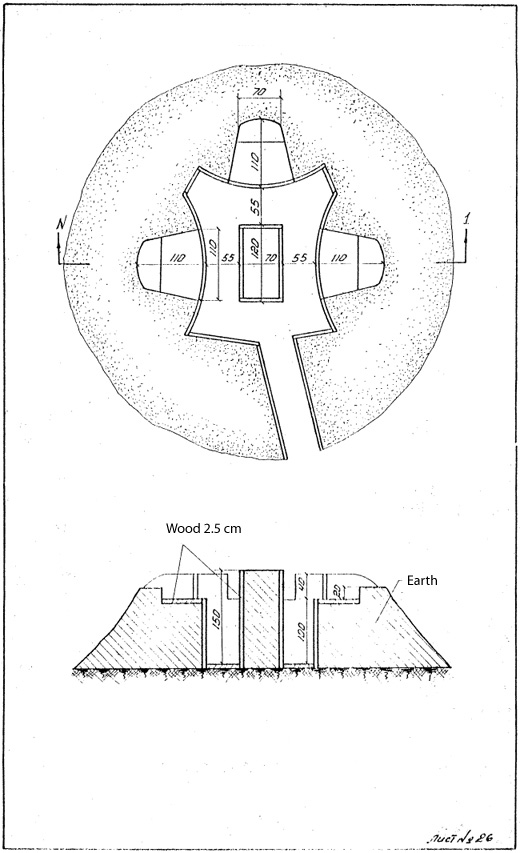
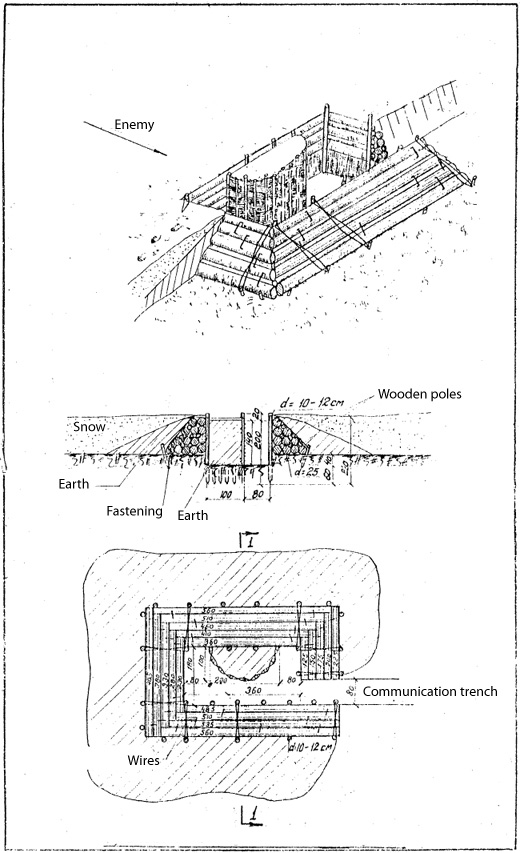
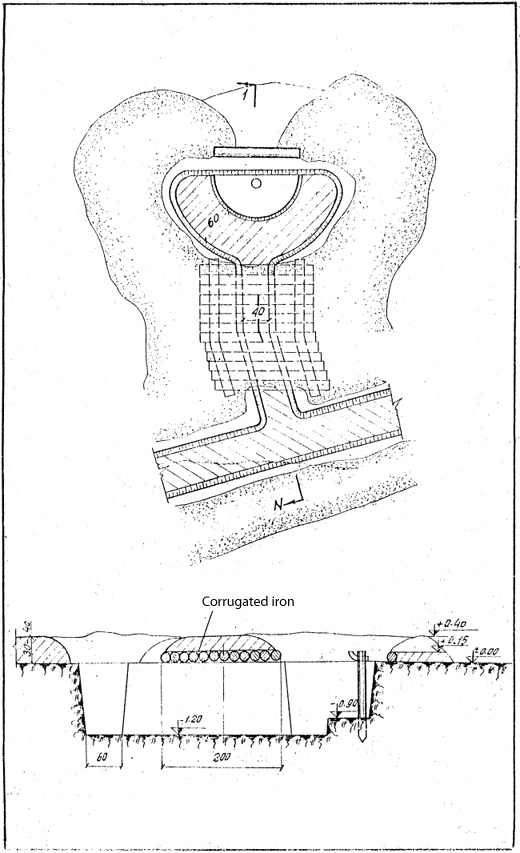
26. Entrenchment with three machine-gun nests.
27. Machine-gun position for anti-aircraft and ground fire.
28. Machine-gun position for anti-aircraft fire.
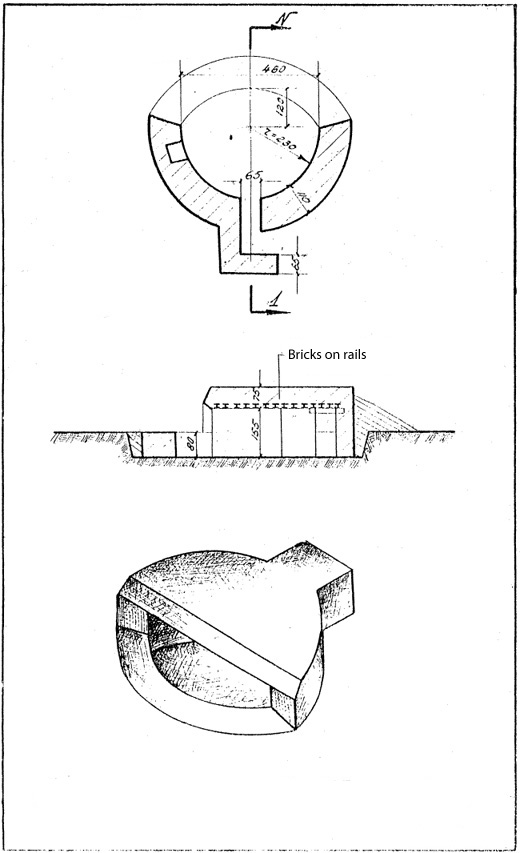
29. Position for anti-aircraft machine gun fire. Anti-tank rifle position.
Mortar positions

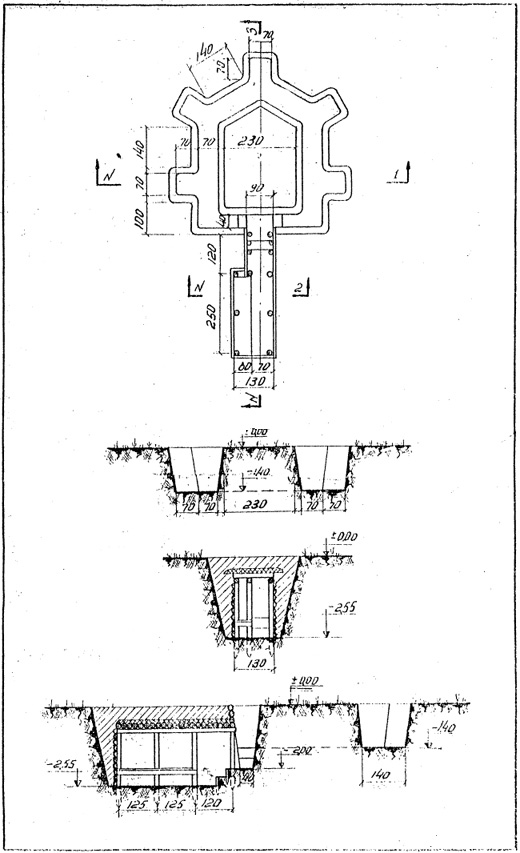
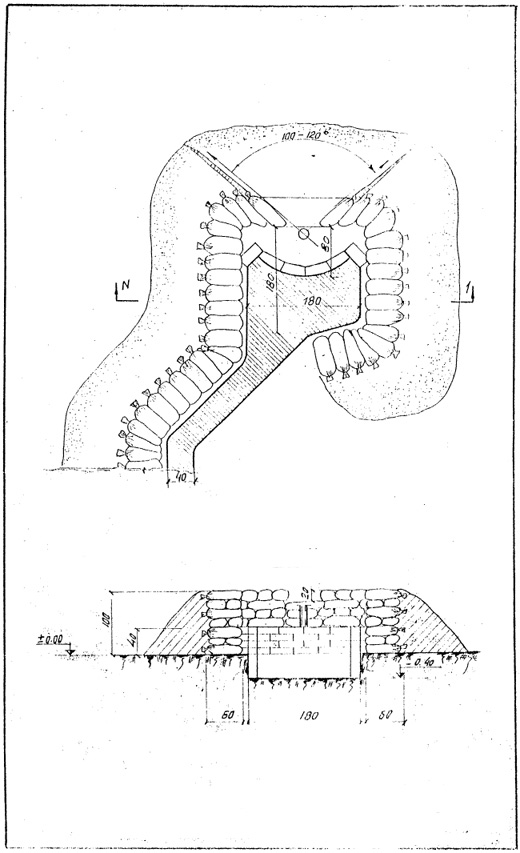
30. Position for 50-mm mortar.
31. Adjacent entrenchment for 81-mm mortar.
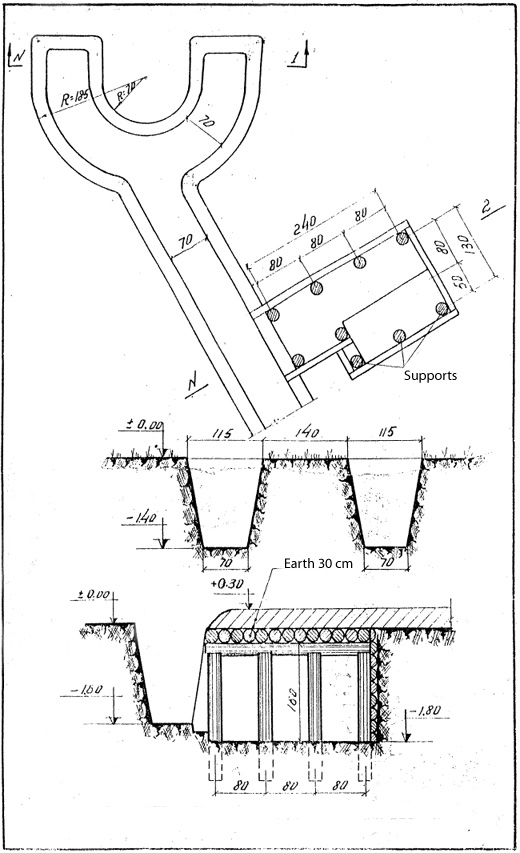
32. Entrenchment for 81-mm mortar.
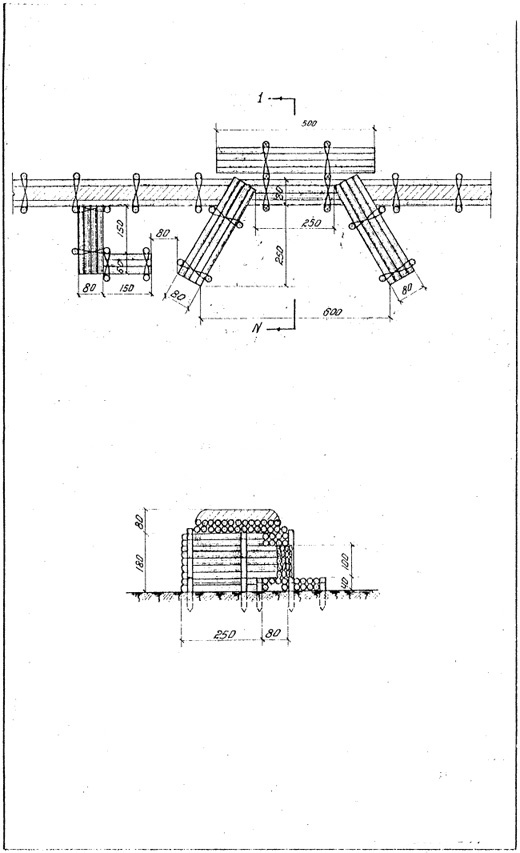
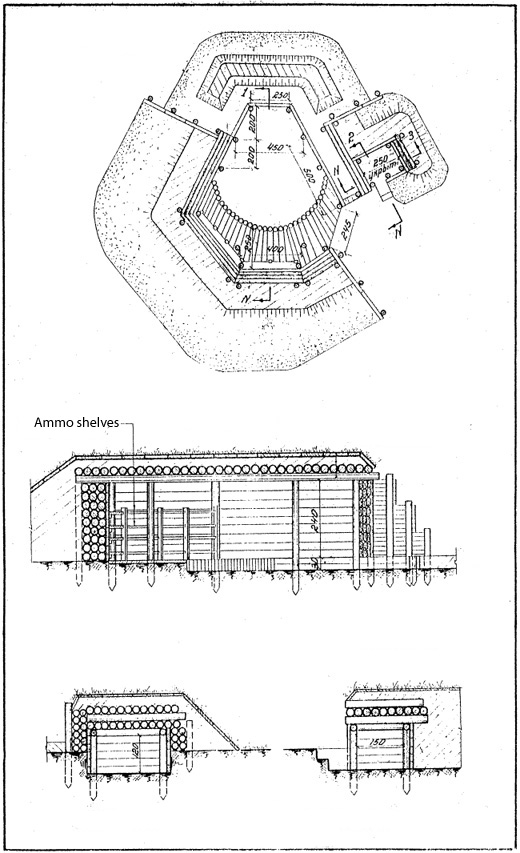
33. Entrenchment for 120-mm mortar.
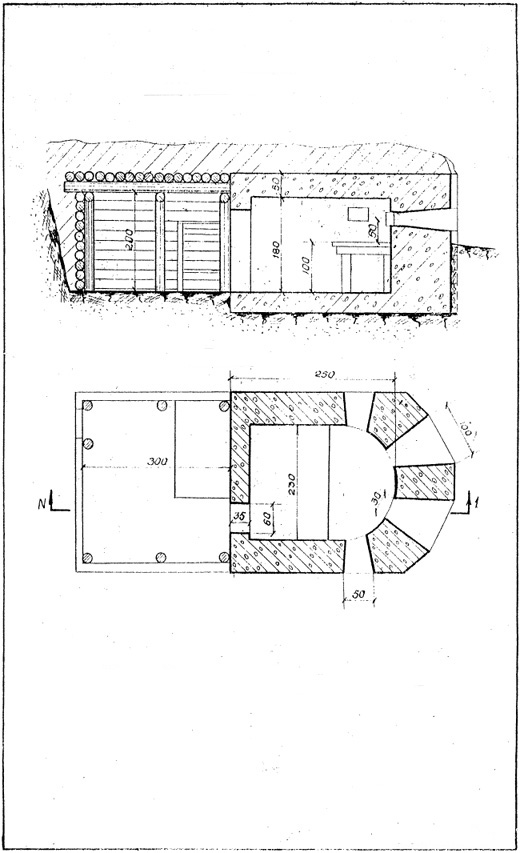
34. Entrenchment for six-barrel mortar.
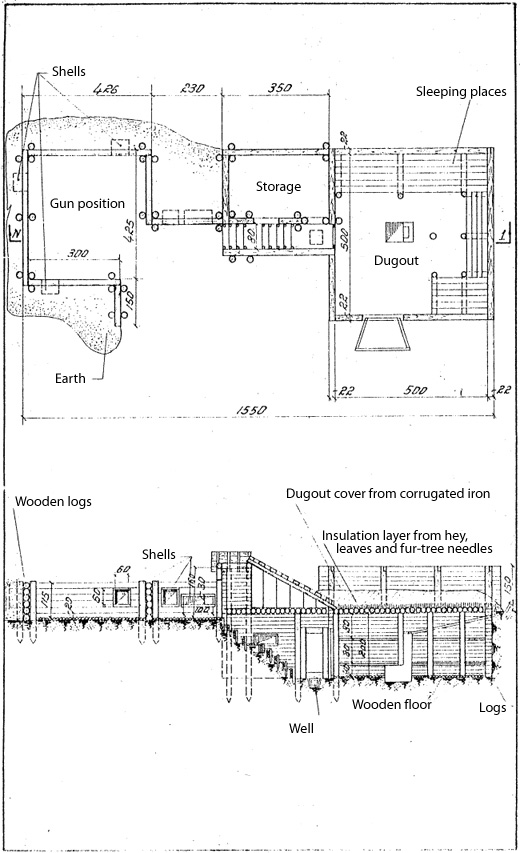
Artillery positions
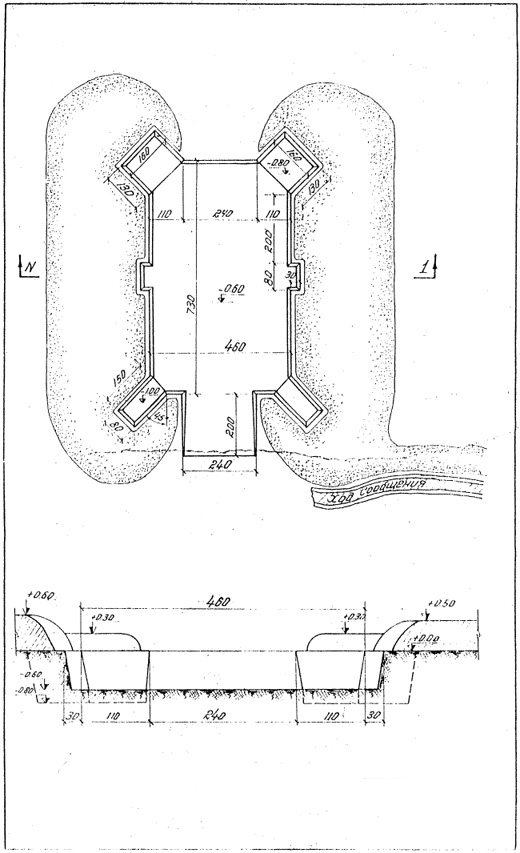
35. Artillery position.
36. Gun position.
37. Entrenchment for 37-mm gun.

38. Entrenchment for 75-mm gun.
39. Entrenchment for 150-mm gun.
40. Entrenchment for 155-mm gun.
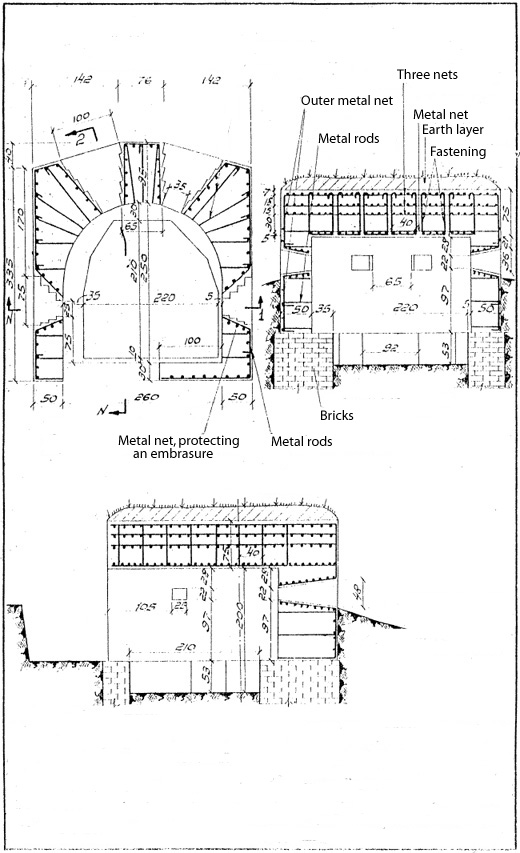
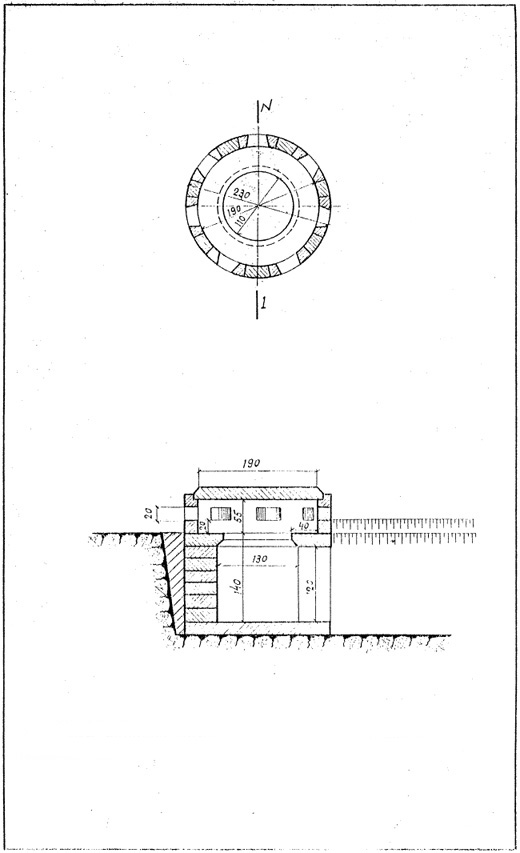
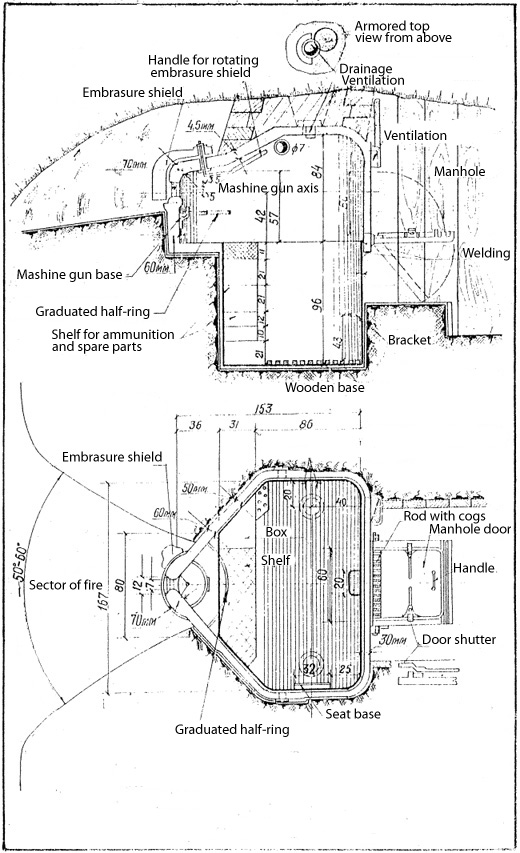
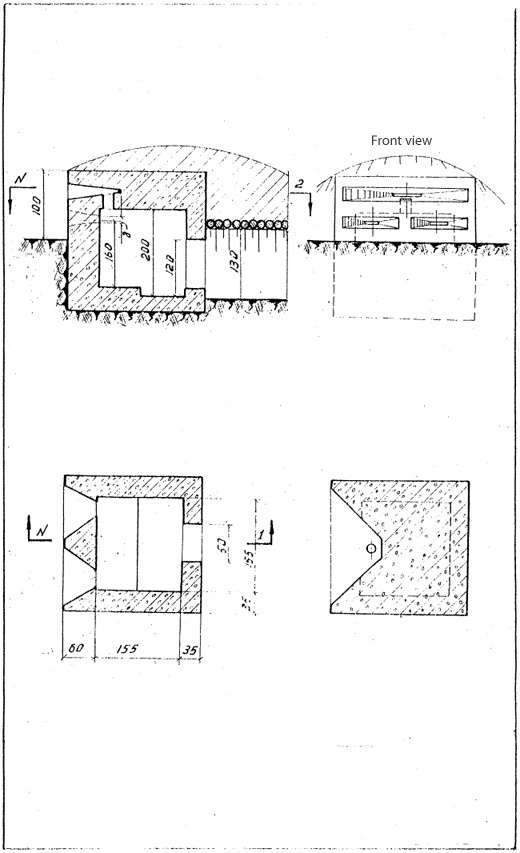
41. Artillery position with wooden and earth barrier for the heavy gun.
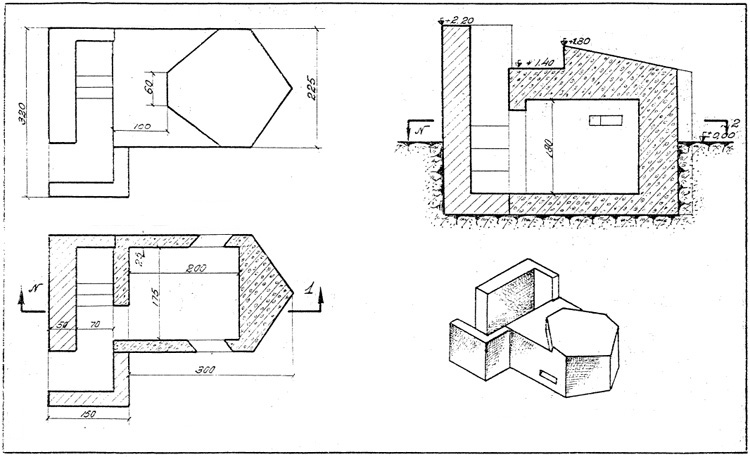
42. Open artillery position for the heavy 210-mm gun.
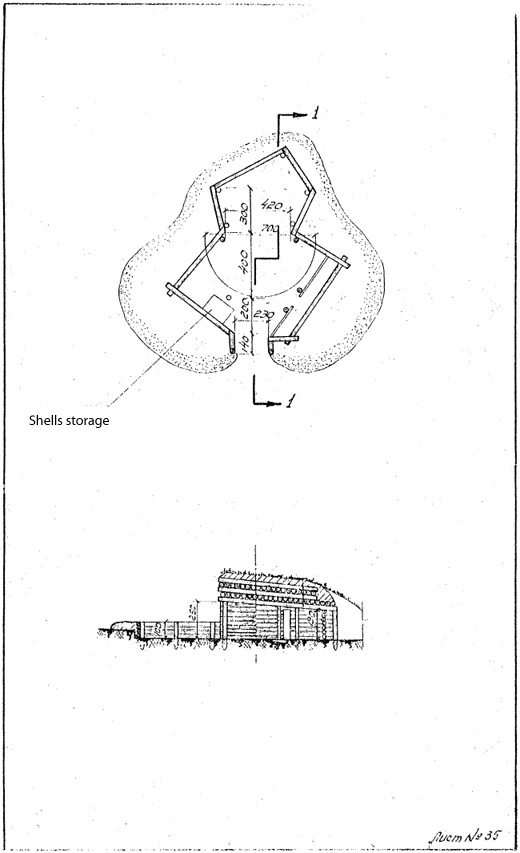
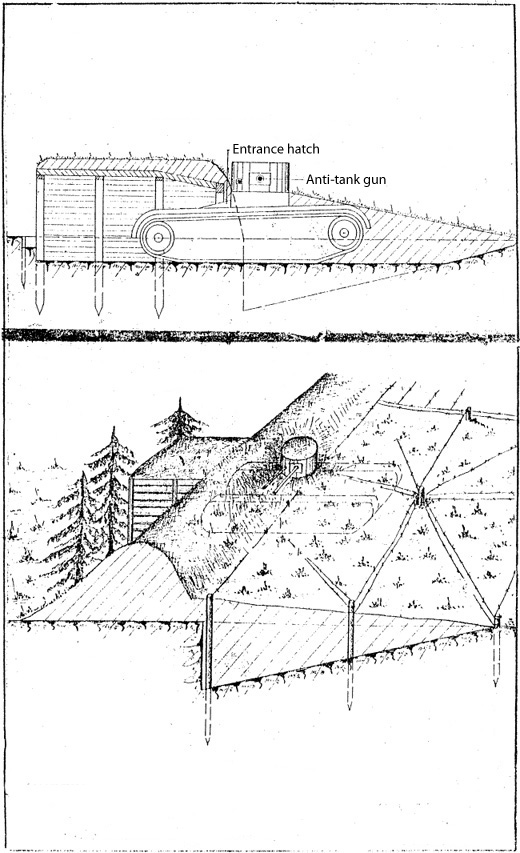
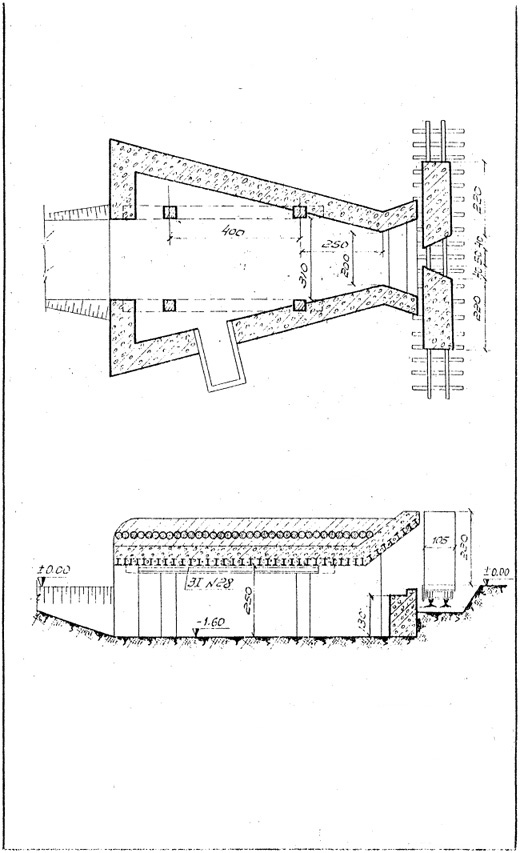
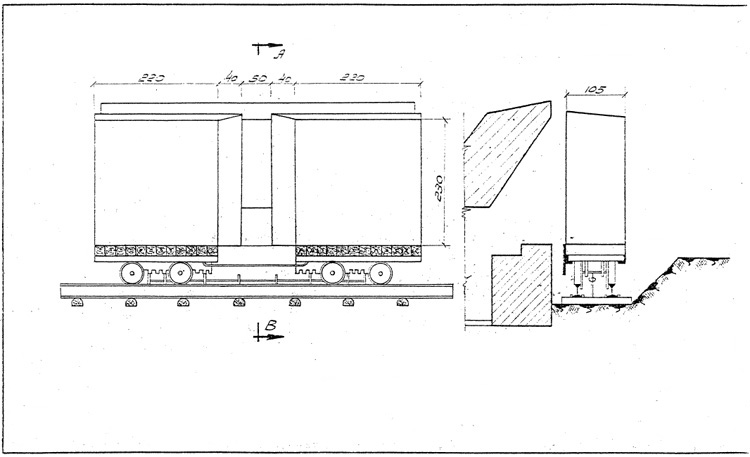
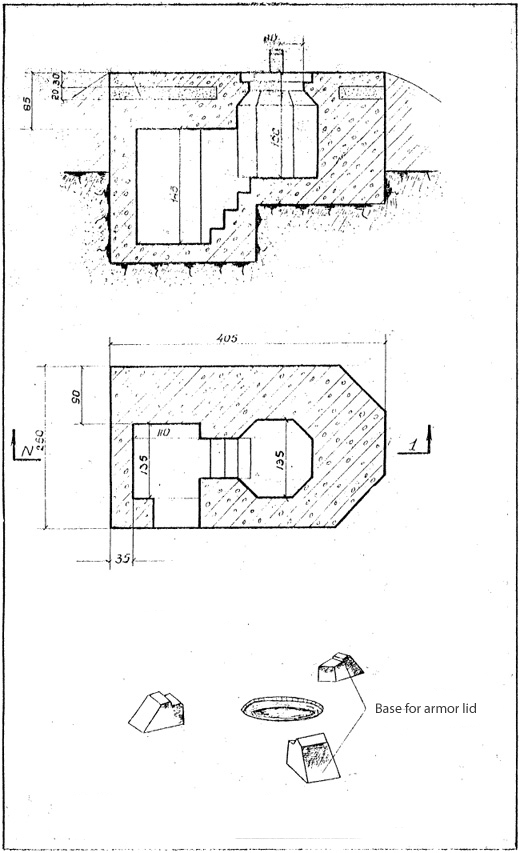
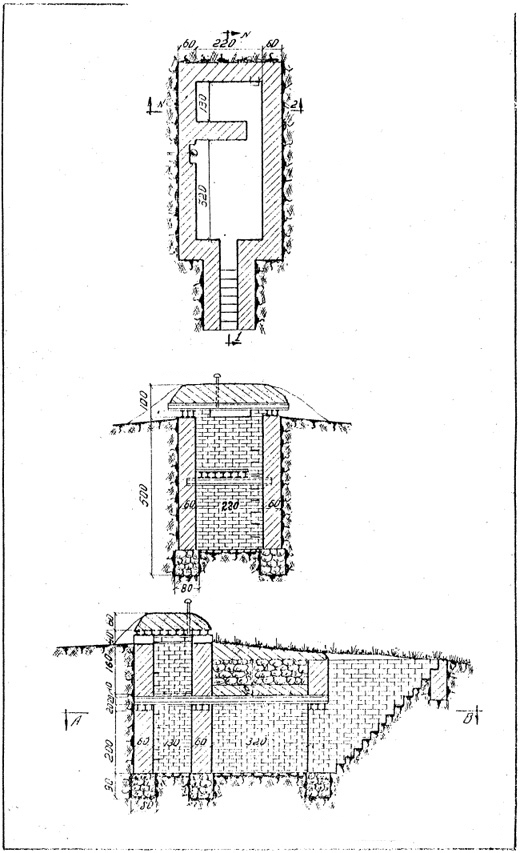
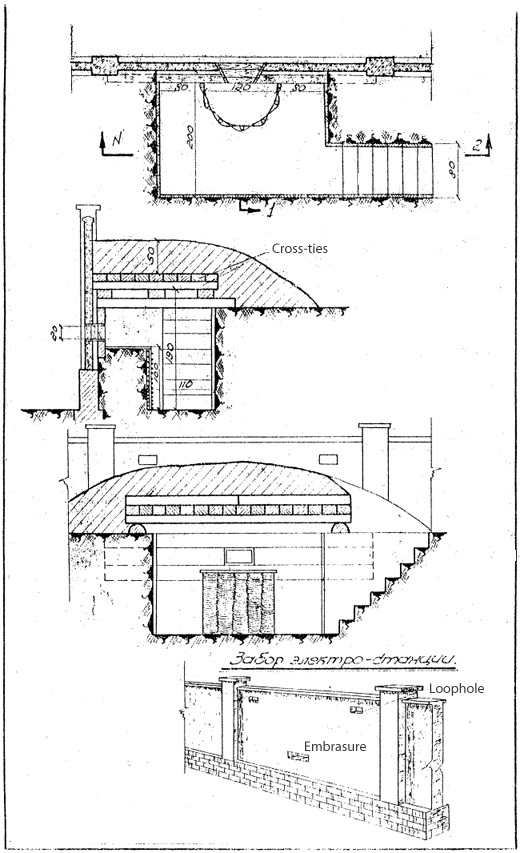
43. Entrenchment for 220-mm howitzer with shelter for the crew.
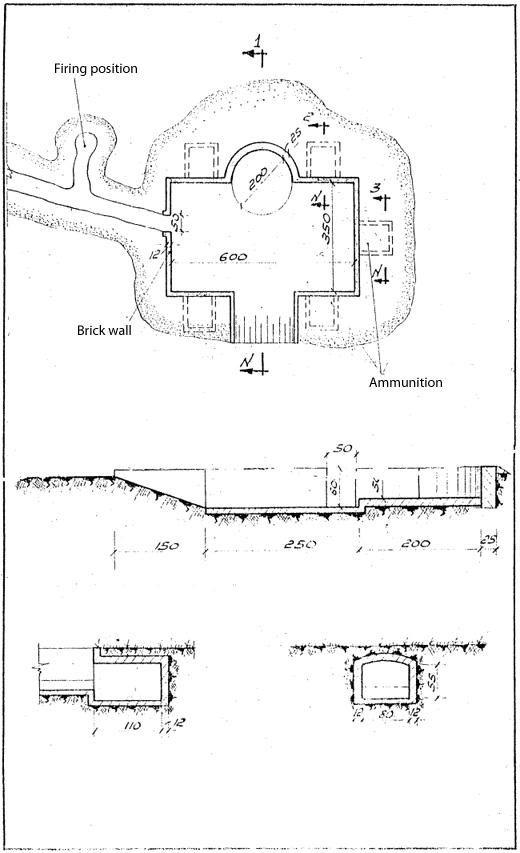
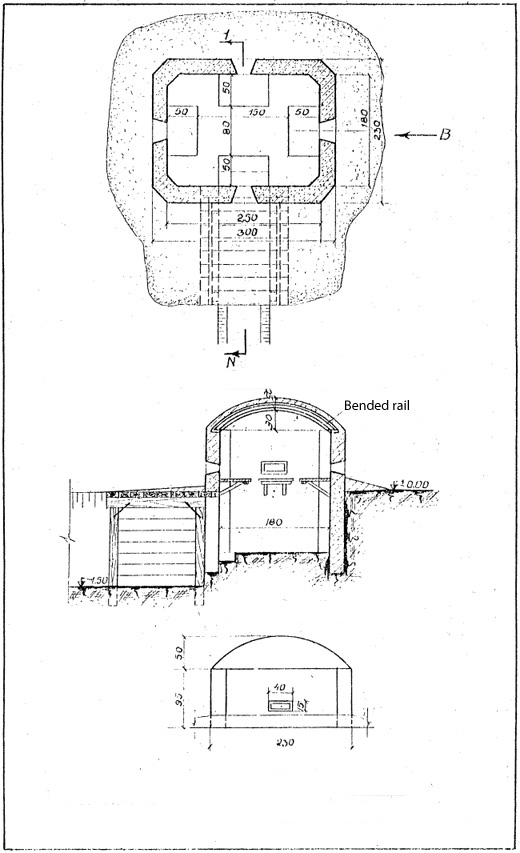
44. Position for 305-mm howitzer.
45. Opened position for an automatic anti-aircraft gun.
46. Part of a trench for inside defense. Sliding shield.
47. Preparation of communication trench for inside defense.
48. Collapsible metal supports for inside defenses.
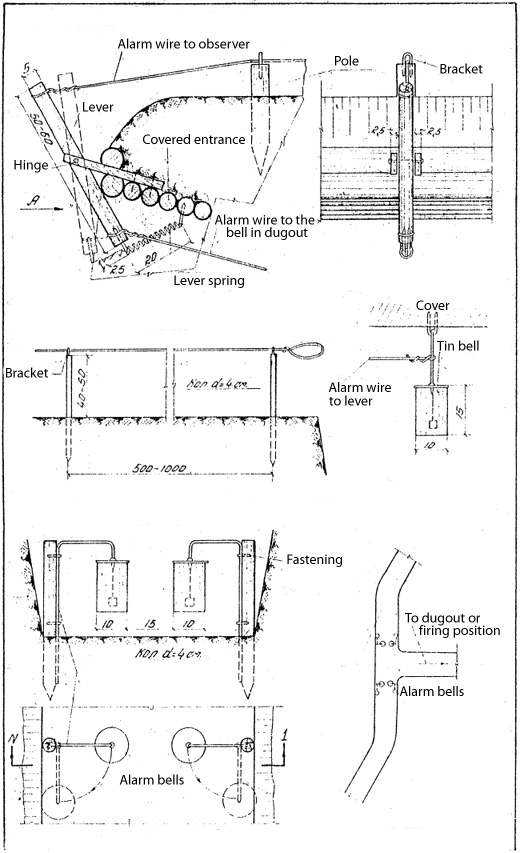
49. Signal systems details. Fastening of alarm wire to covered entrance of a dugout. Fastening of a bell. Fastening of alarm wire from observer to dugout. Signal system on the bottom of a trench near fire position or dugout.
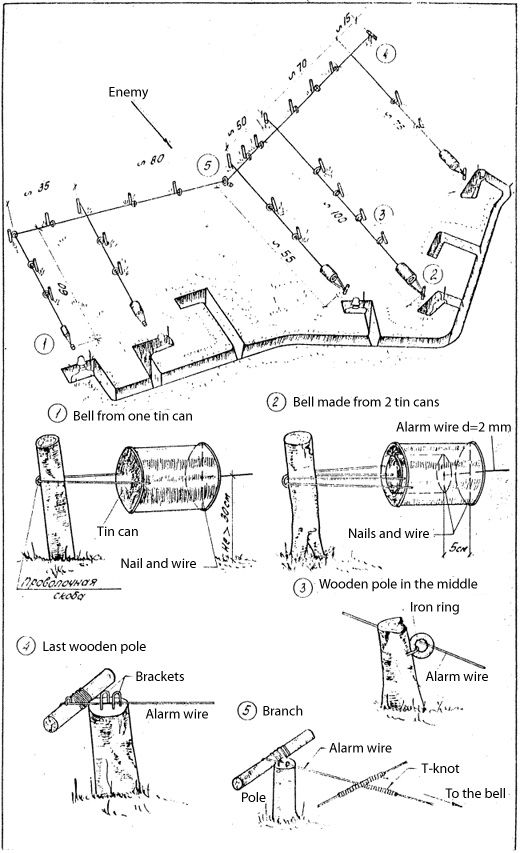
50. Alarm. Alarm scheme. Bells. Last pole. Pole in the middle of the line. Networks.
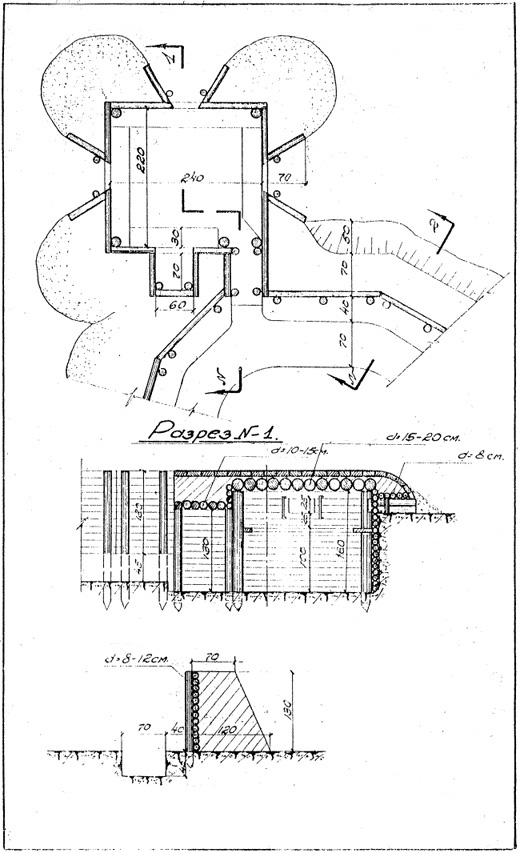
COVERED FIRE POSITIONS
Pages 51-52 (not included) show protection characteristics of different types of construction materials.
53. Anti-fragmentation machine-gun pillbox.

54. Machine-gun pillbox made from wood and earth.
55. Machine-gun wood and earth pillbox excavated in a firm ground.
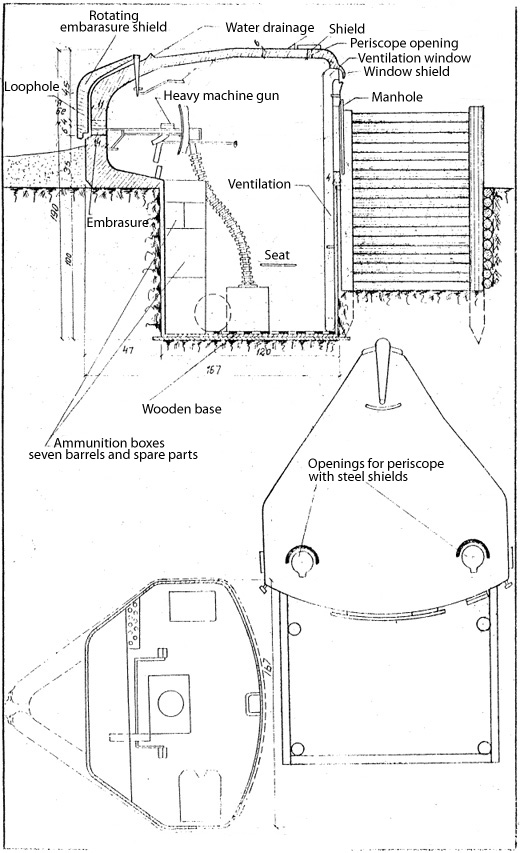
56. Fire position for heavy machine-gun made from wood and earth.
57. Anti-fragmentation nest in a forest area, anti-fragmentation heavy machine-gun nest.
58. Earth pillbox for machine gun.
59. Machine-gun pillbox.
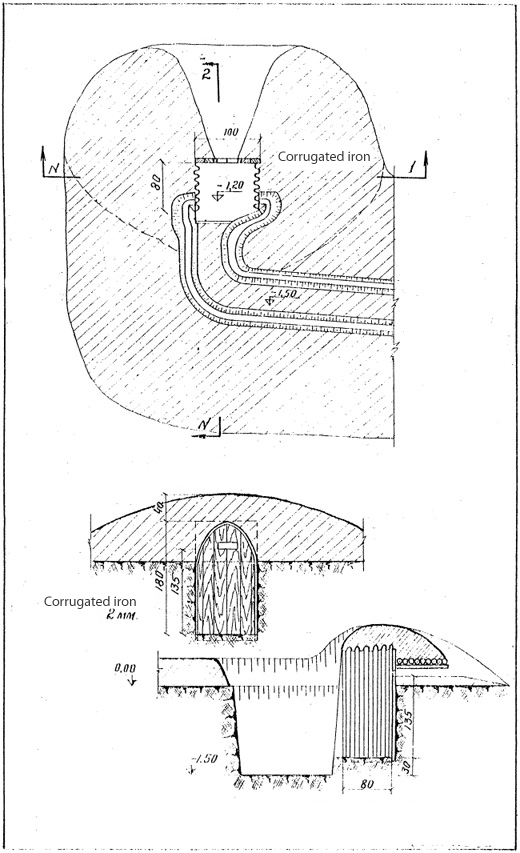
60. Machine-gun pillbox (continued).
61. Machine-gun position with 360 degrees field of fire.
62. Heavy machine-gun pillbox made from wood and earth, observation post in the ground.
63. Machine-gun pillbox. Machine-gun position in a slope. Entrance to machine-gun position.

64. Machine-gun pillbox with 4 embrasures.
65. 3-embrasures machine-gun brick building (constructed by Romanians).
66. 4-embrasures brick building for submachine gunners (constructed by Romanians).

67. Ferro-concrete multi-purpose fire position.
68. Ferro-concrete machine-gun nest.
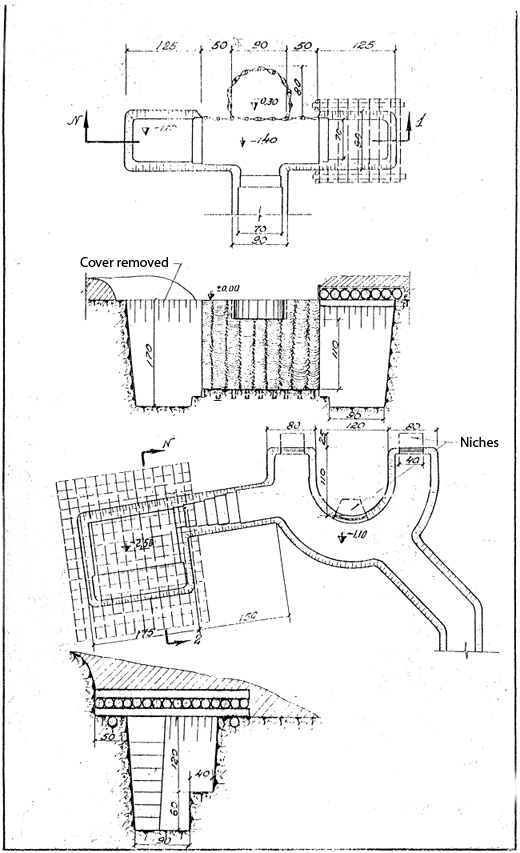
69. Ferro-concrete 4-embrasure building.
70. Ferro-concrete machine-gun building with a platform on top.
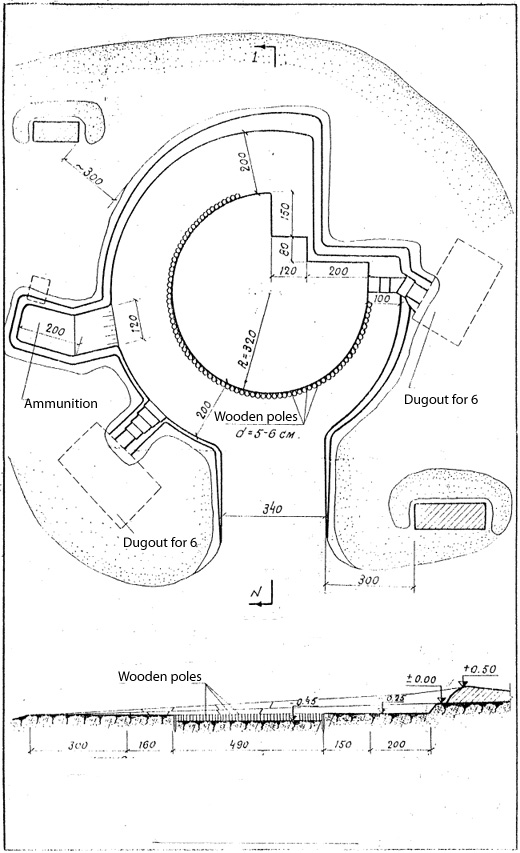
71. Ferro-concrete 4-embrasure fire position for a heavy machine-gun.
72. Ferro-concrete modular fire position with 360 degrees fire sector.
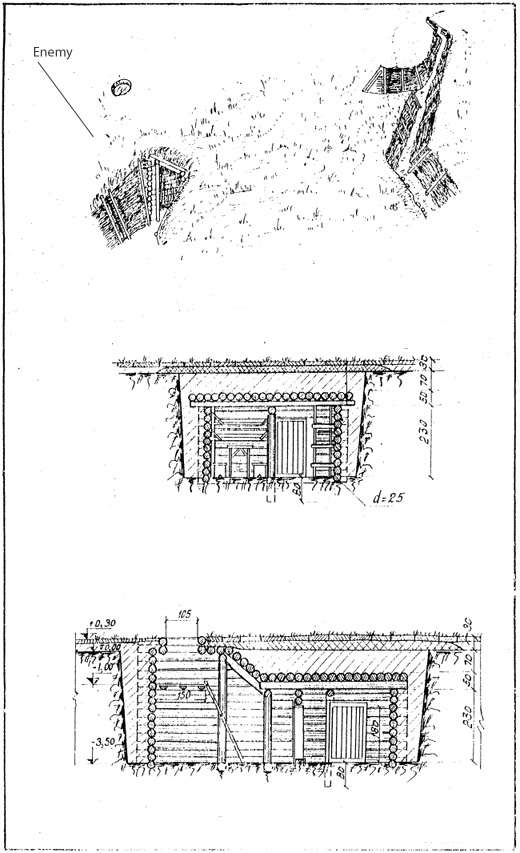
73. Armored half-sphere ("Crab") for machine-gun.
74. Armored half-sphere ("Crab") for machine-gun (continued).
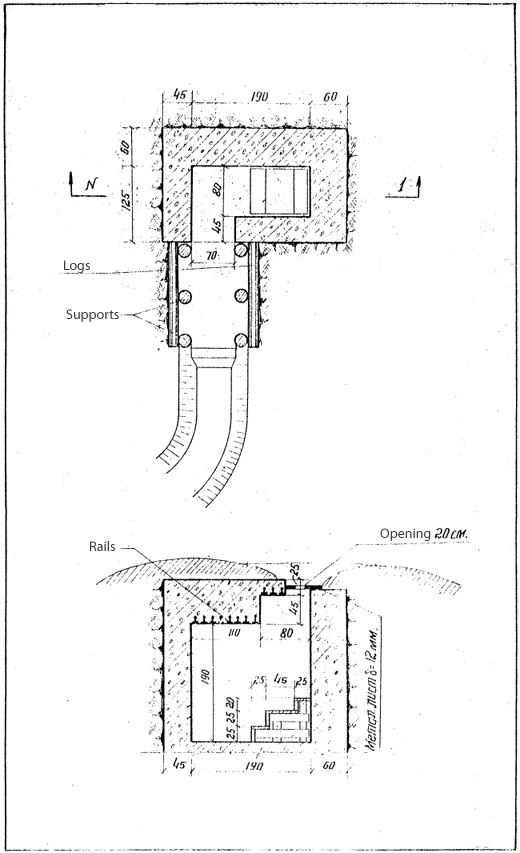
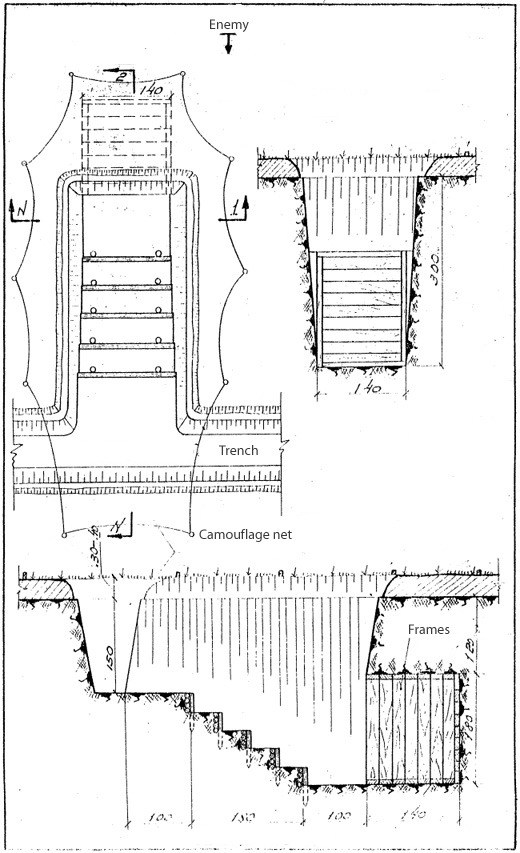
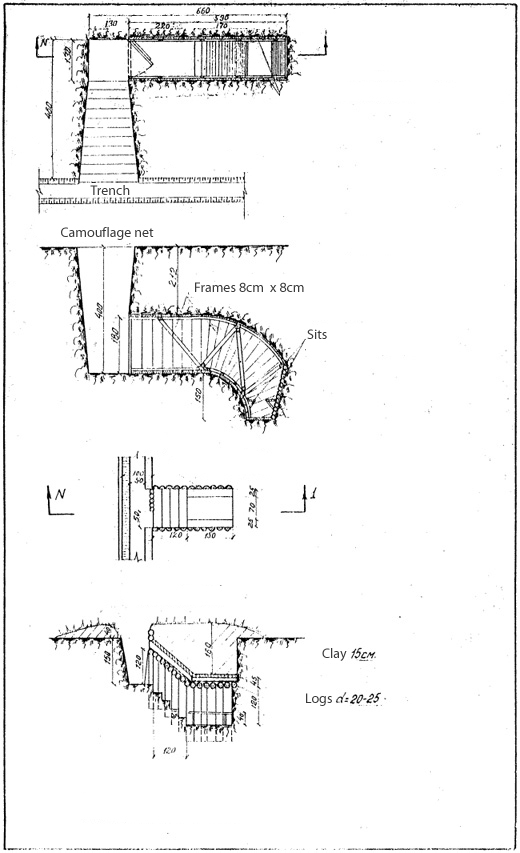
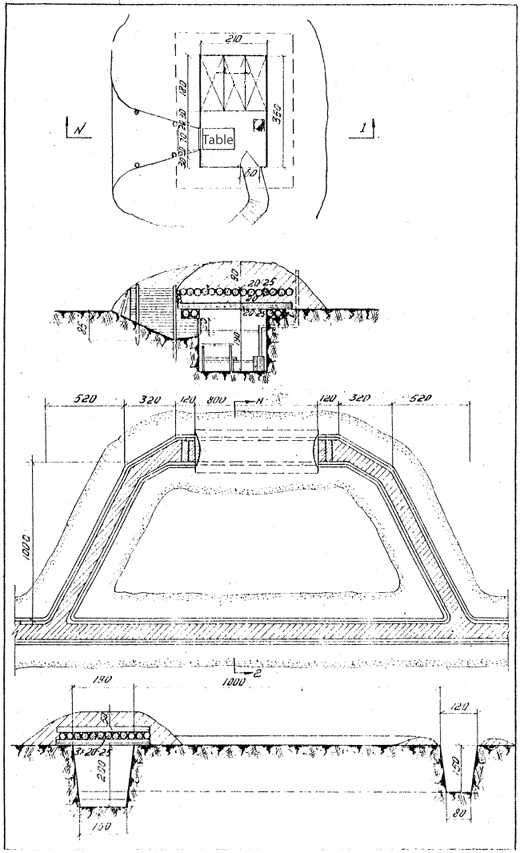
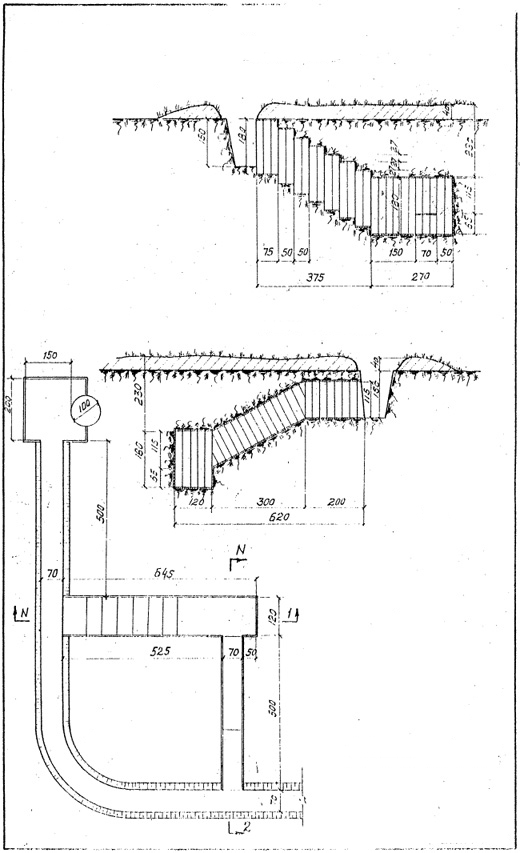
75. Tank shelter.
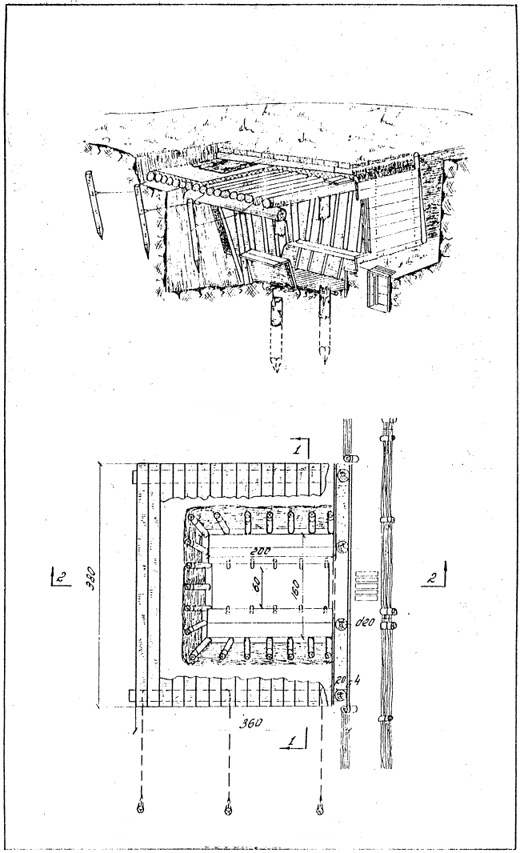
76. Using tank for a ditch defense.
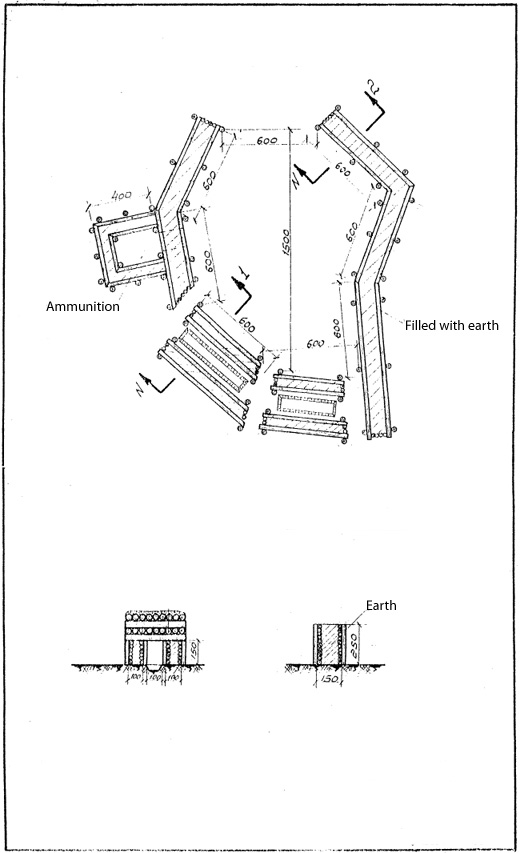
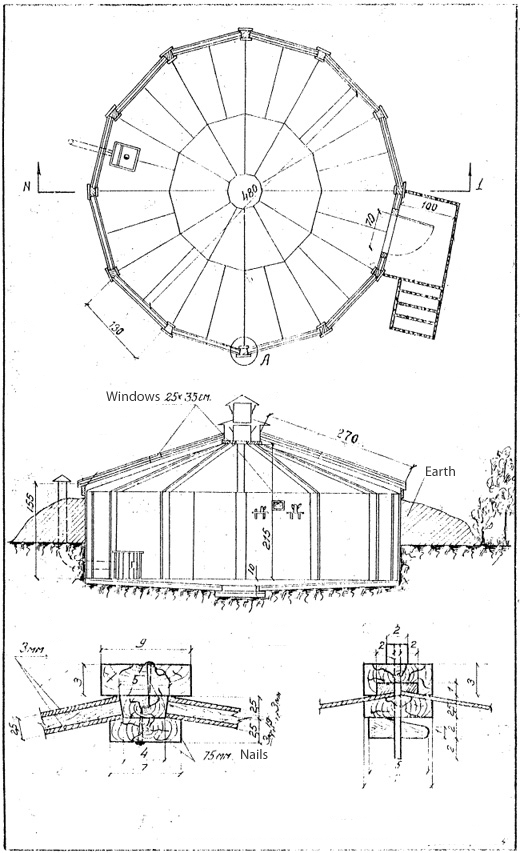
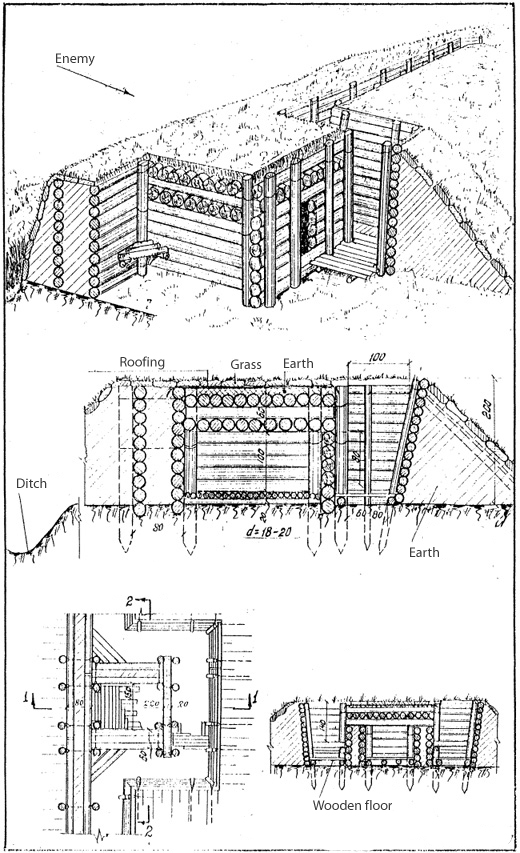
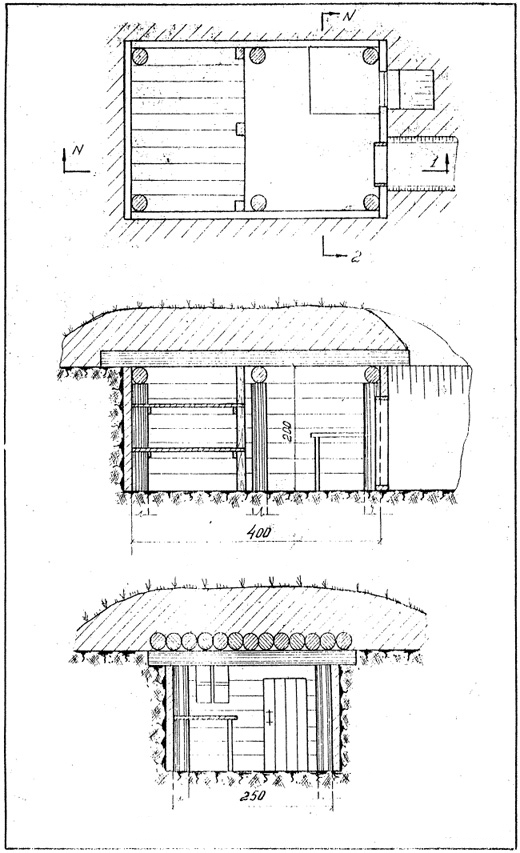
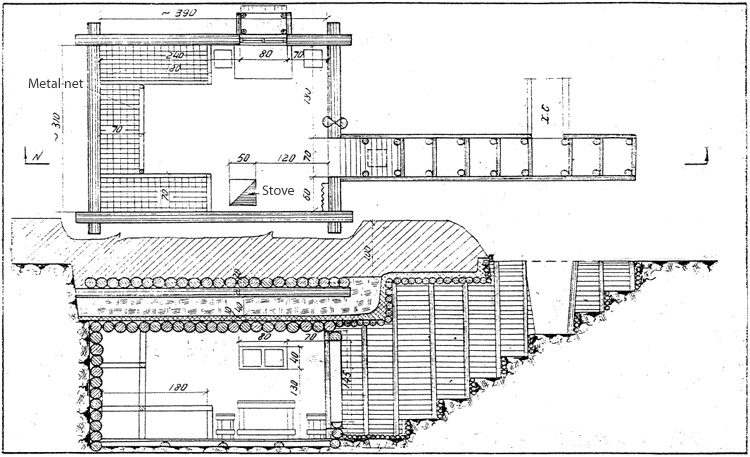
77. Gun position made from wood and earth.
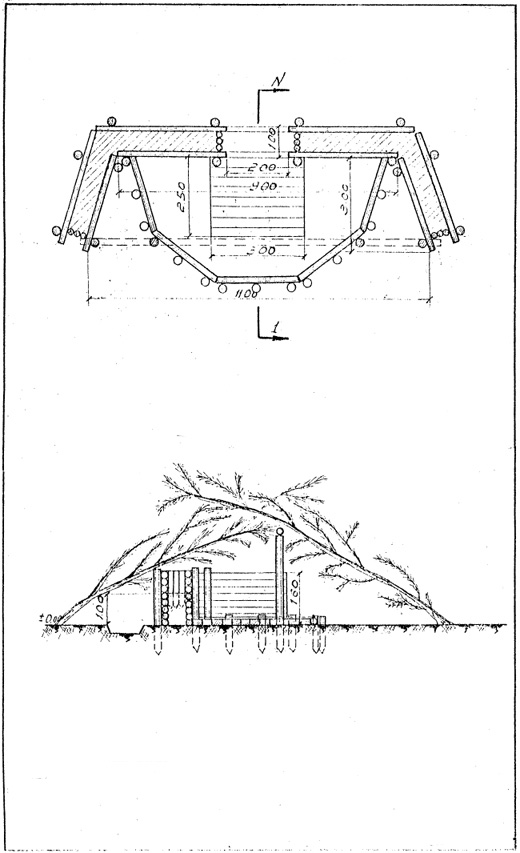
78. 105-mm gun position made from wood and earth.
79. Position for 75-mm gun made from bricks.

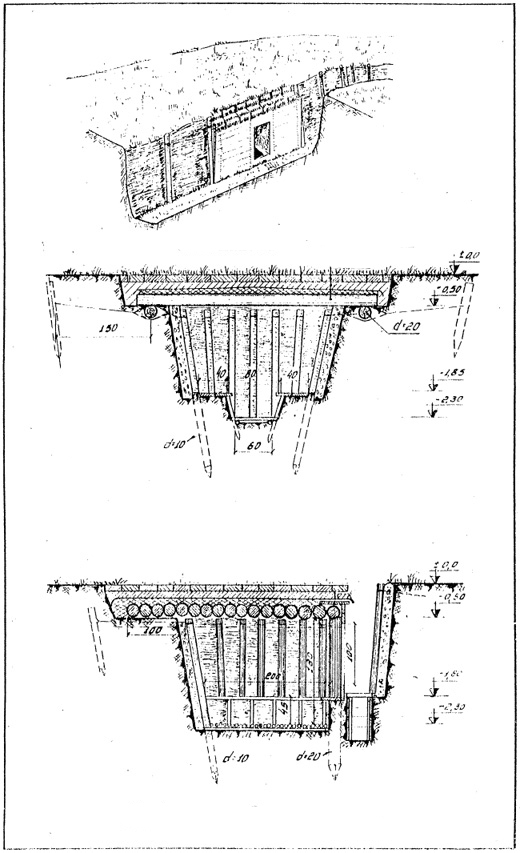
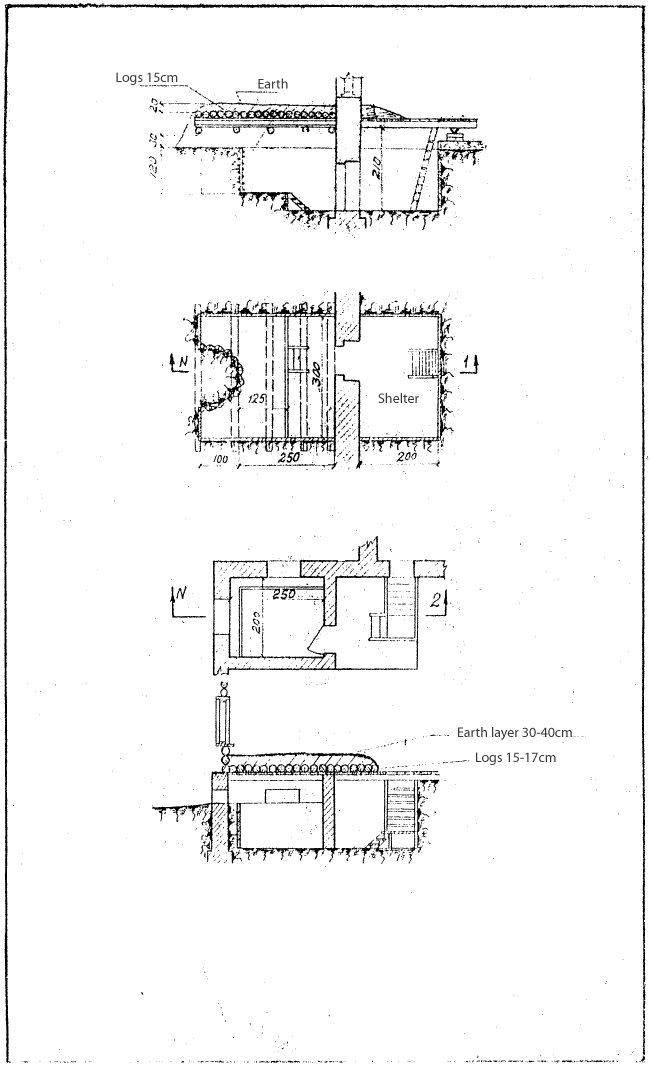
80. Position for 75-mm gun made from bricks.
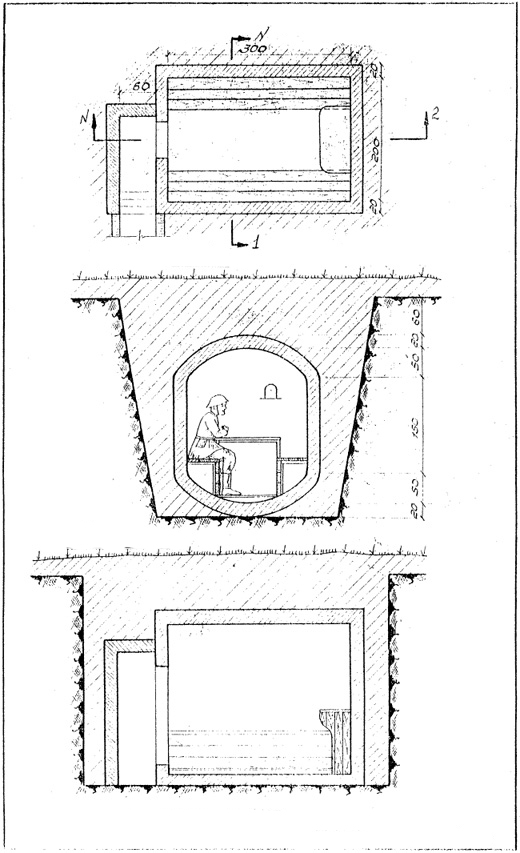
81. Ferro-concrete position for 105-mm gun with a mobile protection wall before an embrasure.
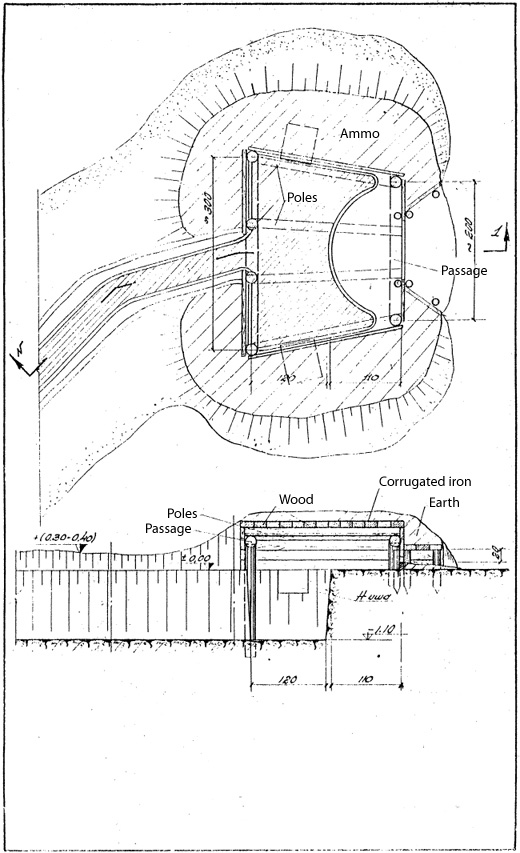
82. Ferro-concrete mobile protection wall.
OBSERVATION POSTS

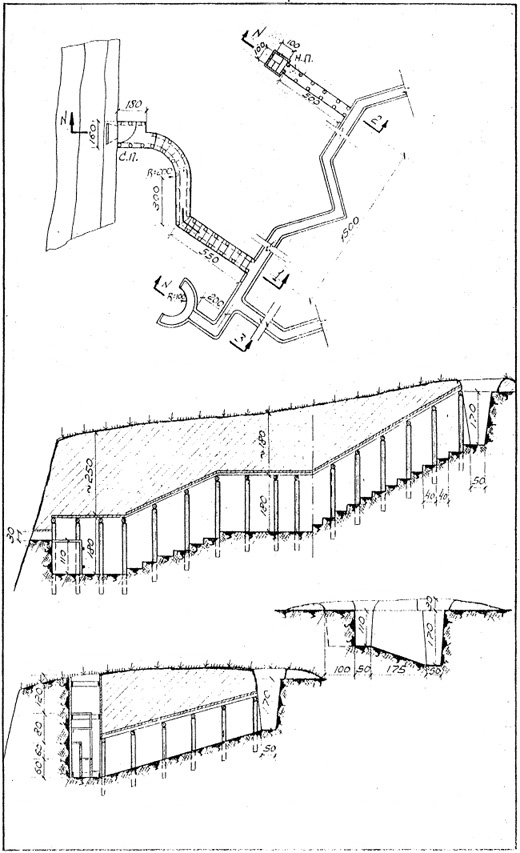
83. Observation post, adjacent to the trench.
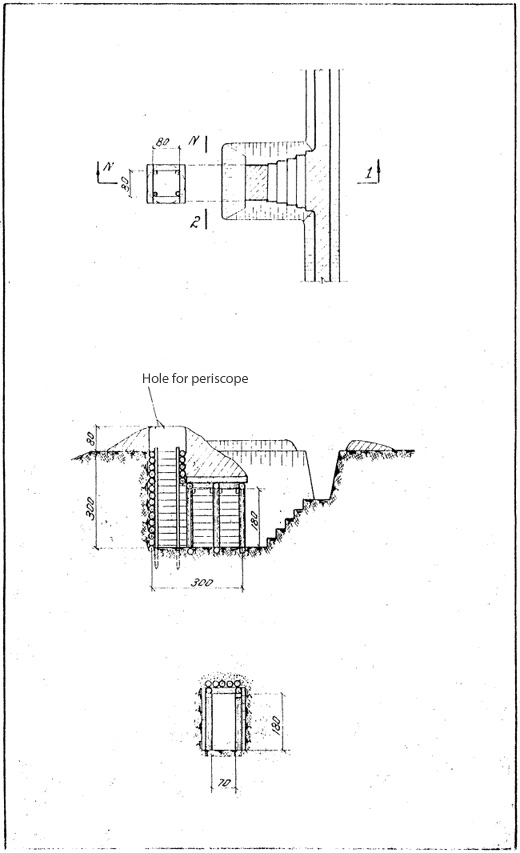
84. Observation post.

85. Observation post.

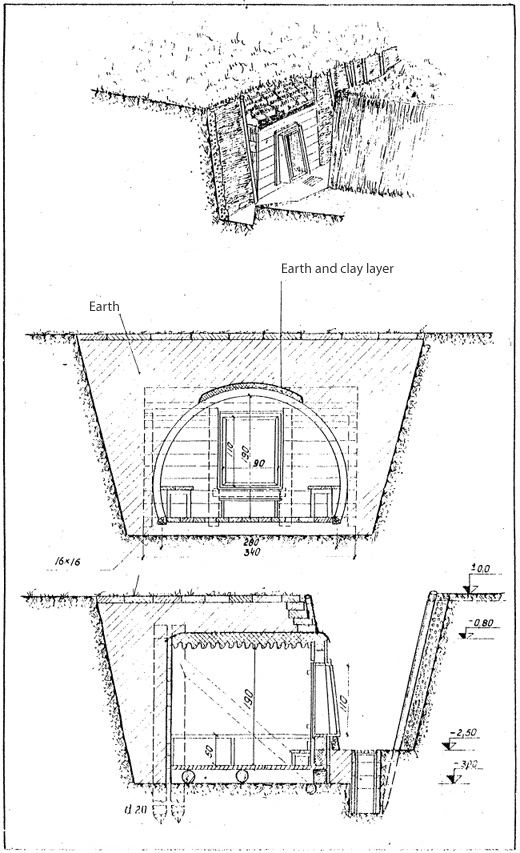
86. Observation post.
87. Observation post (continued).
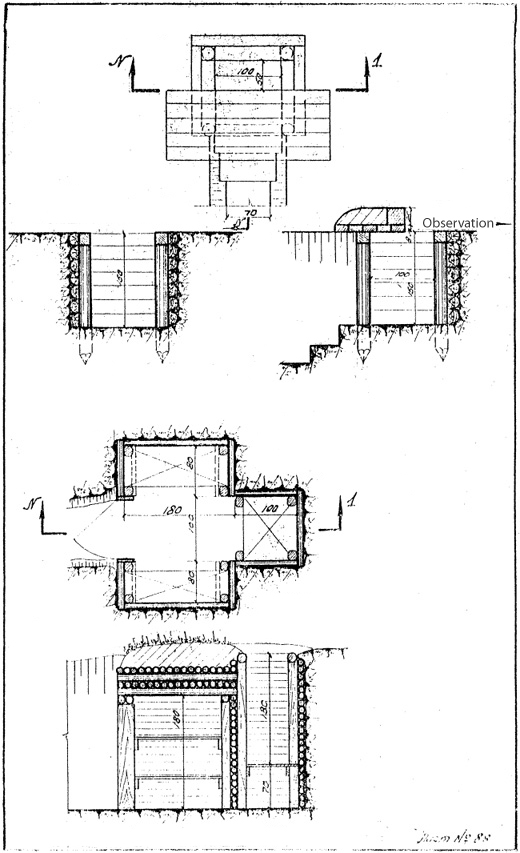
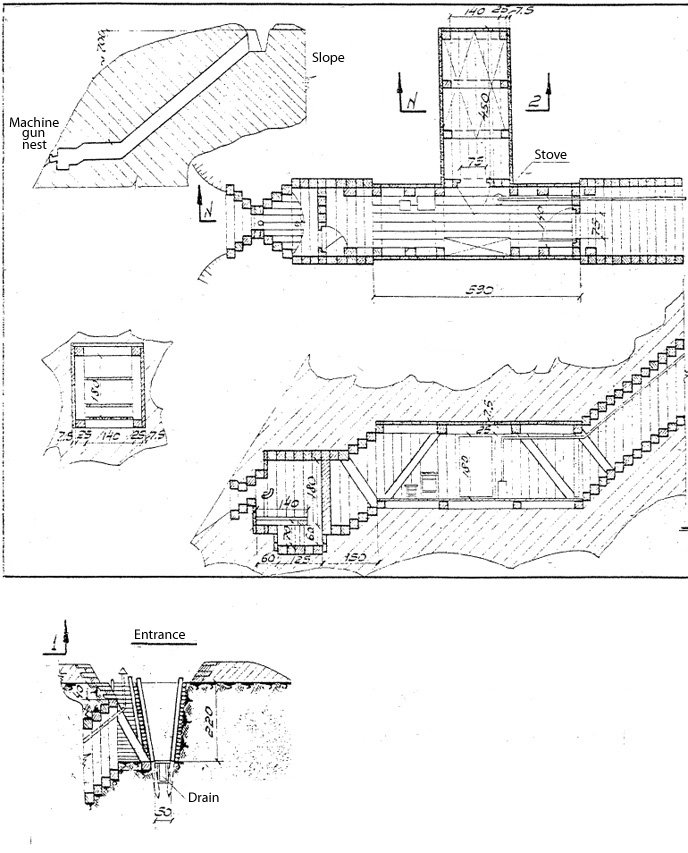
88. Observation post near dugout, observation post constructed from wood and earth bags.
89. Observation post with a shelter.
90. Mortar battery observation post, constructed from wood and earth bags.
91. Artillery command and observation post.
92. Observation post from corrugated iron.
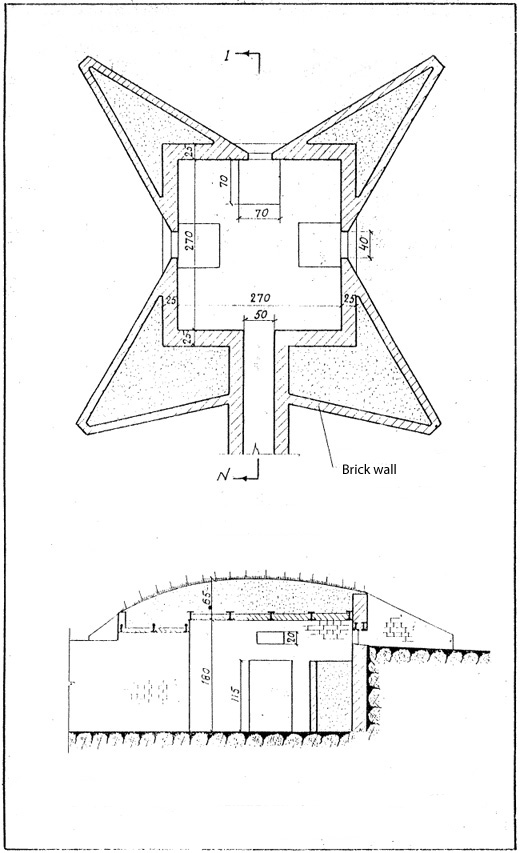
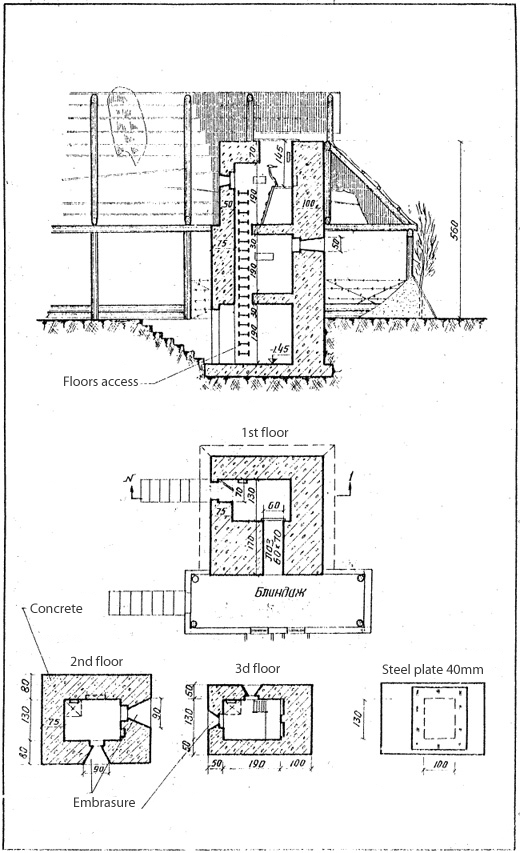
93. Ferro-concrete observation post.
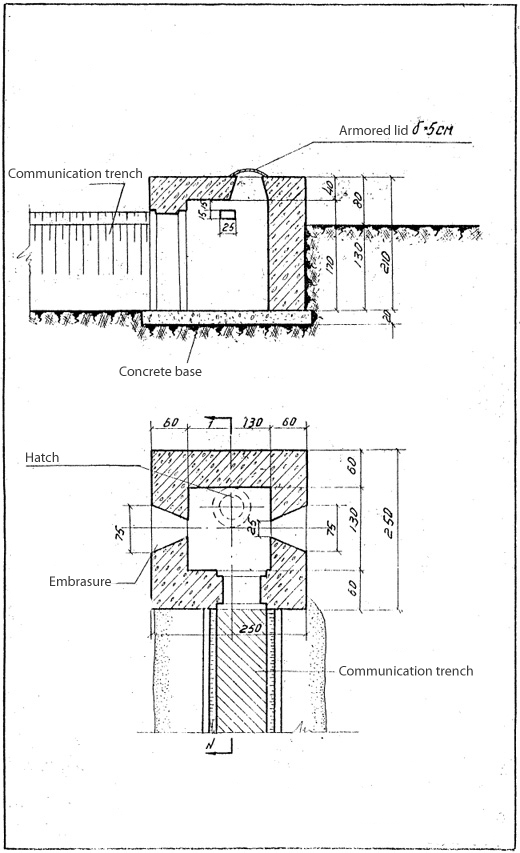
94. Ferro-concrete observation post.
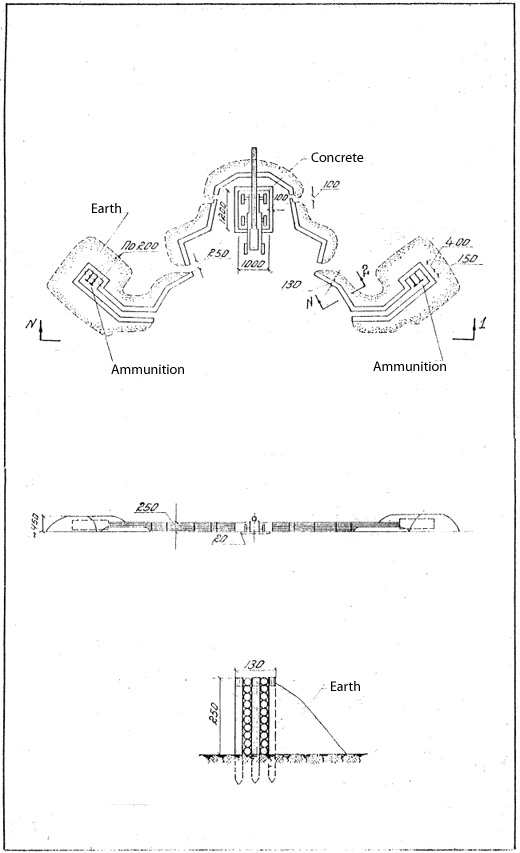
95. Ferro-concrete observation post.
96. Ferro-concrete observation post with embrasure.
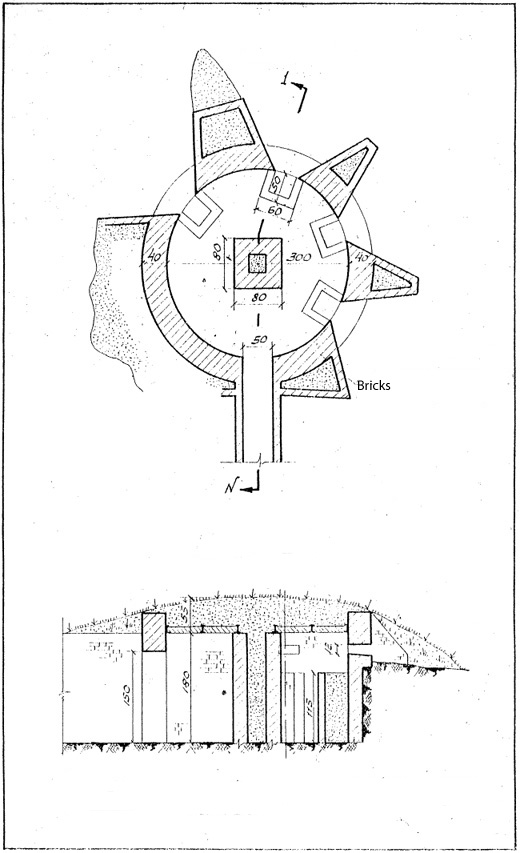
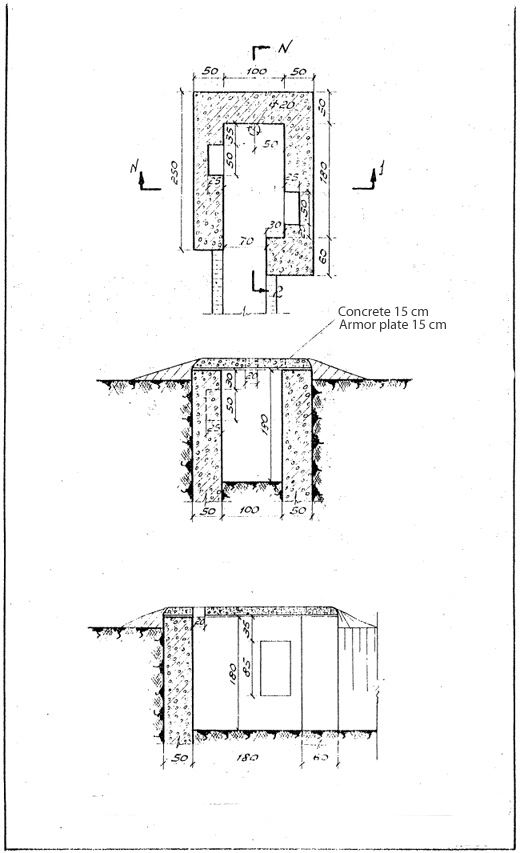
97. Multi-purpose ferro-concrete field fortification for observation, machine gun, light mortar and anti-tank rifle ("Tobruk-style bunker").
98. Ferro-concrete observation post.
99. Ferro-concrete observation post with underground shelter.
100. Observation post with embrasure.
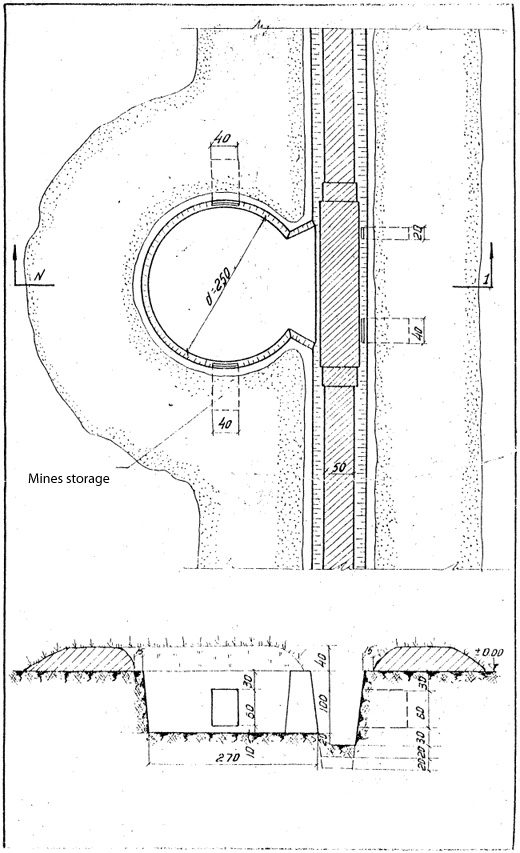
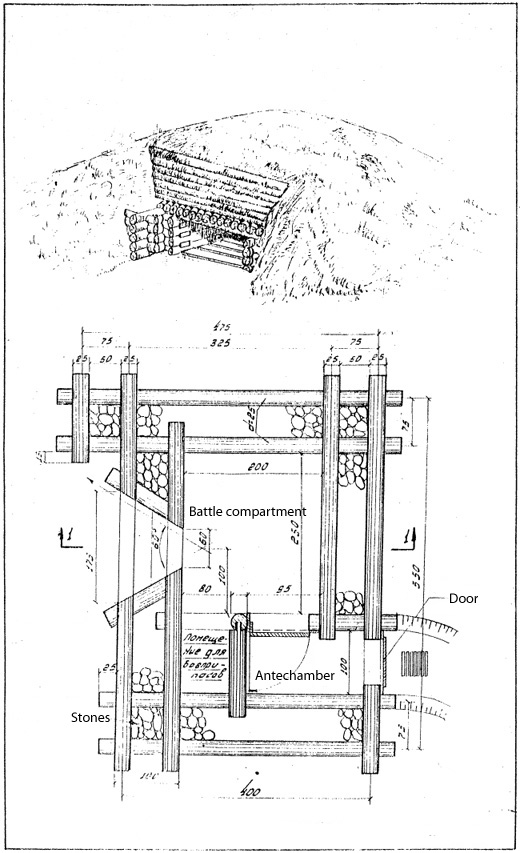
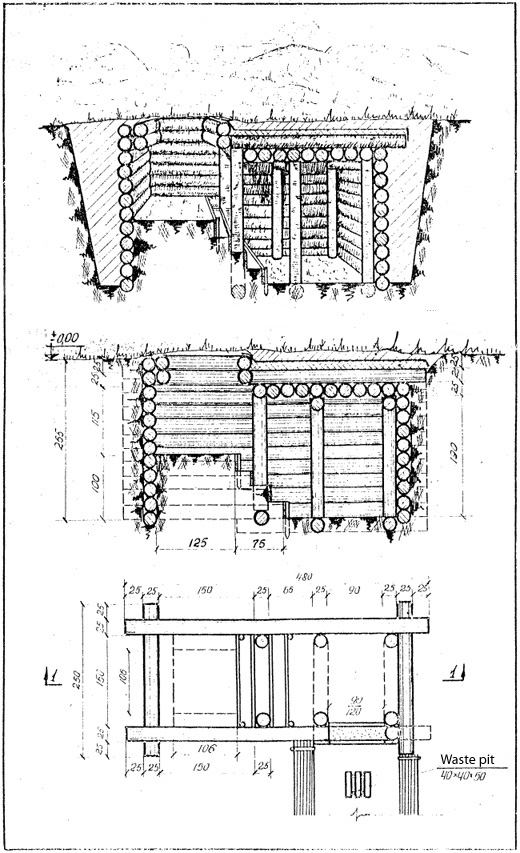
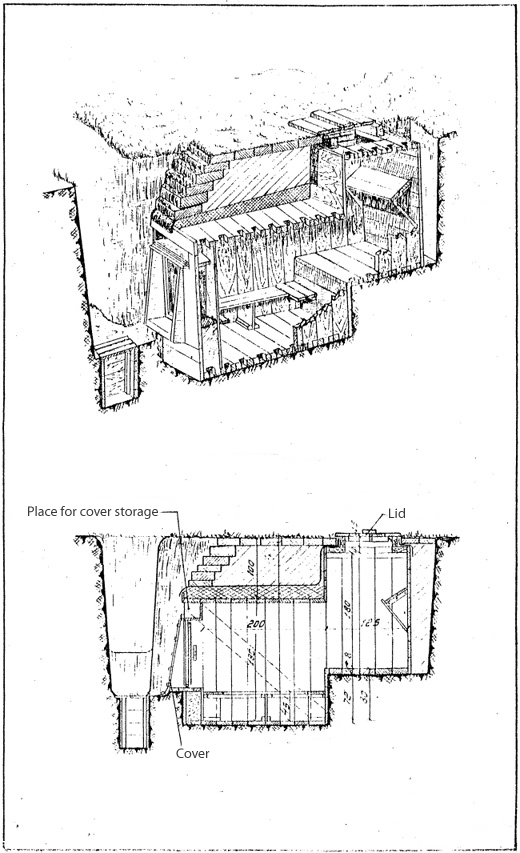
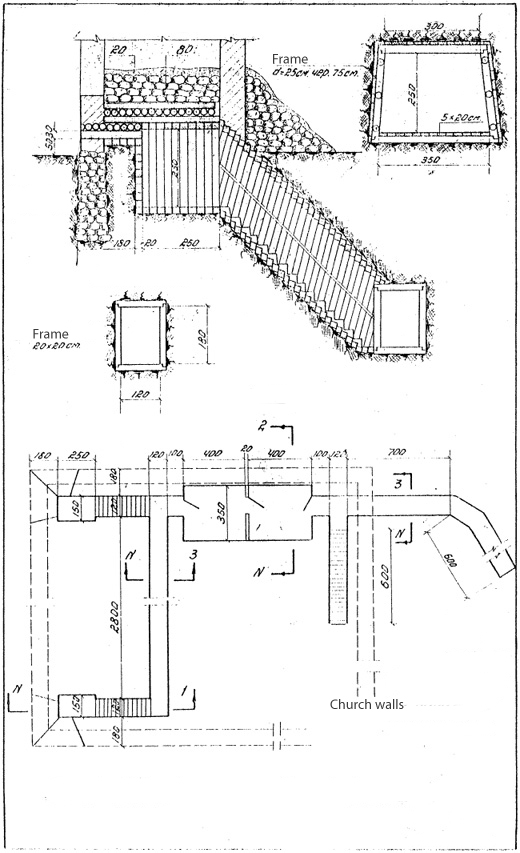
SHELTERS
101. Foxhole.
102. Foxhole with niche for 6 persons.
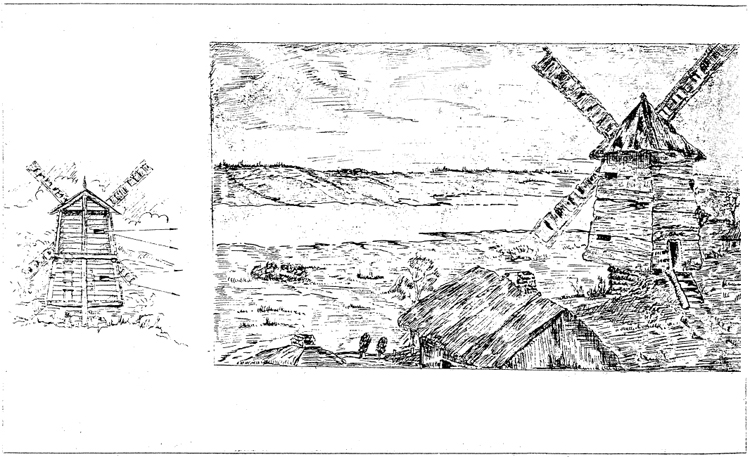
103. Dugouts for 6 persons.
104. Modular plywood tent.
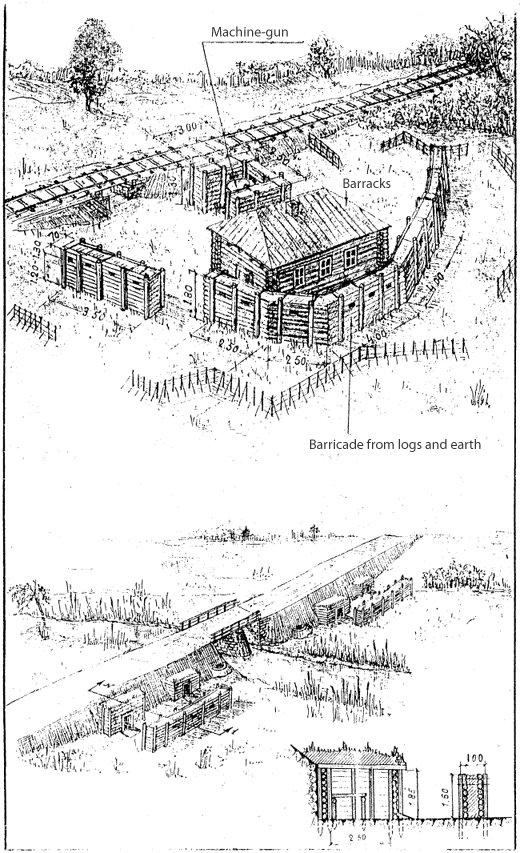
105. Shelter with brushwood finish.
106. Shelter with brushwood finish (continued).
107. Shelter in marshland area.
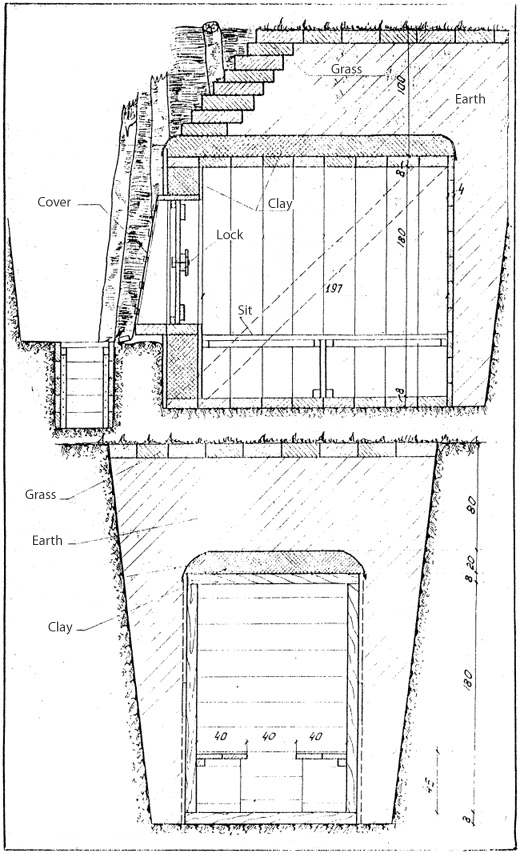
108. Dugout.
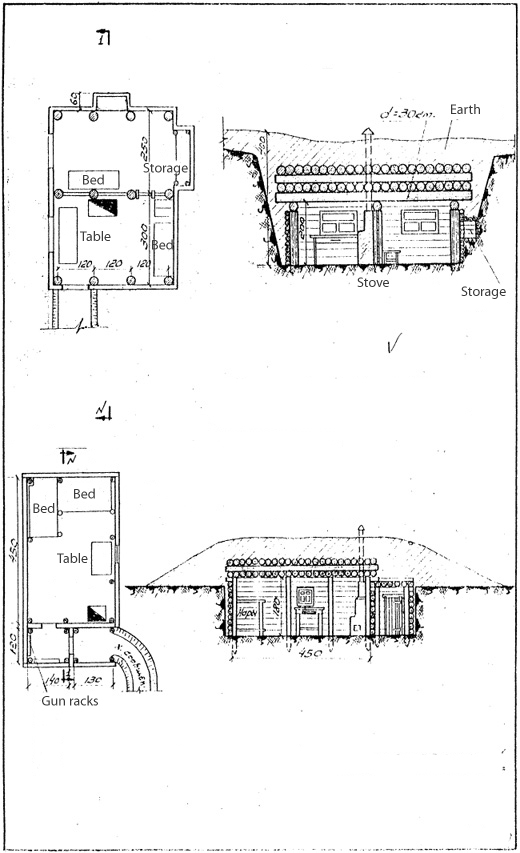
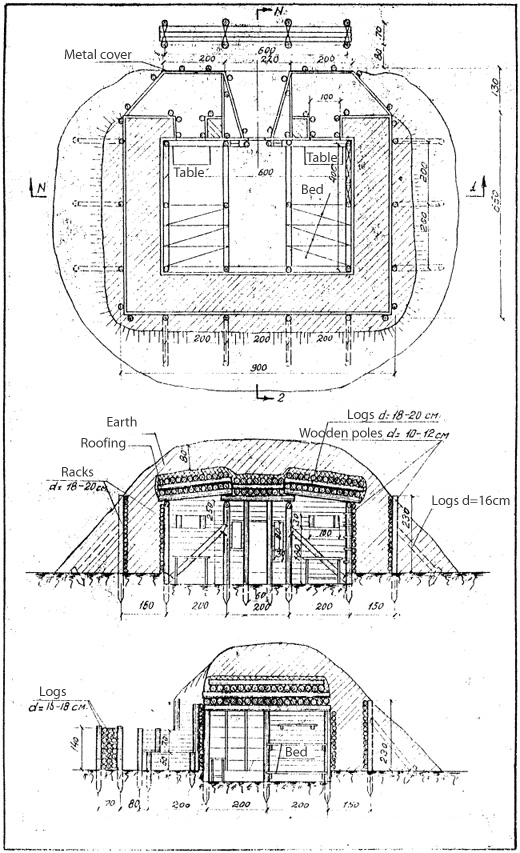
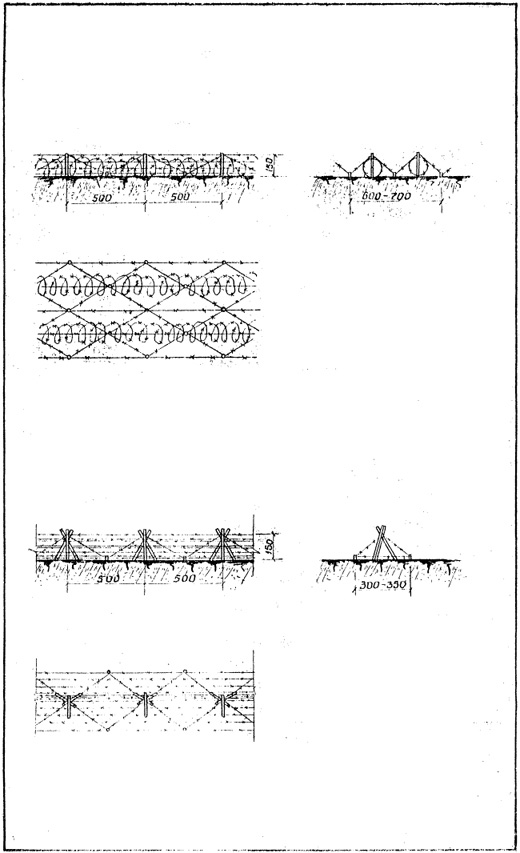
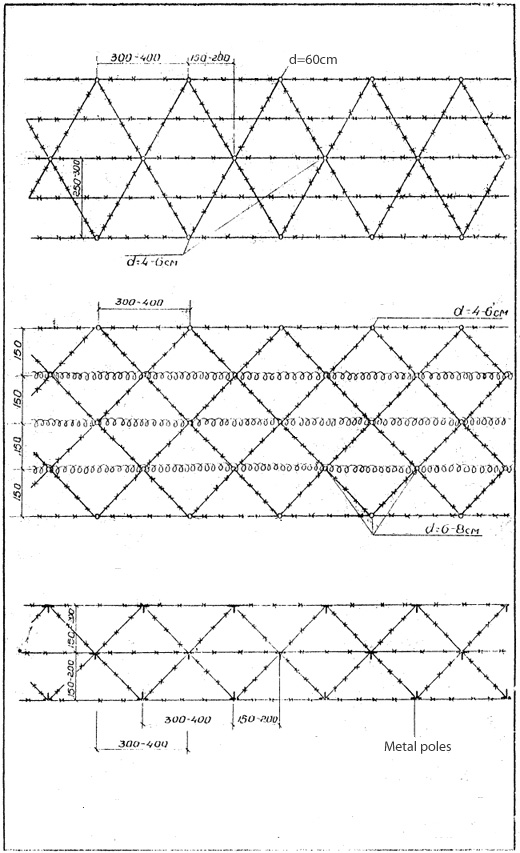
109. Officers dugout with supports. Dugout for infantry section.
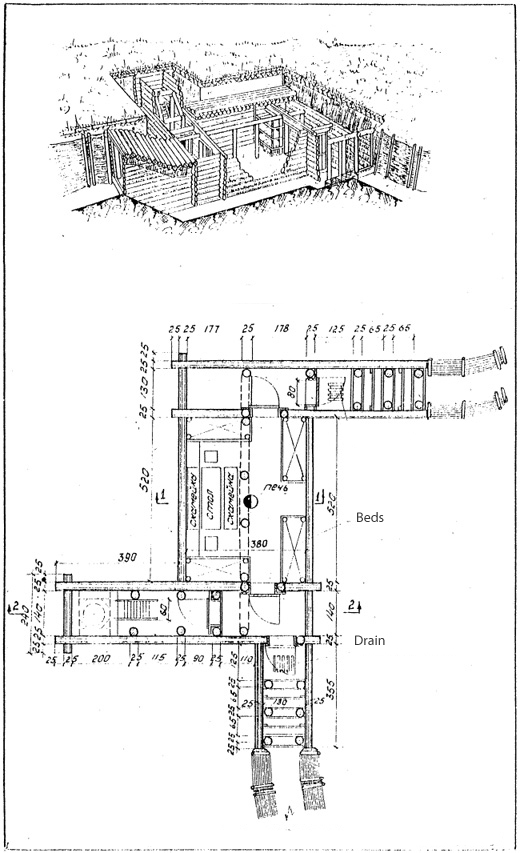
110. Infantry section dugout.
111. Infantry section dugout (continued).
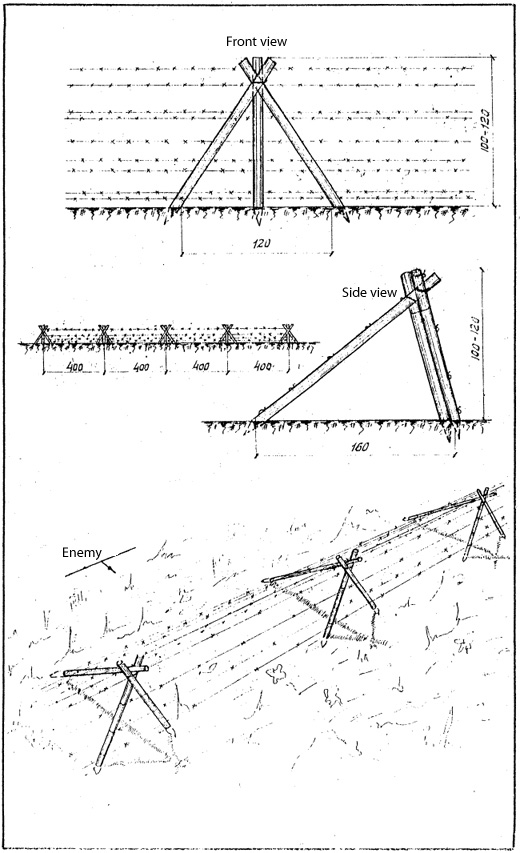
112. Shelter.
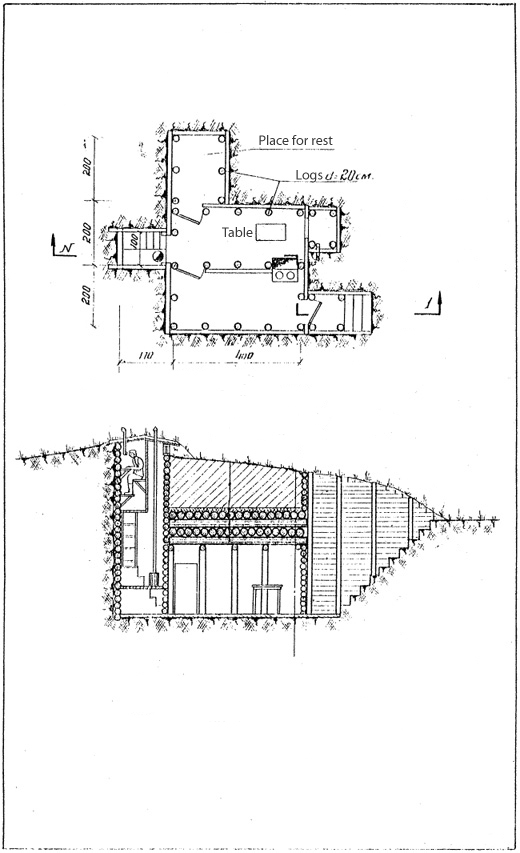
113. Command post dugout.
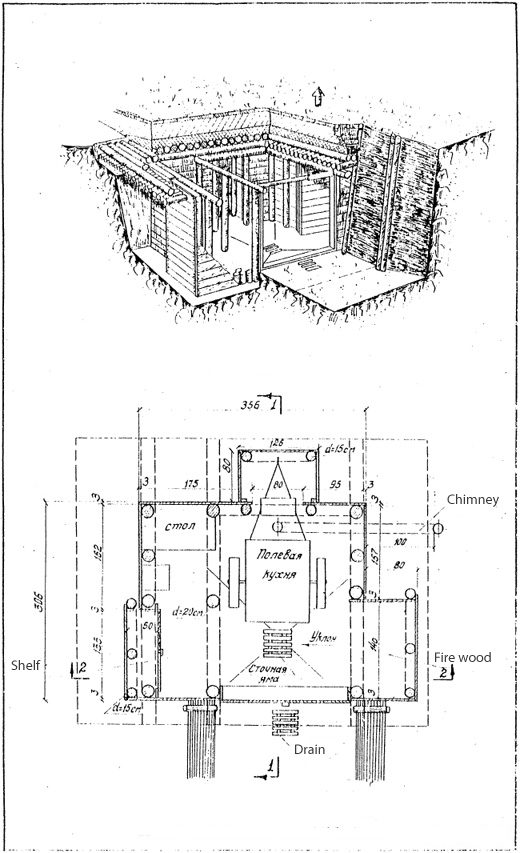
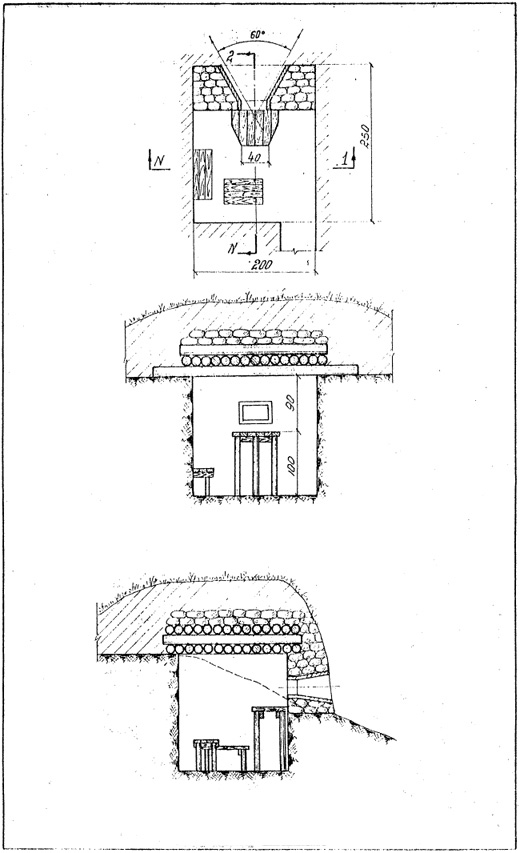
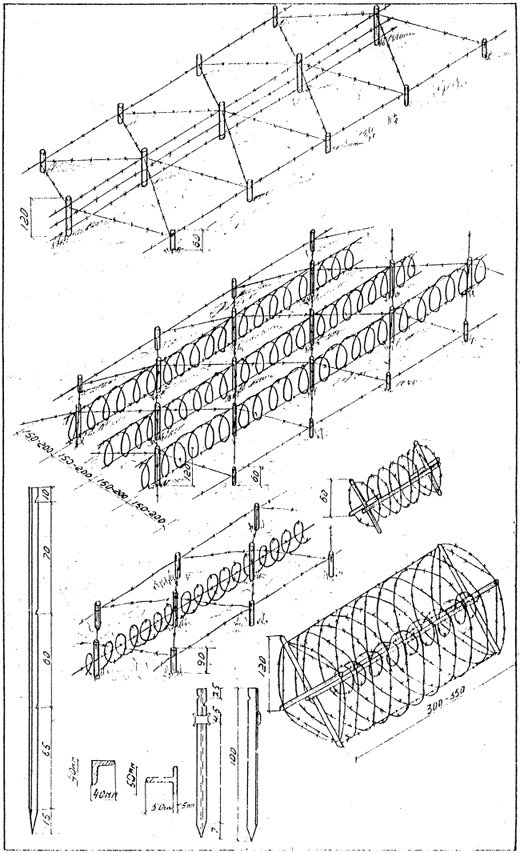
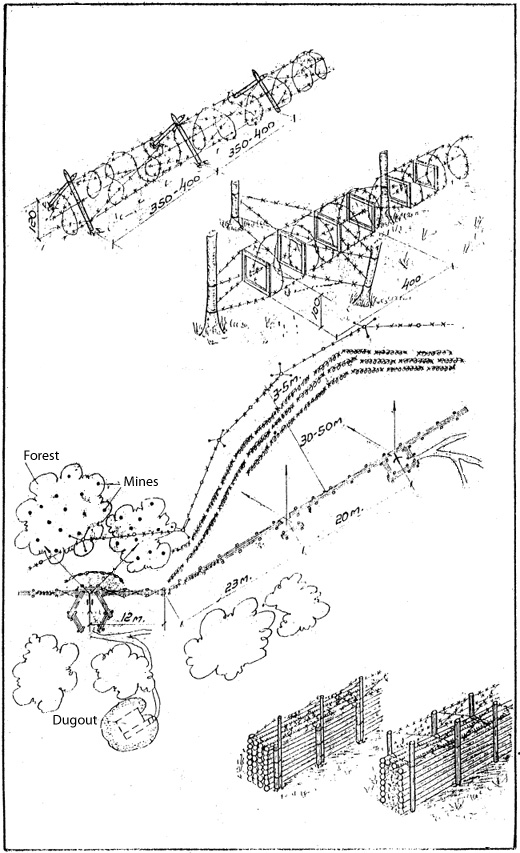
114. Field kitchen dugout.
115. Field kitchen dugout. (continued).
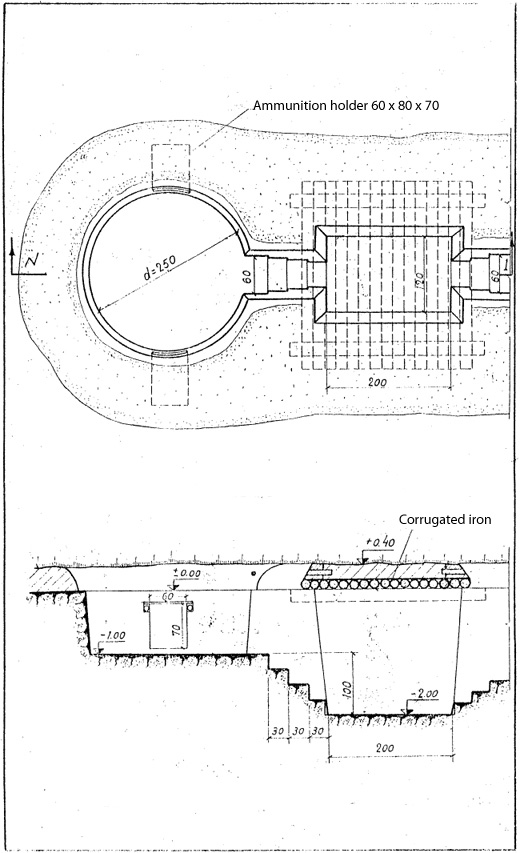
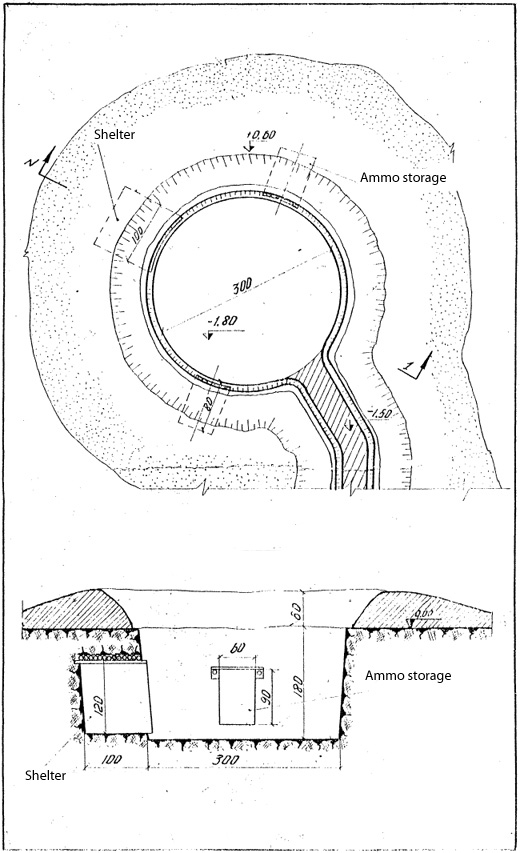
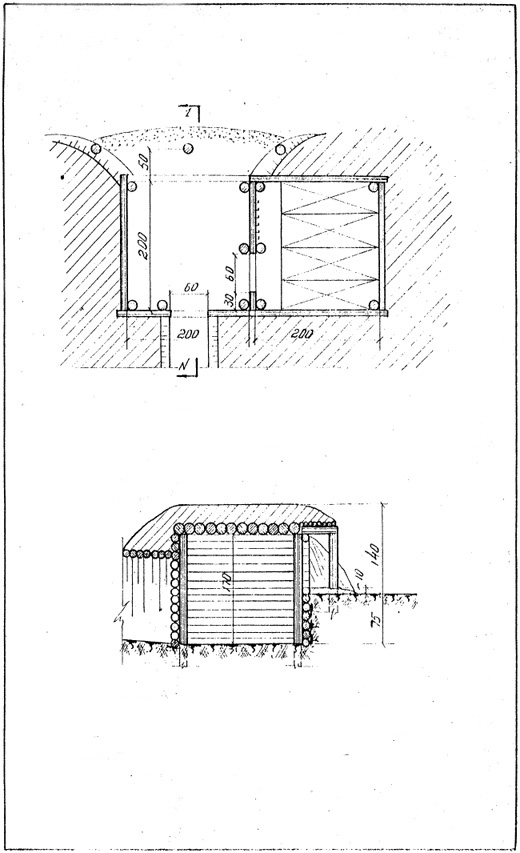
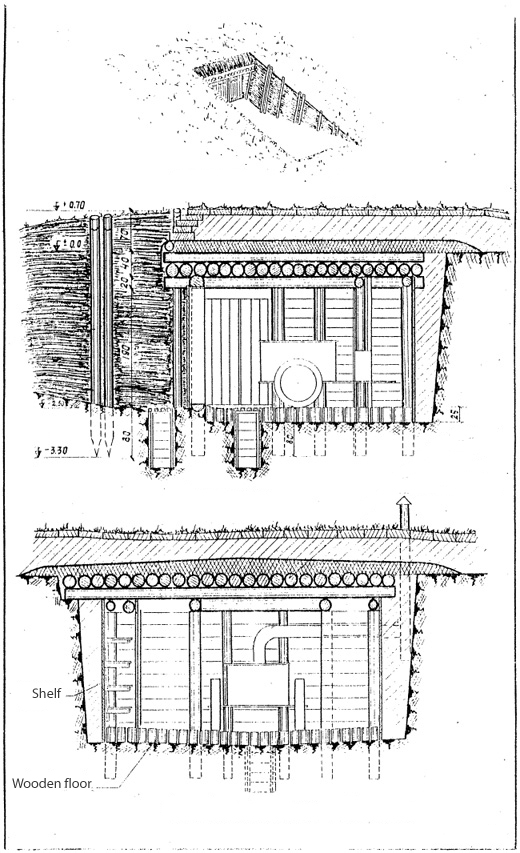
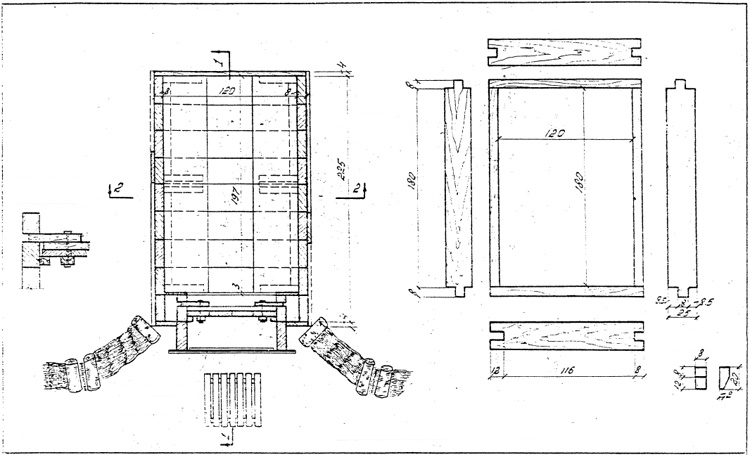
116. Underground shelter.
117. Shelter made from Dutch wooden frames.
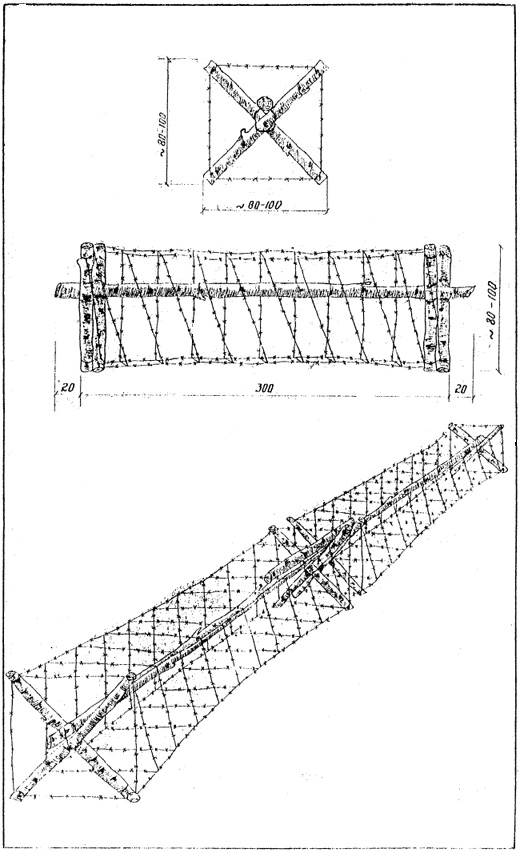
118. Shelter made from Dutch wooden frames (continued).
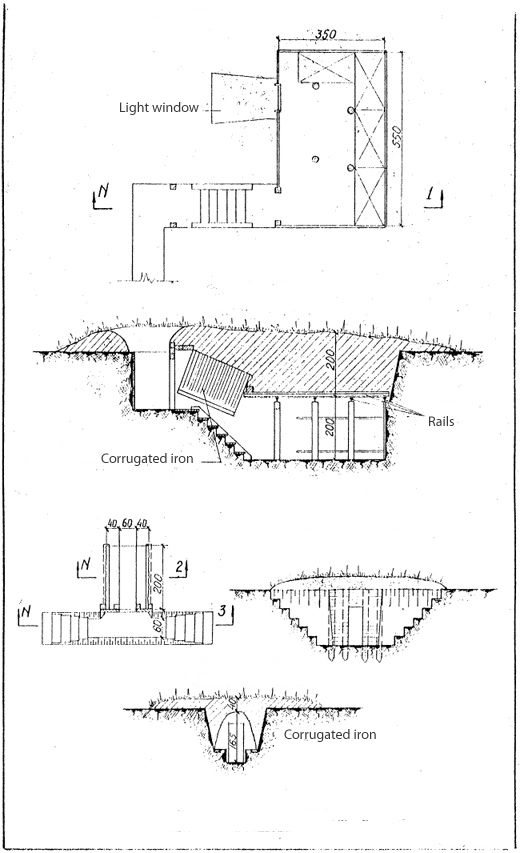
119. Shelter made from corrugated iron.
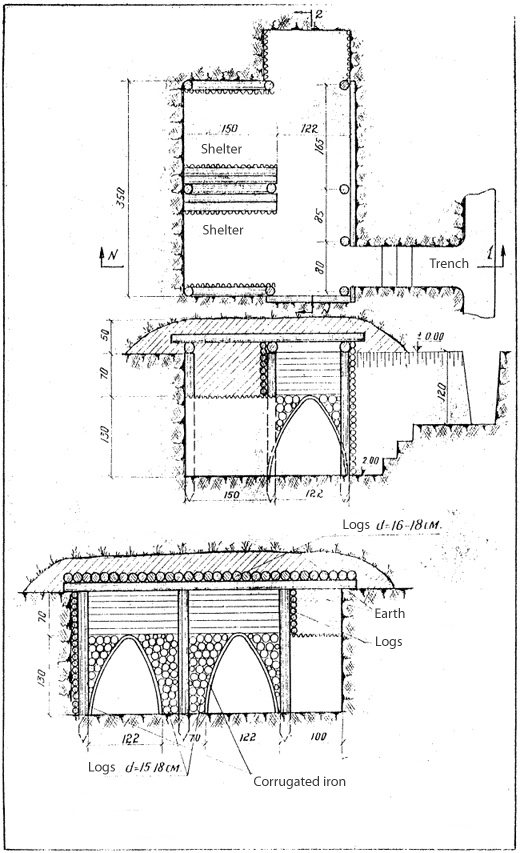
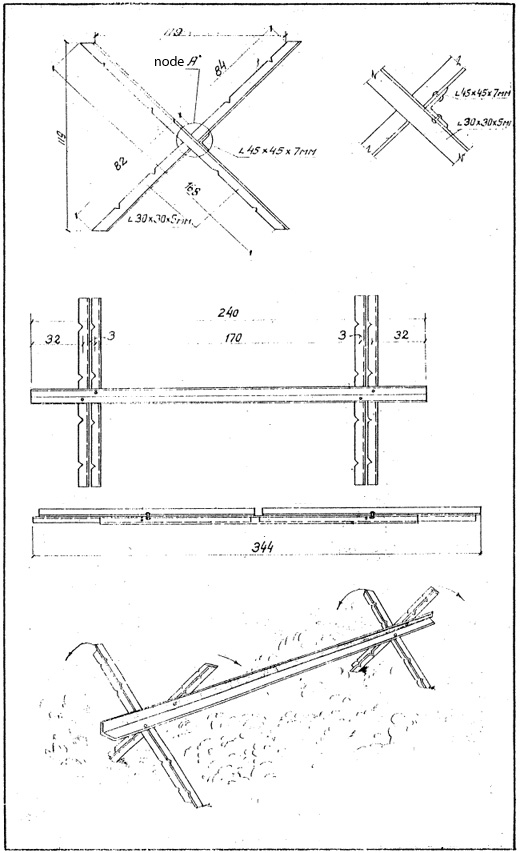
120. Group shelter made from corrugated iron.
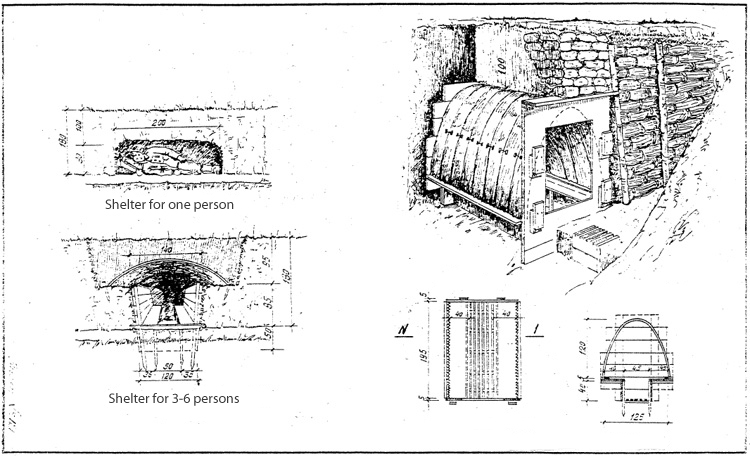
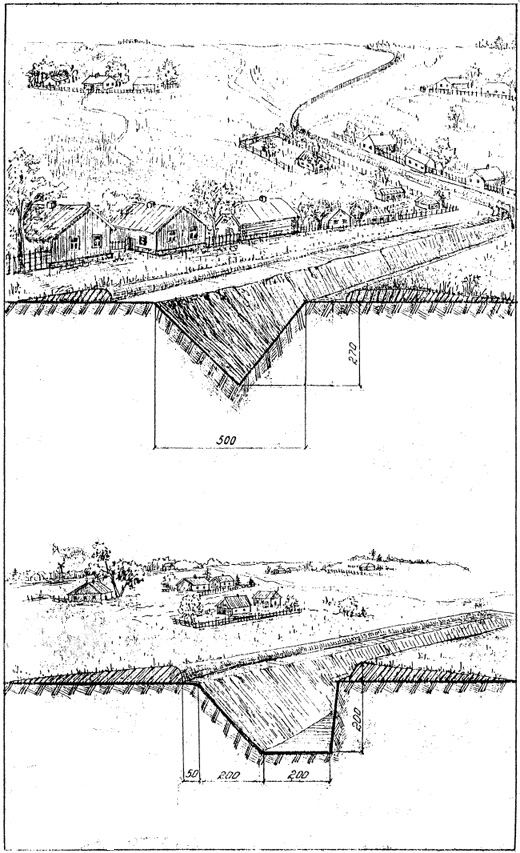
121. Shelter for one person. Shelters for 3-6 persons.
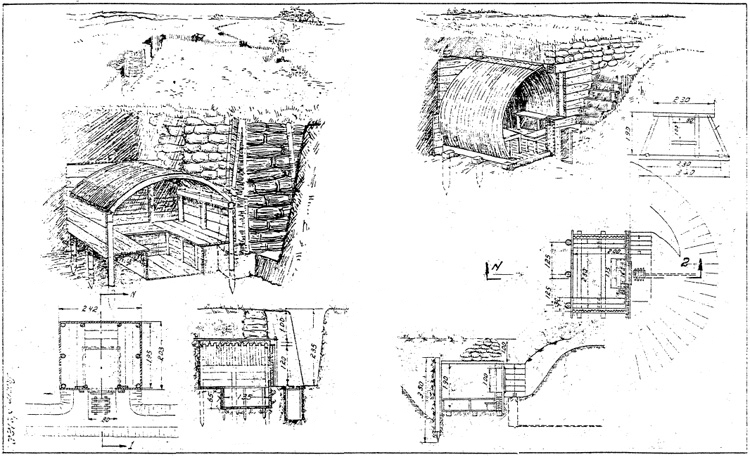
122. Shelters made from corrugated iron.
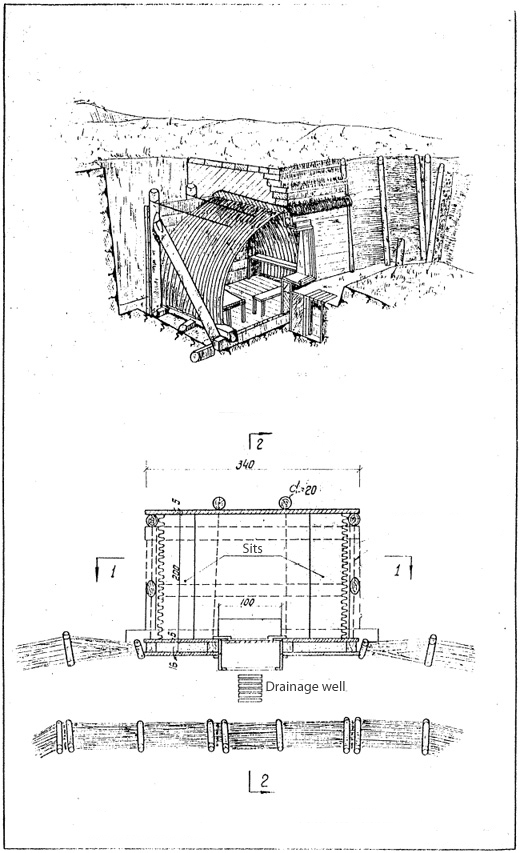
123. Shelter made from corrugated iron "Heinrich".
124. Shelter made from corrugated iron "Heinrich" (continued).
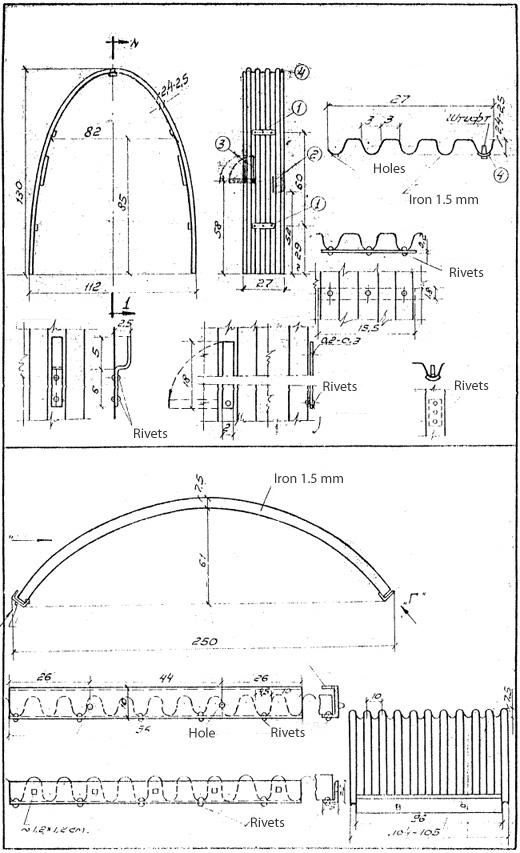
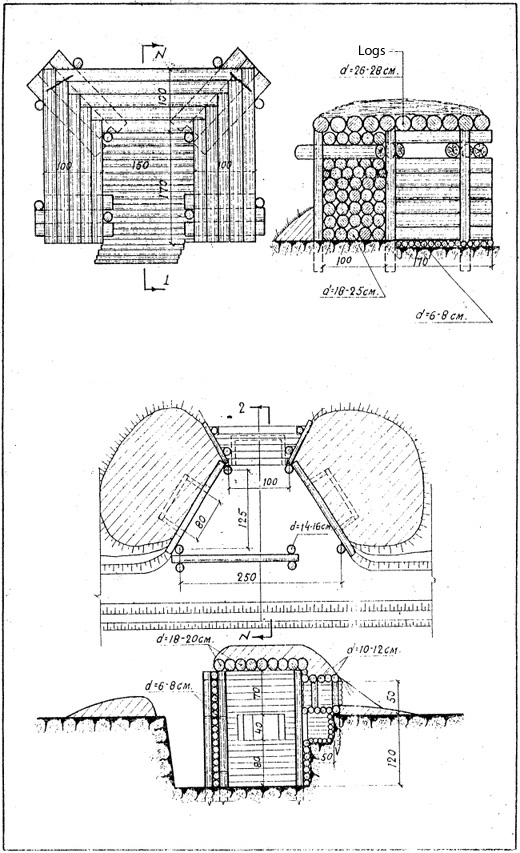
125. Construction elements made from corrugated iron.
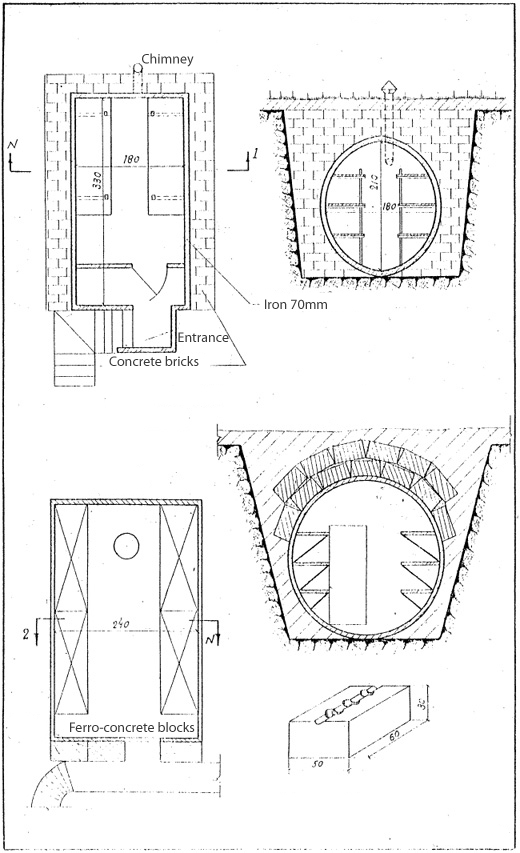
126. Armored shelter for 6 persons, armored shelter.
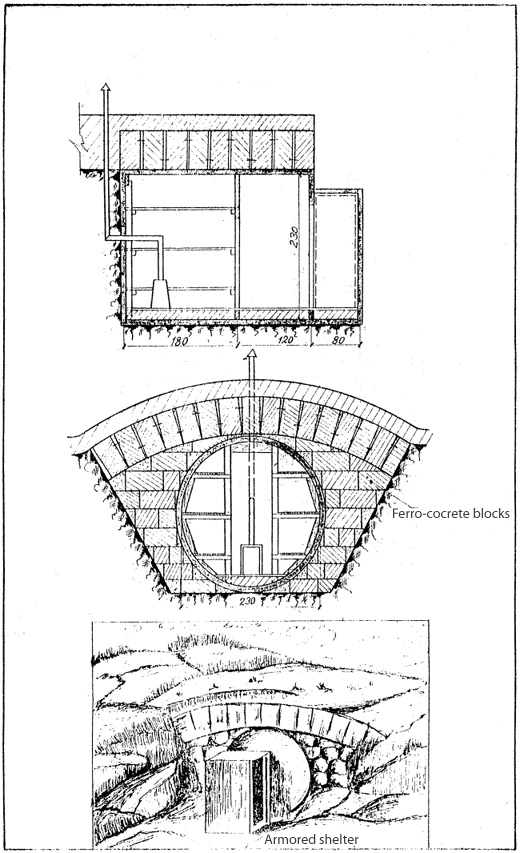
127. Armored shelter.
128. Armored shelter for batallion command post. [Page 129 is missing in original - AWW]
PREPARING LOCAL ENVIRONMENT FOR DEFENSE
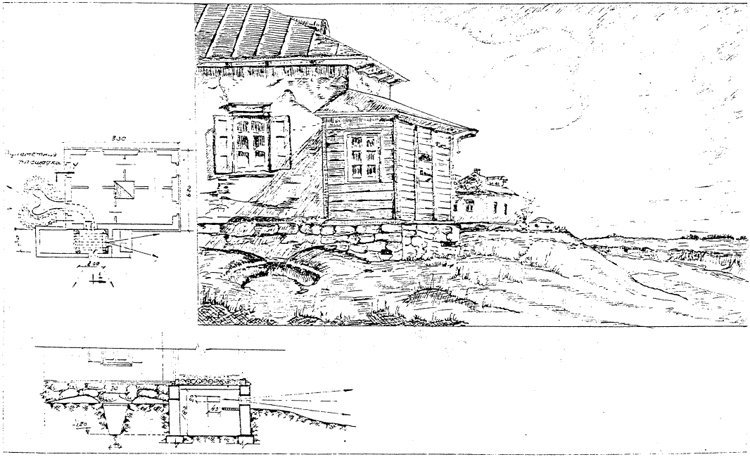
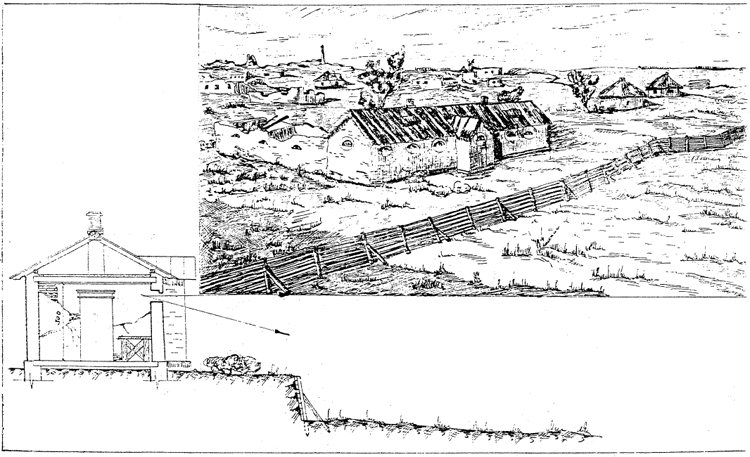
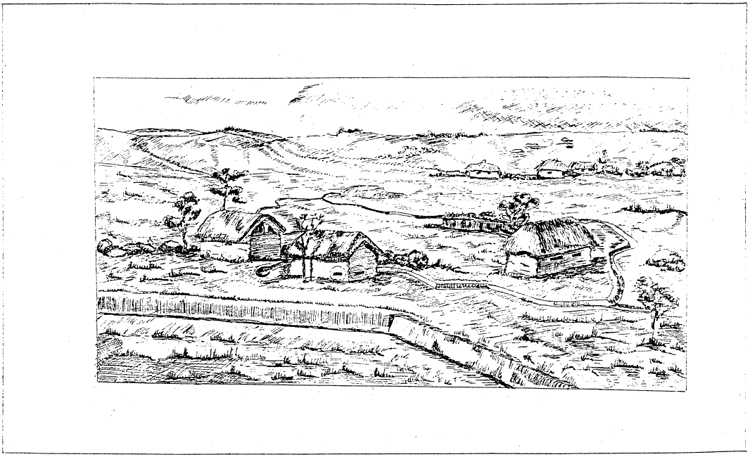
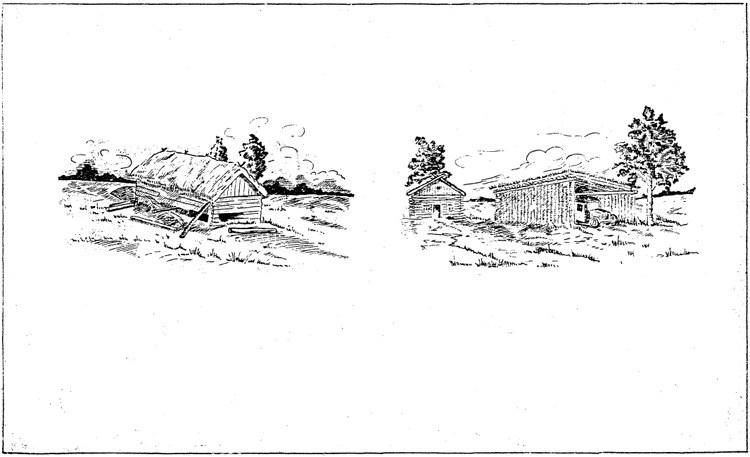
130. Residential buildings, prepared for defense.

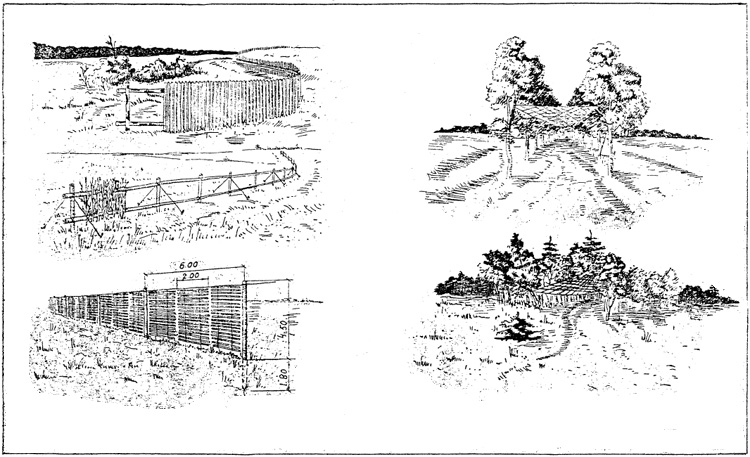
131. Anti-tank ditch prepared for use as firing position.
132. Ferro-concrete half-sphere for anti-tank defense.
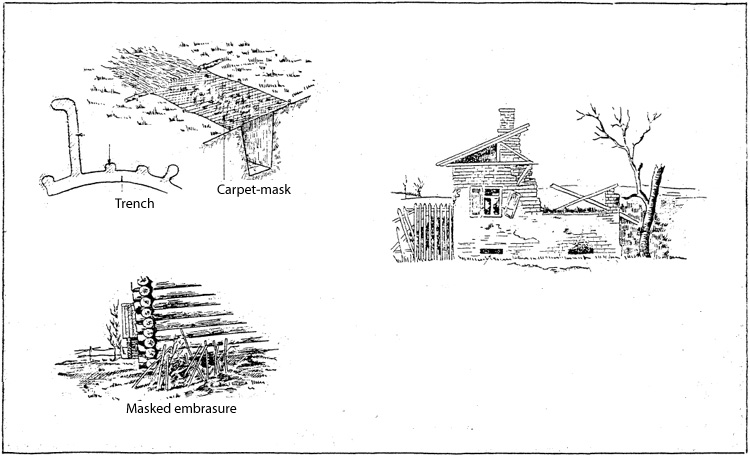
133. Local objects, prepared for defense.
134. Anti-fragmentation nests constructed from wood and earth in cellars of residential buildings.
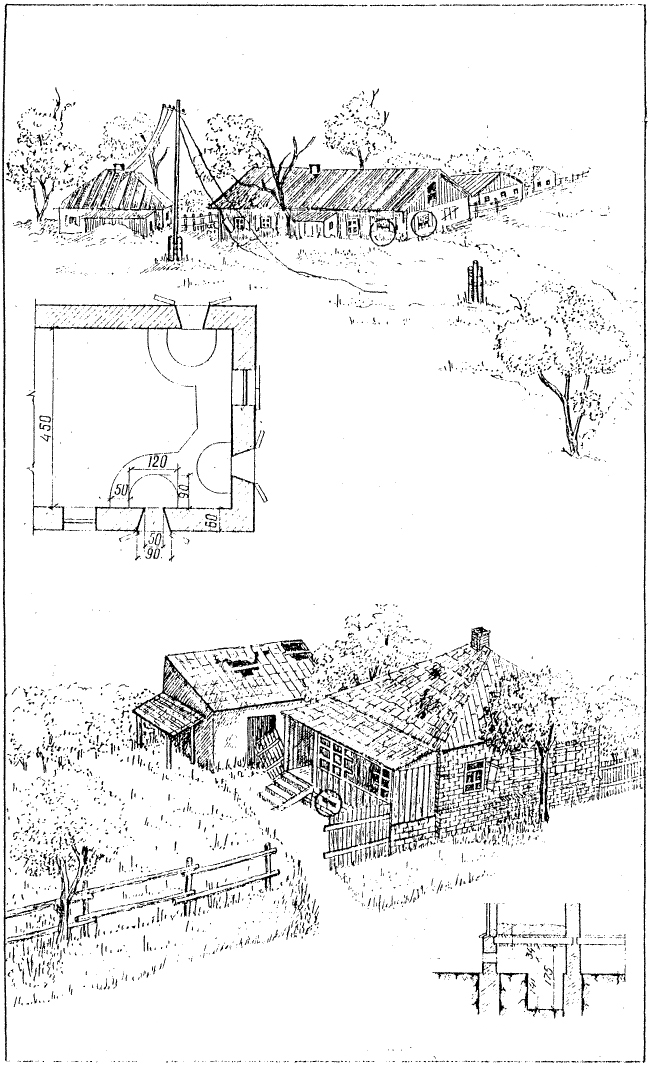
135. Apartment house, prepared for defense, embrasure in a stone basement.
136. Brick stables, prepared for defense.
137. Mill, prepared as observation post.
138. Using fake buildings for defense.
139. Security-defense positions at the railway, security-defense positions at a highway.
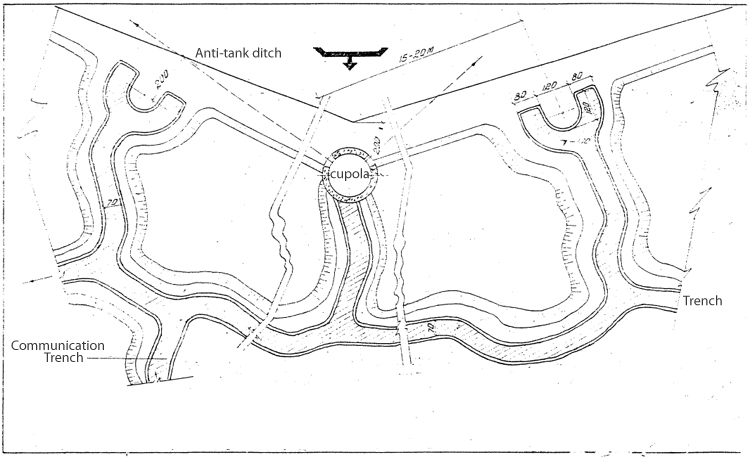
140. Srongpoint "Fortress" in a settlement, security-defense positions at a railway.
141. Security-defense position at the railway.
142. 75-mm gun position in a railway embankment.
ANTI-TANK AND ANTI-PERSONNEL OBSTACLES
A. Anti-personnel obstacles
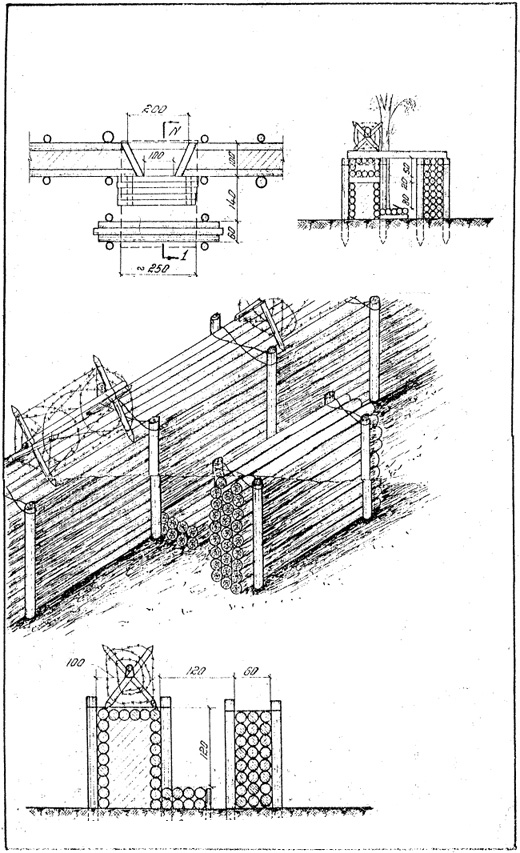
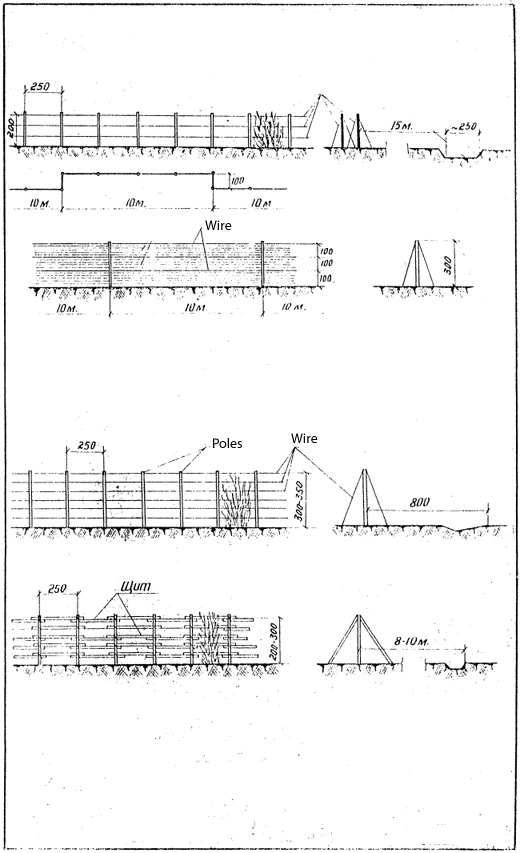
143. Ani-personnel obstacles. Double barbed wire fence. Barbed wire fence on metal tripods.
144. Anti-personnel barbed wire obstacles. Strengthened barbed wire fence. Barbed wire net in three lines with barbed wire on top. Strengthened fence on metal poles.
145. Barbed wire obstacles. Barbed wire fence.
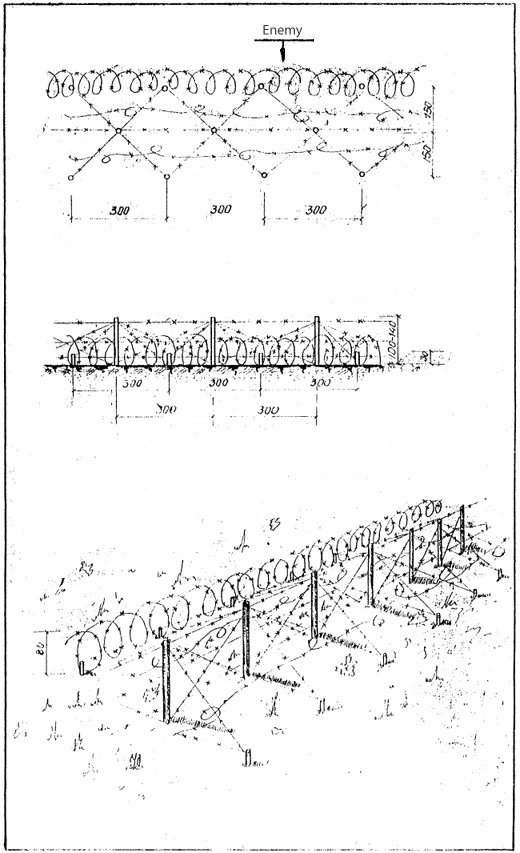
146. Strengthened barbed wire fence on wooden poles.
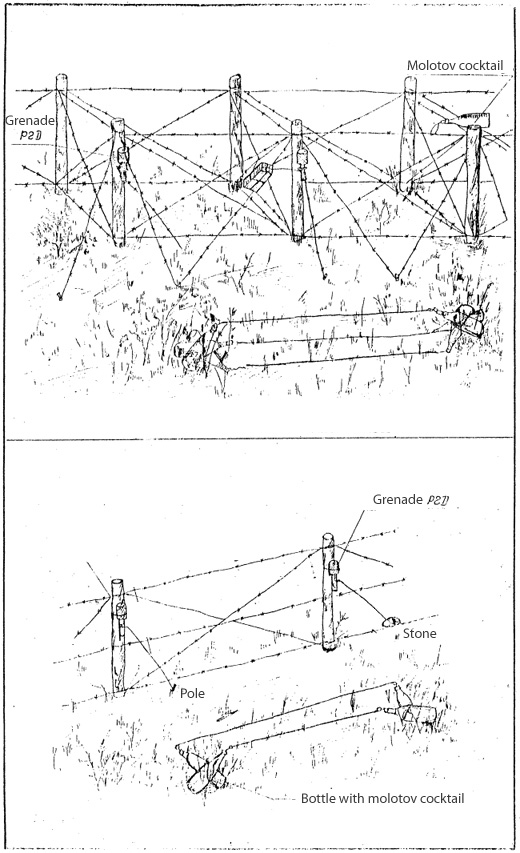
147. Barbed wire fence in one and two lines, strengthened by grenades and bottles with an incendiary mixture.
148. Barbed wire fence on supports, portable barbed wire installation on frameworks, combined anti-personnel and anti-tank obstacles, types of anti-personnel barbed wire obstacles on a wooden fence.
149. Barbed wire obstacle on supports.
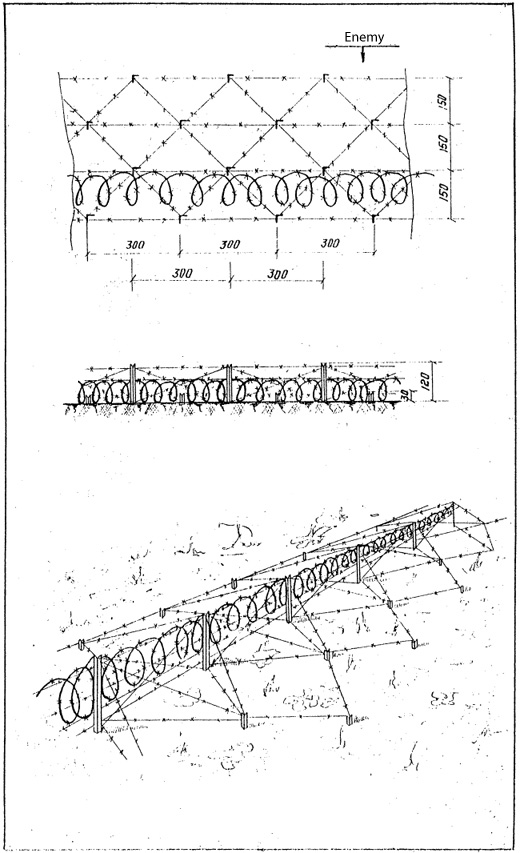
150. Strengthened barbed wire fence on metal poles.
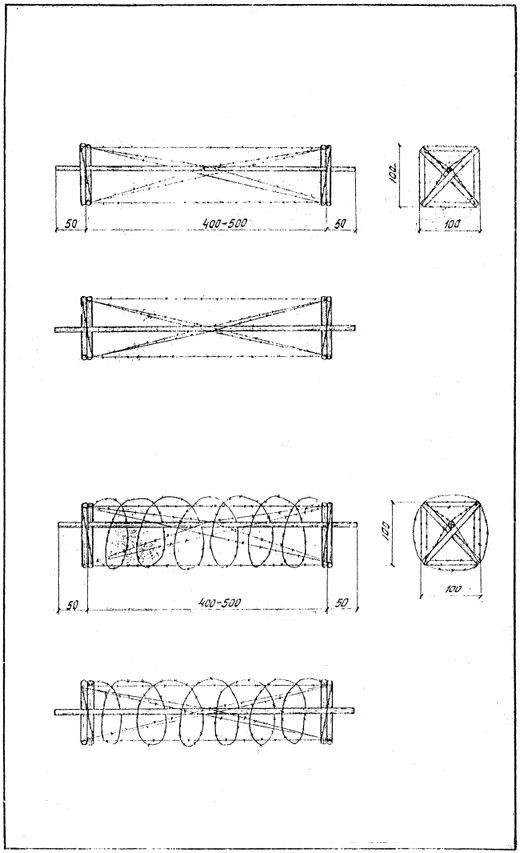
151. Anti-personnel portable obstacles.
152. Portable wooden supports.
153. "Stumbler" shield for passage closing.
154. Collapsible metal supports.
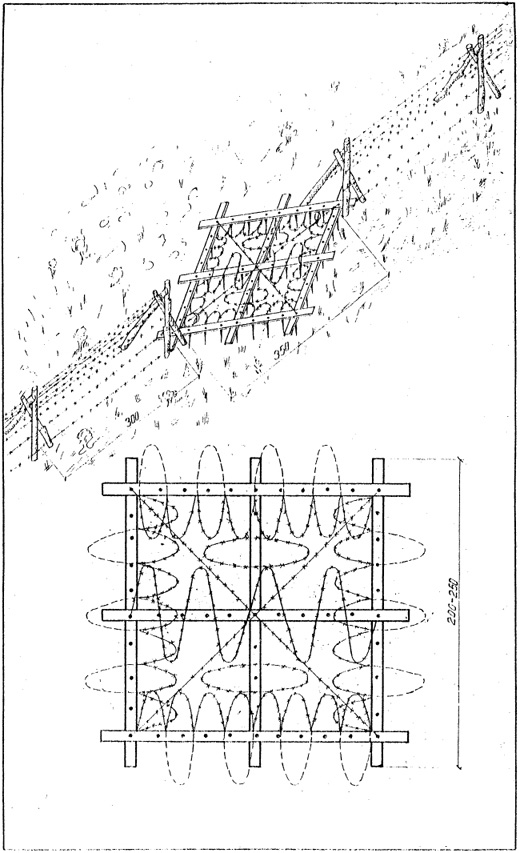
B. Anti-tank obstacles.
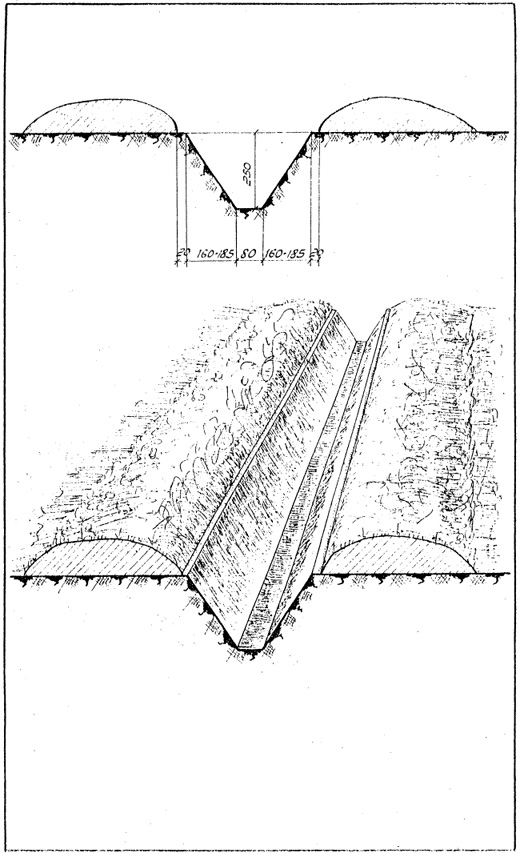
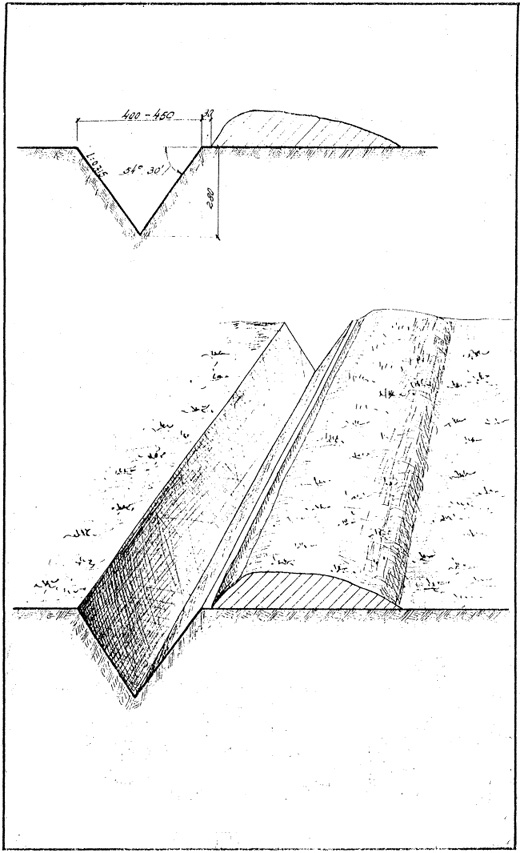
155. Trapezoid anti-tank ditch.
156. Triangular anti-tank ditch.
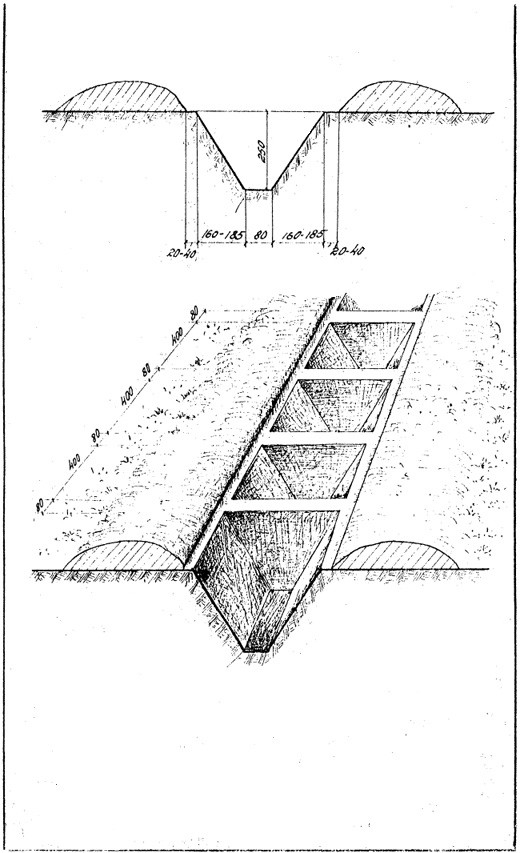
157. Trapezoid anti-tank ditch with crosspieces.
158. Anti-tank ditch in settlement settings.
159. Anti-tank fence.
CAMOUFLAGE
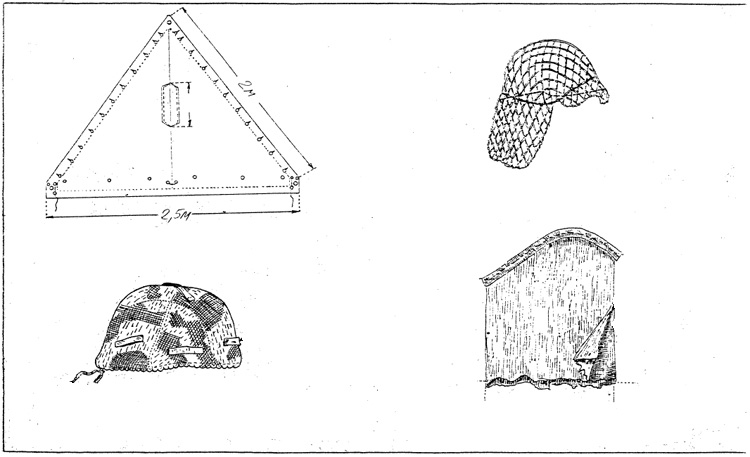
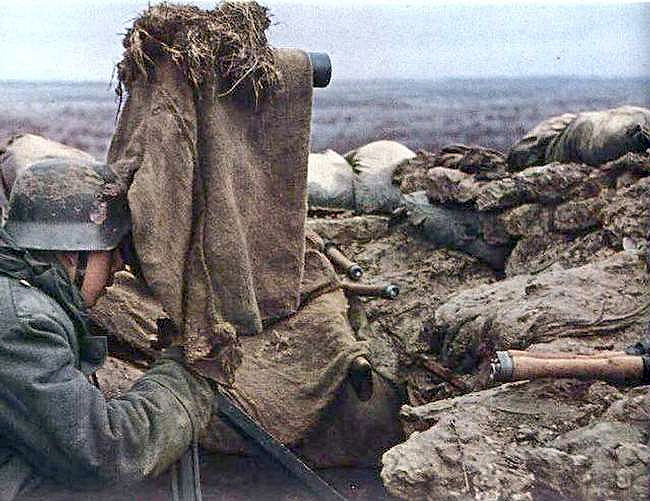
160. Camouflage raincoat. Camouflage hood for a steel helmet. A winter white paper cover for a helmet.
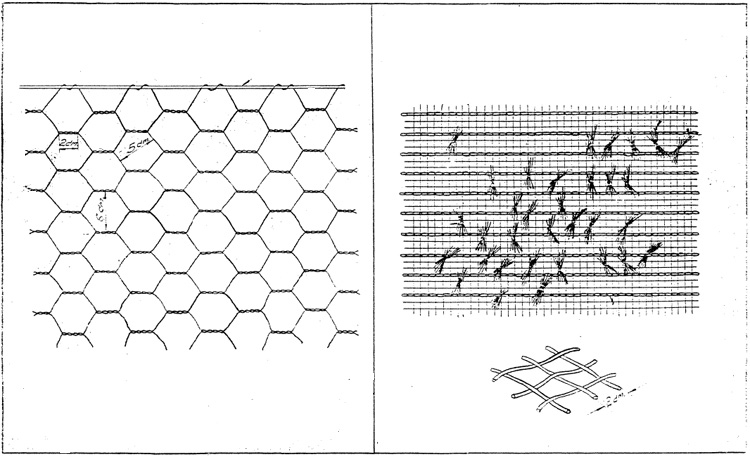
161.Camouflage metal chain. Camouflage net with a cell 2 by 2 cm.
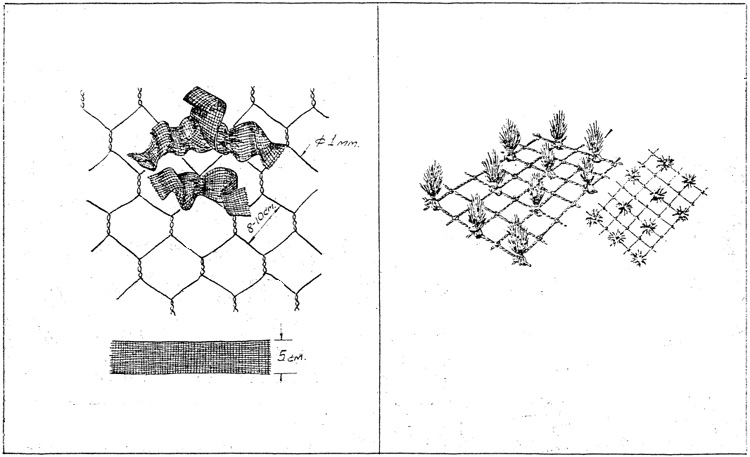
162. Camouflage cover from metal net with attached strips of metal mesh. Camouflage carpet on a mesh basis.
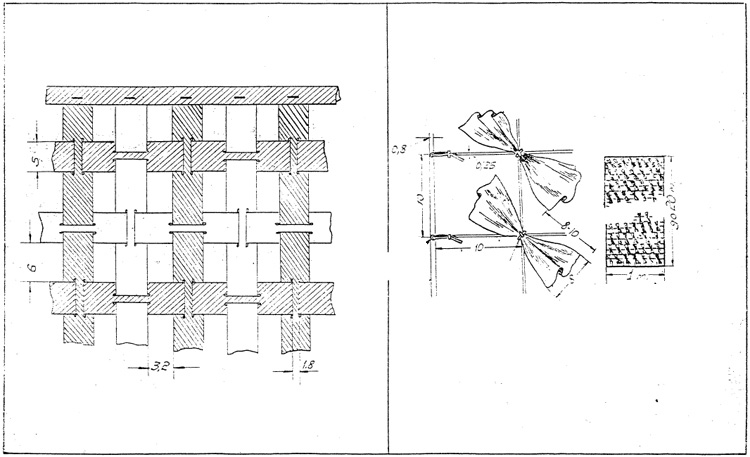
163. Camouflage cover for entrenchments. Plastic camouflage carpet.
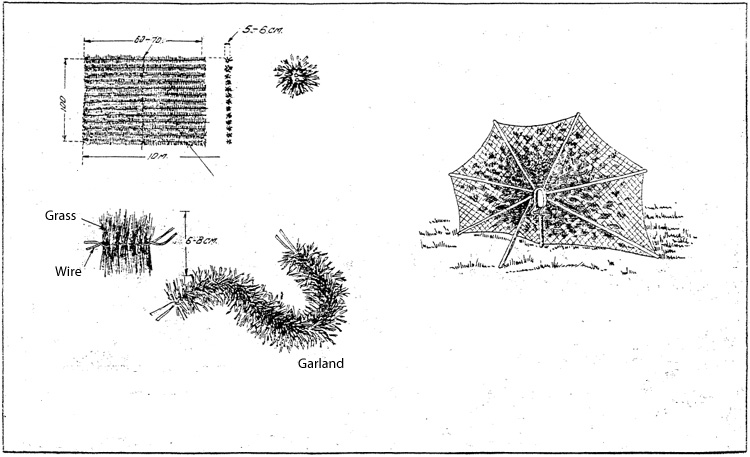
164. Camouflage carpet from grass (without net) and its details.Camouflage umbrella for heavy machine gun.
165. Types of vertical masks.
166. Vertical masks. Horizontal masks.
167. Masks-fences constructed from poles and brushwood. A double vertical mask for communication trench. Trenches masking on wheat fields.
168. Camouflage of mortars and firing positions, adjacent to main trench. Camouflage of an embrasure in a wall of a wooden building. Camouflage of fire position in destroyed building.
169. Camouflage of artillery gun in a shed. Garage camouflage.